This tutorial will show you how to install Franks Kodi build. The steps used in this guide apply to any device that works with Kodi, including FireStick, Fire TV Cube, Windows, macOS, Linux, iOS, Android, Android TV, and more.
What Is Franks Build?
You can think of Franks Build as a reconditioned version of the original Kodi. The default Kodi skin offers a basic interface with a lackluster appearance. It’s like buying a new house and then remodeling it to your liking.
With a build, you customize Kodi in primarily two ways:
- You get a whole new theme, usually with more colors.
- You get a set of preinstalled Kodi addons.
So, if you are looking for a new way to use Kodi, try the Franks build. It is one of the best Kodi builds in the market.
Attention KODI Users: Read before you continue
Government and ISPs endlessly monitor your online activities using your IP address 35.175.39.36 (exposed to everyone). Kodi is an excellent platform for streaming movies, TV shows, and sports, but streaming copyrighted content can get you into legal trouble.
You should use a reliable Kodi VPN and protect your streaming activities and privacy. A VPN will hide your IP address and bypass government surveillance and geo-restrictions.
I trust and use ExpressVPN, the fastest and most secure Kodi VPN. It's easy to install on any Kodi device, including Amazon FireStick, PCs, and Smartphones. In addition, it offers a 30-day money-back guarantee, and 3 free months with the annual plan.
Read: How to Install & Use the best VPN for Kodi.
Is Franks Build Safe?
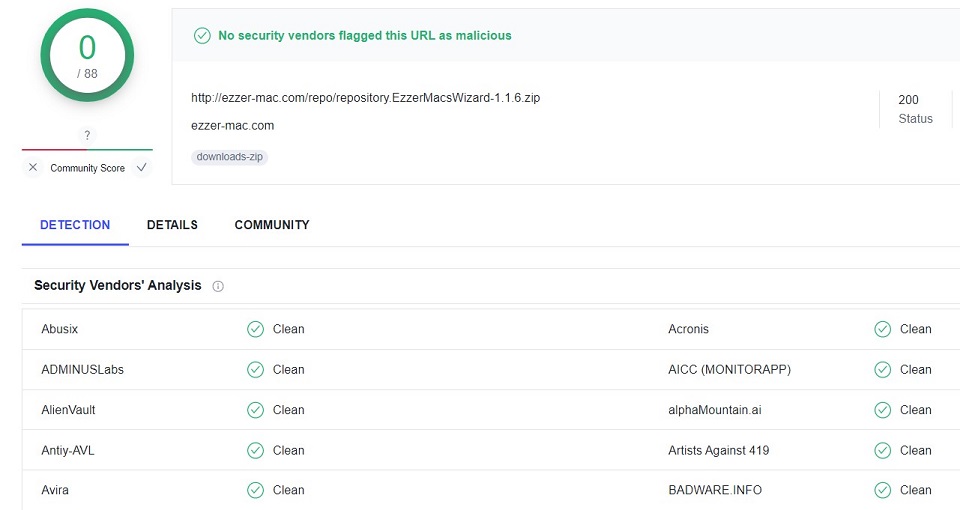
You may ask this question because this build comes from an external source and not from the official repository of Kodi. You will download this build from the EzzerMacs repository. Before writing this guide, I tested this build on multiple devices with antivirus for a week. None of my devices raised any flags.
As a final touch, I scanned the installation file of the EzzerMacs repository with Virus Total. The Virus Total antivirus also cleared the repository of any malicious intents. The following image is a copy of the scan result:
Is It Legal?
Again, since the build comes from an unofficial source, it is obvious to be concerned about its legal status.
The first job of the Franks build is to give a cosmetic makeover to Kodi with its new skin. There is no harm in that. You can tweak Kodi to your liking as much as and whenever you like. Kodi is an open-source program.
However, the Franks Build also offers many preinstalled addons from unverified sources. These addons scrape the video streaming links from unknown providers from across the world.
FireStickHow cannot determine the legality of the addons or their providers due to a lack of resources.
You would like to stick to public-domain videos. Even better, get yourself ExpressVPN to maintain your privacy when streaming from unofficial addons.
How to Install Franks Kodi Build
The Franks Kodi build is part of the third-party repository called EzzerMacs. You must go through additional instructions when installing a build from a third-party repository. The additional steps may get a little confusing. Therefore, I am breaking down the process into smaller pieces. This will make the instructions easier to follow.
- Part 1: Allow Sideloading of Third-party Kodi Builds
- Part 2: Add the EzzerMacs Repository Source
- Part 3: Install the EzzerMacs Repository
- Part 4: Install the Breezz 19 WizardPart 5: Install the Franks Kodi Build from the Wizard
It may still appear confusing. However, I will explain every part briefly to give you the proper perspective. Let’s get started.
Part 1: Enable Sideloading of Kodi Builds
Kodi has an internal setting that disables the installation of any third-party builds. Therefore, to install the Franks build, we will enable this setting. Here are the steps:
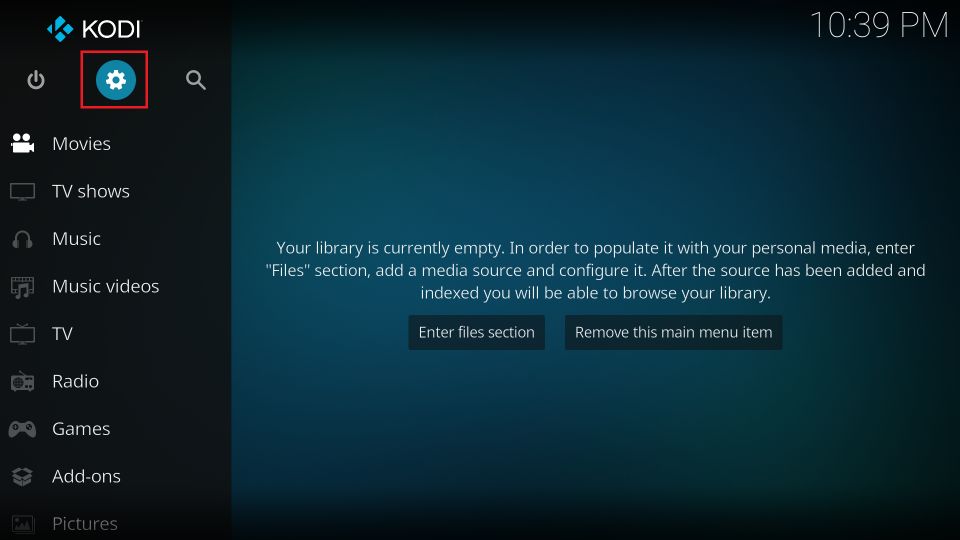
1. Run the Kodi app. Navigate to the top-left corner. Click the gear icon. It will open Kodi Settings.
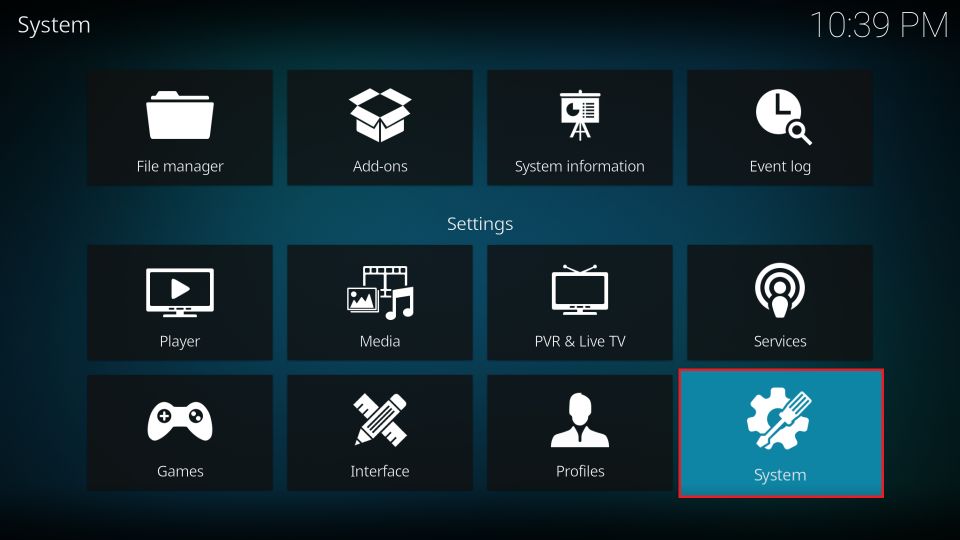
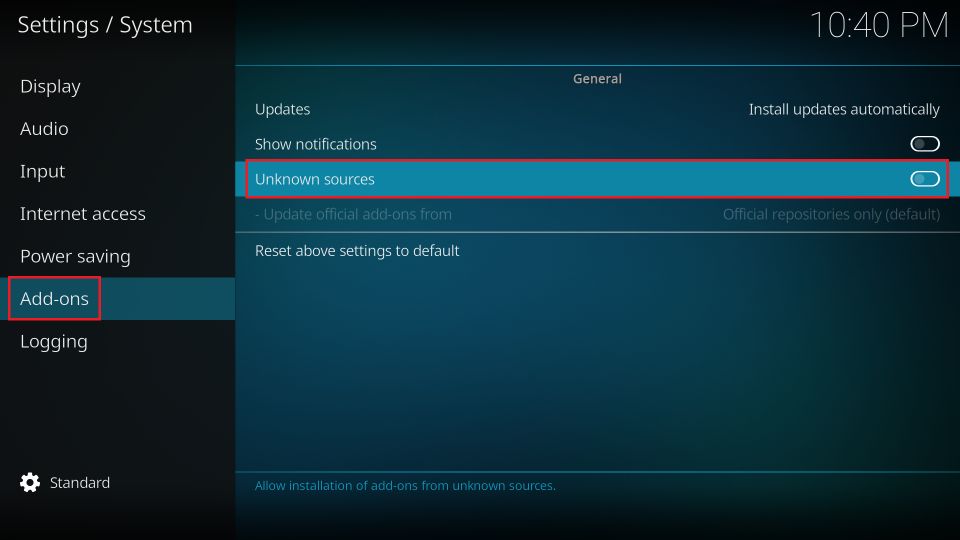
2. This is the Kodi Settings menu. Click System.
3. Now, navigate to Add-ons > Unknown Sources. Here, click the switch and flip it to the ON position.
4. A prompt appears. Go ahead and click Yes.
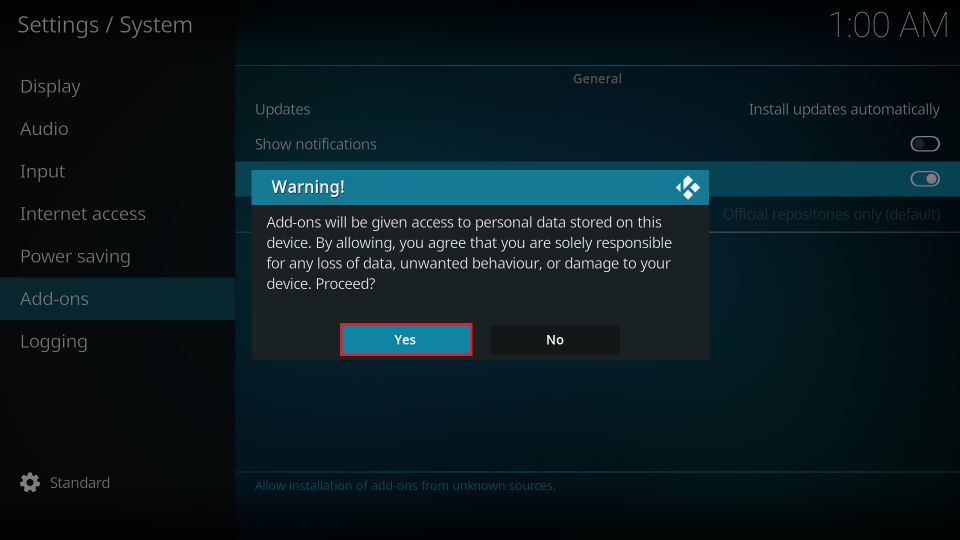
This is how you enable sideloading on Kodi.
Part 2: Add the EzzerMacs Repository Sources
To install the Frank build, we need to install its repository EzzerMacs. To install the repository, we must first add the repository source. Here is how you do it:
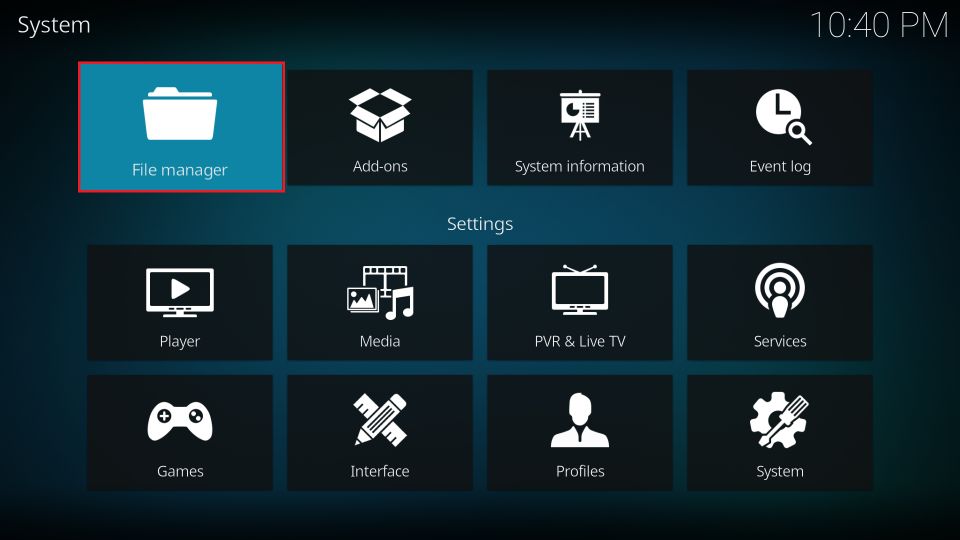
1. Go to the Kodi Settings screen one more time.
2. Click the option File manager.
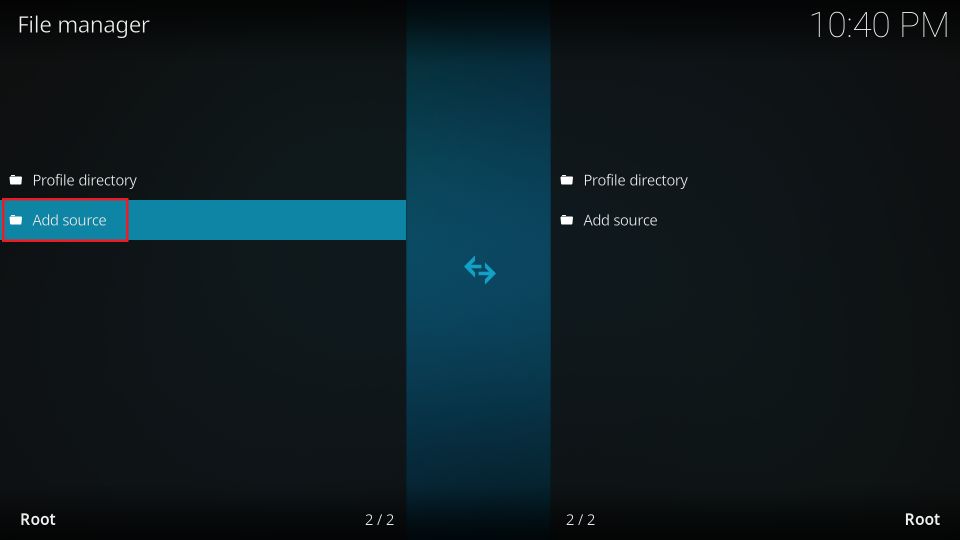
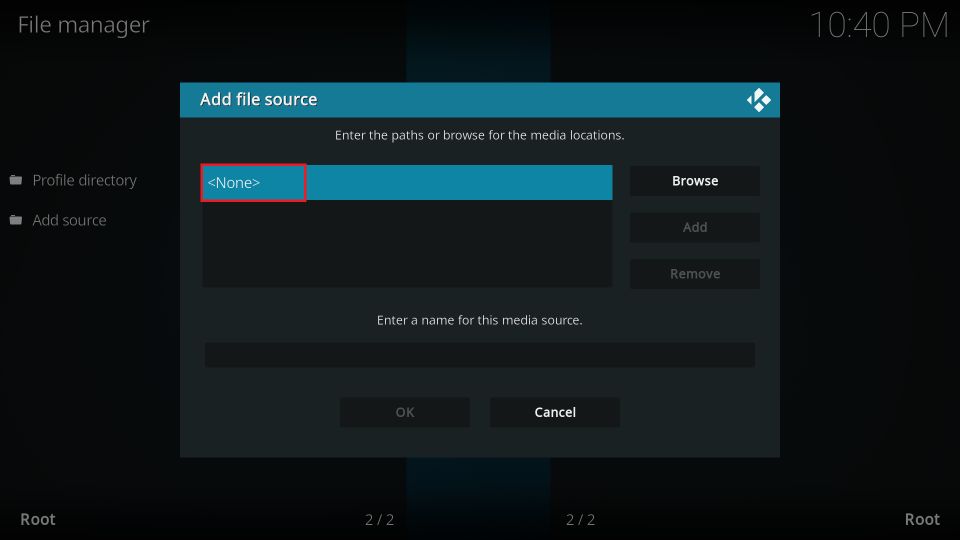
3. On the following screen, click/double-click the option Add source. You can do it on either side, as this option appears twice.
4. Your Kodi should show the following popup window. Go ahead and click <None>.
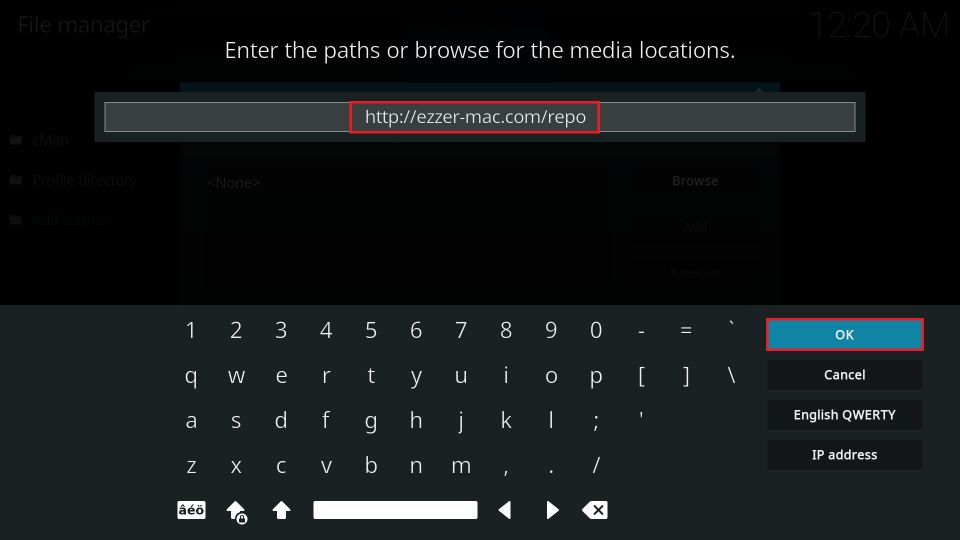
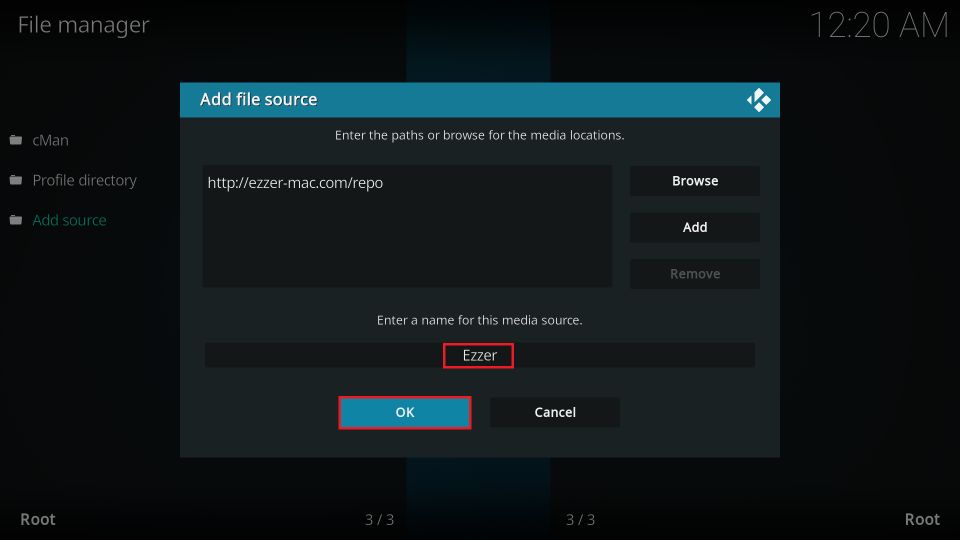
5. This window lets you enter the source path or URL. Here is what you will type: http://ezzer-mac.com/repo
Type it exactly as I have provided to avoid any issues later. Click GO.
Note: FireStickHow is not associated with the developers of the Franks build or the repository. This is the URL of the repository source.
6. I recommend clicking the text box where it says repo and changing the source name to something more relevant.
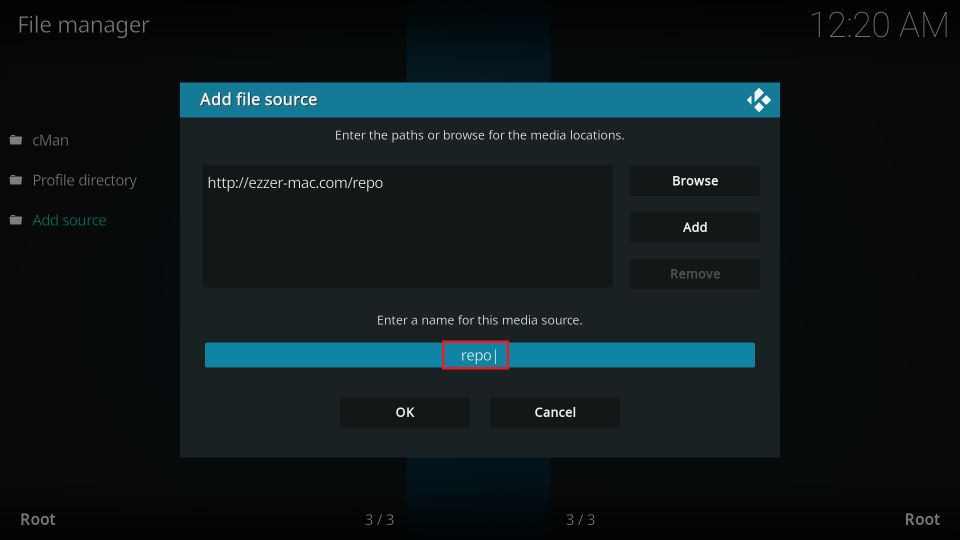
7. Type the new repo name here. I am going with Ezzer. You may choose any other name or go with the same. Click OK.
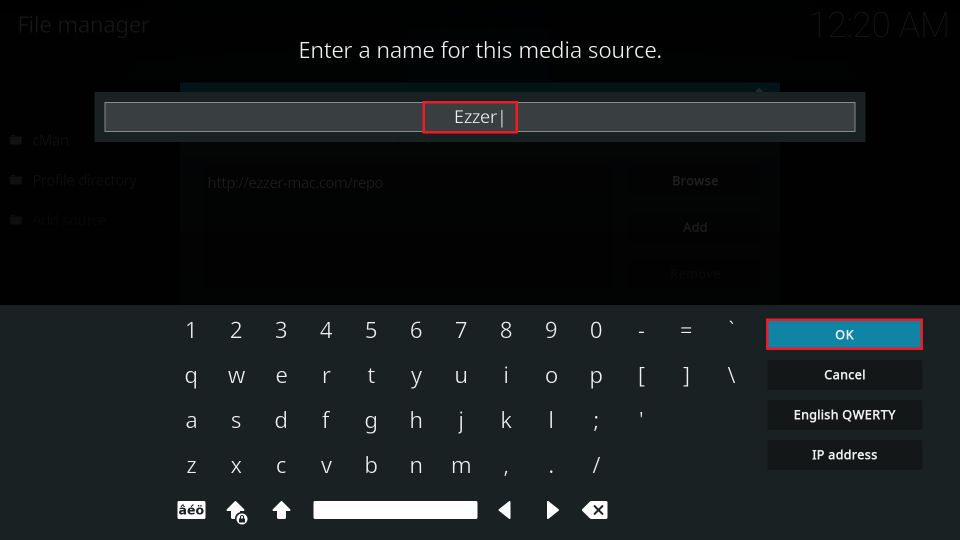
8. The new name should appear in the input text box when you return to this window. Click OK and save the changes.
Excellent! You have added the source!
Part 3: Install the EzzerMacs Repository
You can now install the repository from the source. Here are the steps:
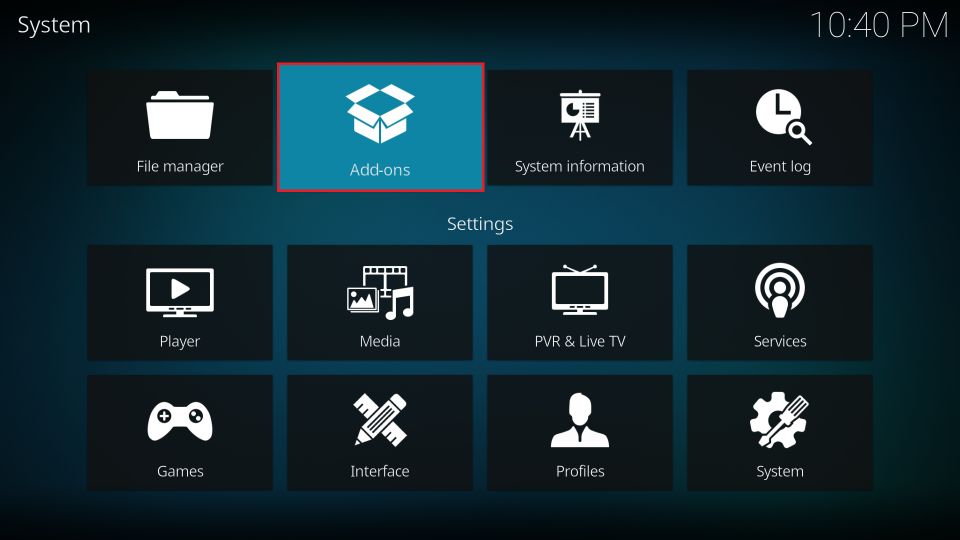
1. Go to the Settings window one more time and open Add-ons.
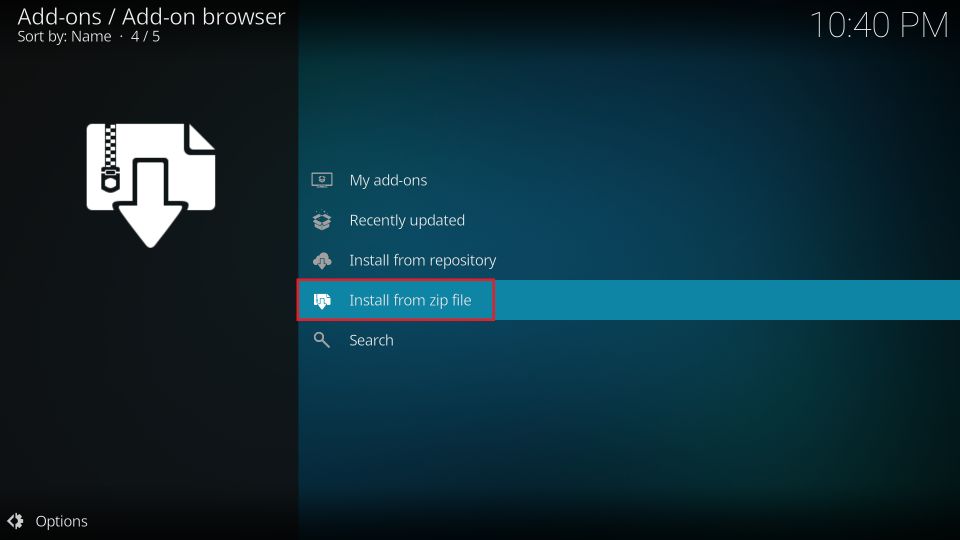
2. Choose Install from zip file from the following set of options.
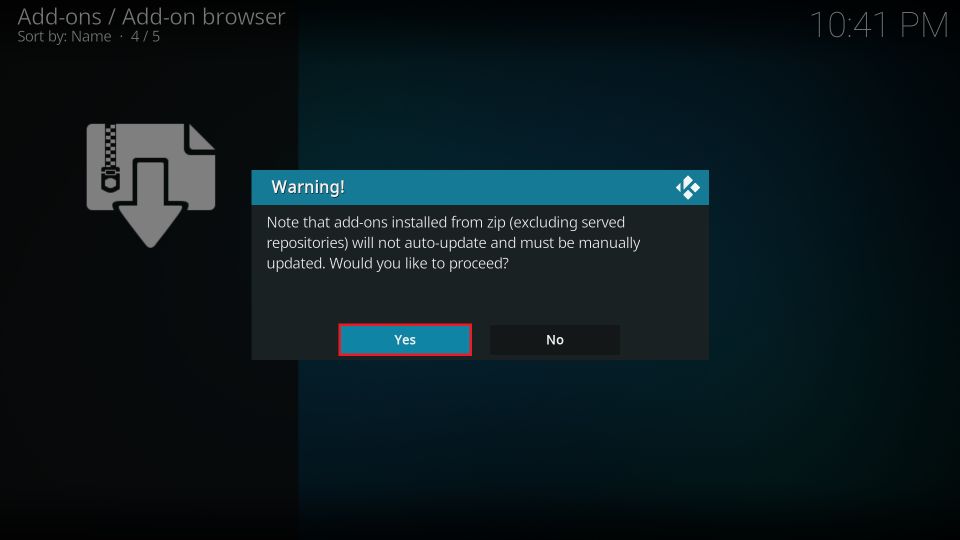
3. Click Yes in order to get rid of this prompt and proceed.
4. Click Ezzer or the custom source name you saved earlier when this window appears.
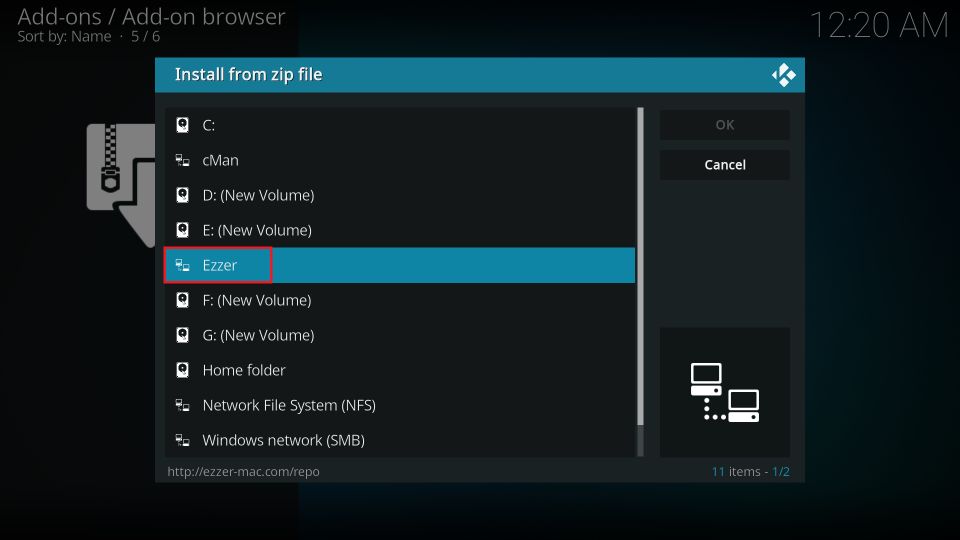
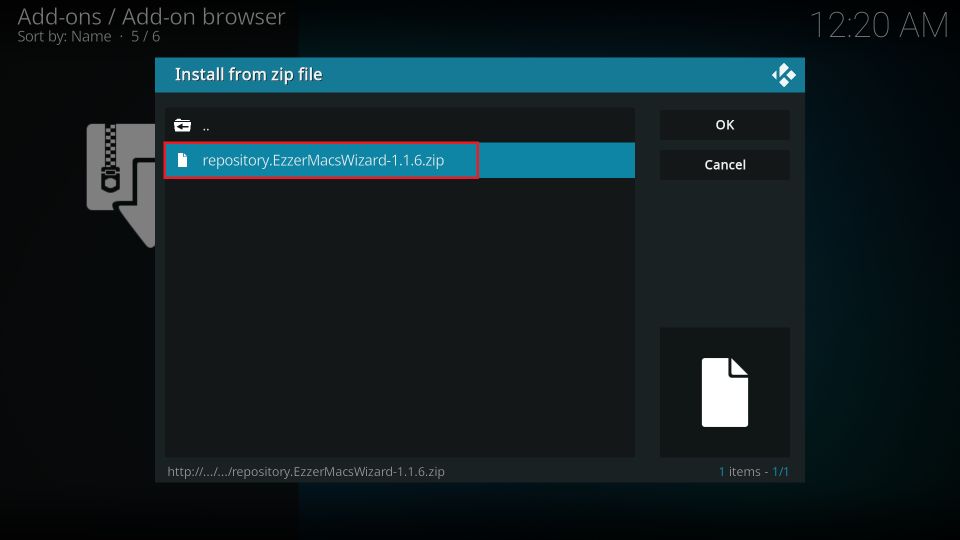
5. This window displays the zip file of the EzzerMacs repository. Click this file to install the repository. The file version may have changed since the time I wrote this guide.
6. You won’t see the installation update. However, a notification will appear in the top-right corner. Stay on this window for the next section.
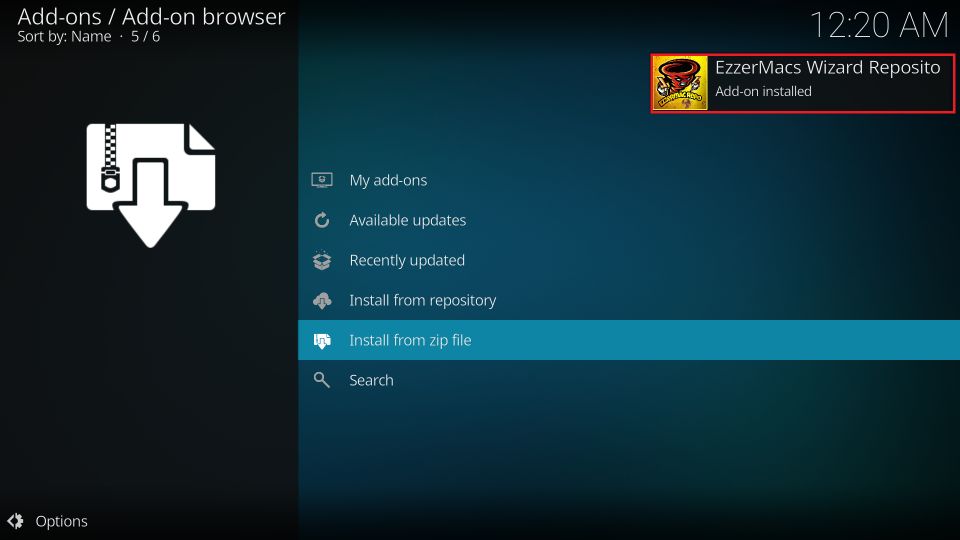
You have successfully installed the EzzerMacs Wizard Repository.
Part 4: Install the Breezz 19 Wizard
Breezz 19 Wizard is the Kodi addon that hosts the Franks build. Therefore, we are going to install this addon now:
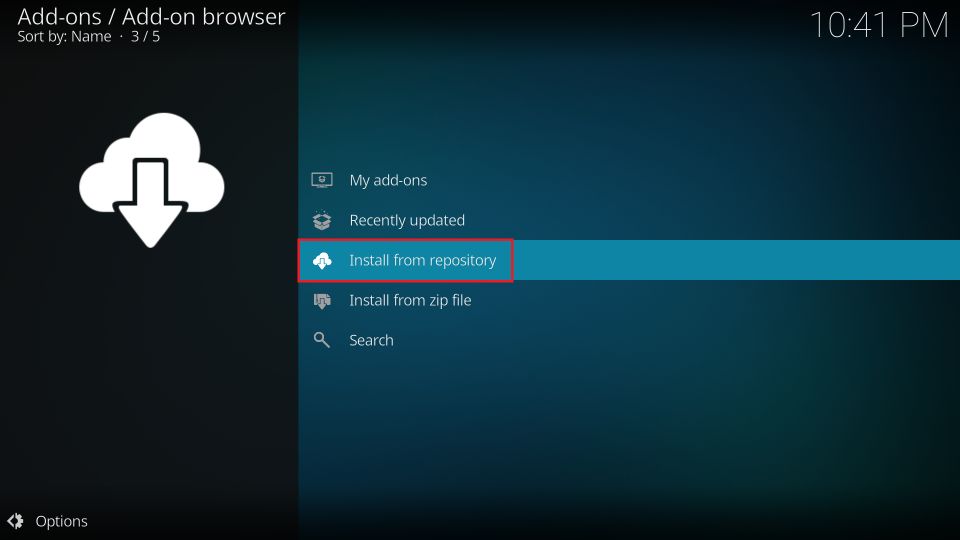
1. Click Install from repository on the same window from the last part.
Note: In case you navigated to another window, open the Kodi Settings menu again from the home screen and then click Add-ons.
2. Open EzzerMacs Wizard Repository.
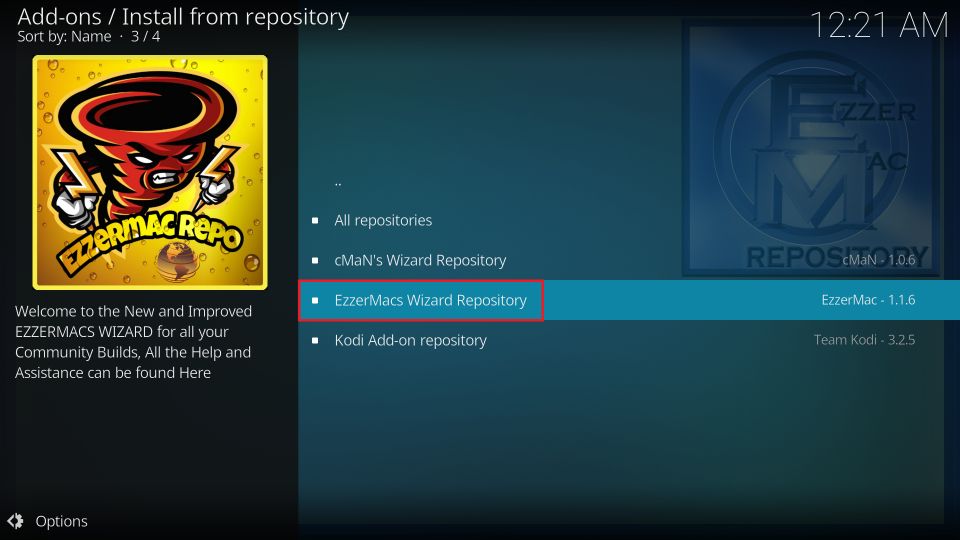
3. Click Program add-ons.
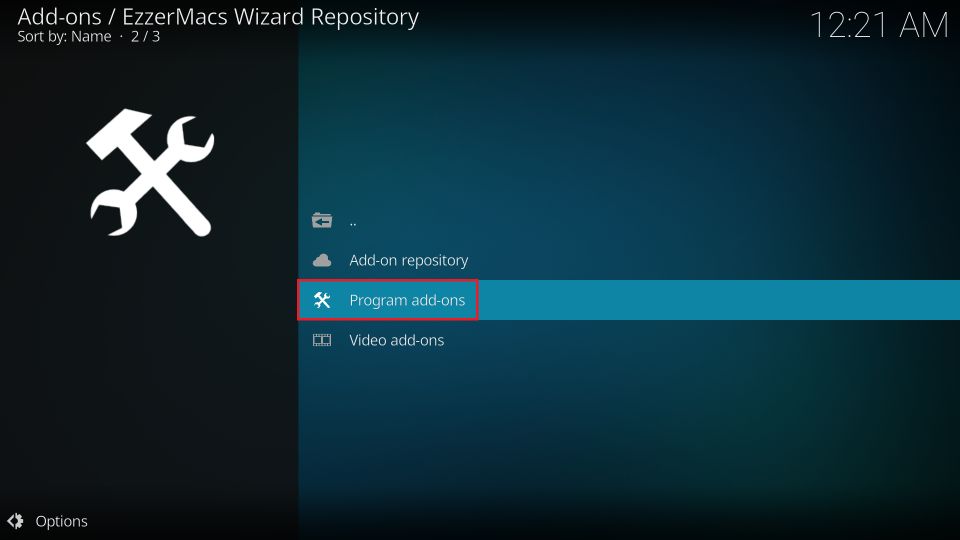
4. Click Breezz 19 Wizard on the next screen.
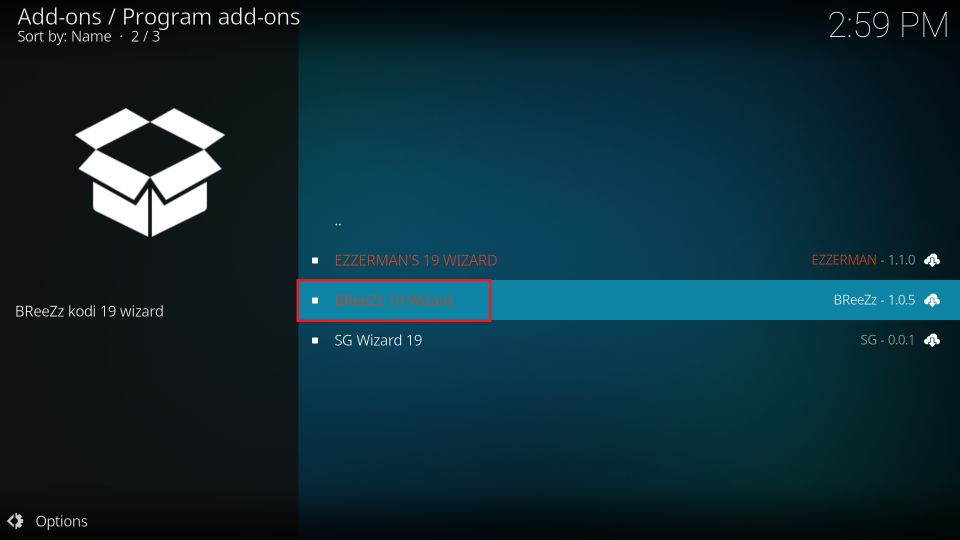
5. Click the Install option in the lower-right corner on the following Wizard dashboard.
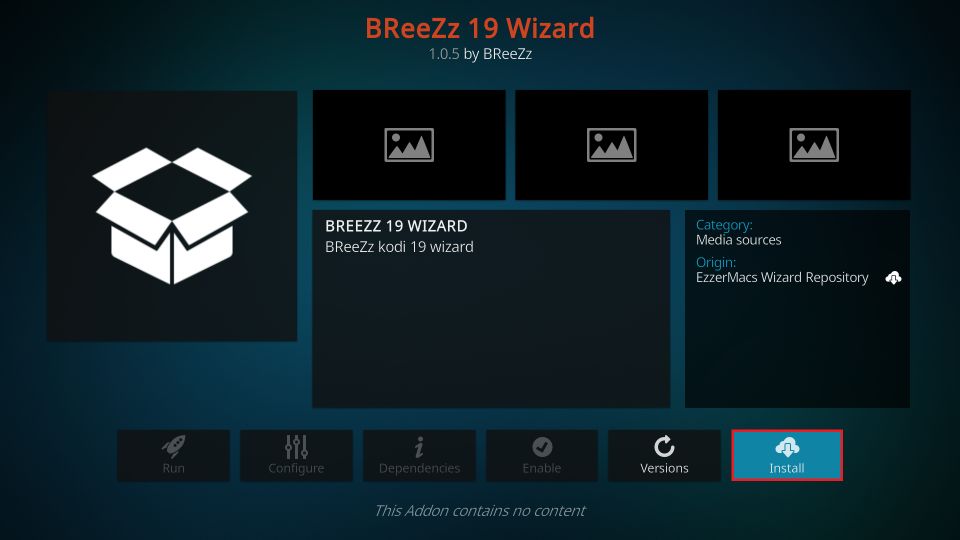
6. In less than a minute, you will see the Breezz 19 Wizard installation notification in the top-right corner.

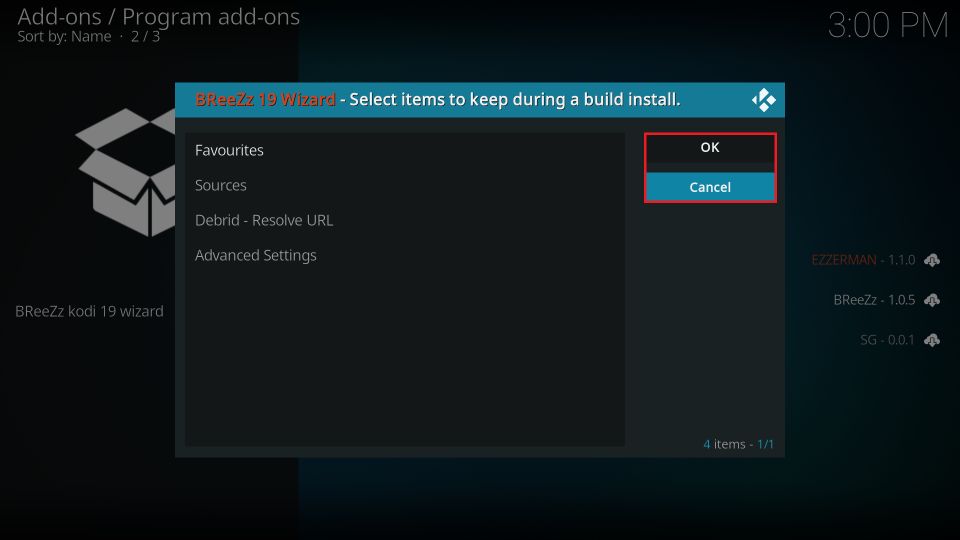
7. Within moments, a popup window appears. You may choose the settings/options you wish to keep during the build install and click OK. However, if you wish to reset Kodi before installing the build (recommended), there is no point in choosing any option here. Therefore, click Cancel to continue.
Great! You have installed the Breezz 19 Wizard.
Part 5: Steps to Install the Franks Kodi Build
This is the last section. In this section, we will open the Breezz 19 Wizard and install the Franks build. Follow these steps:
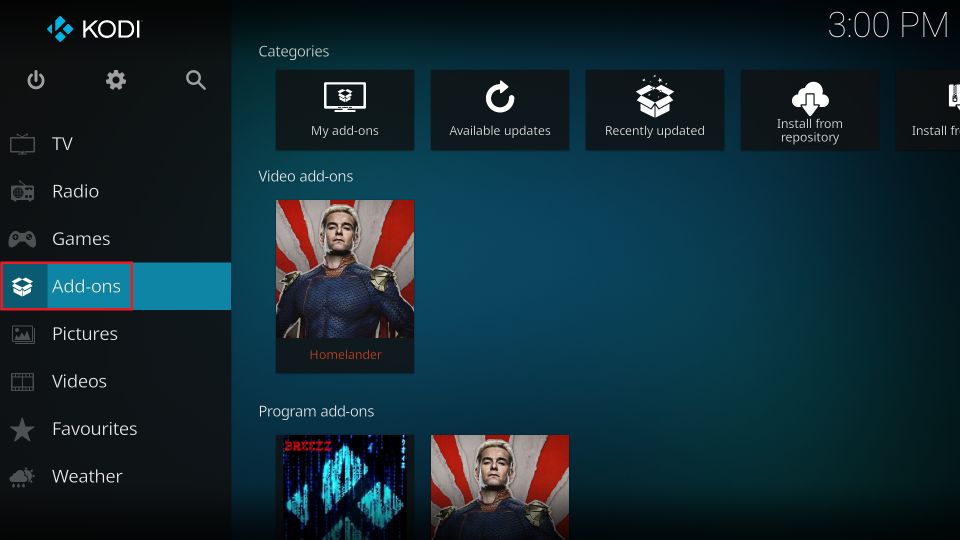
1. Head to the home screen of Kodi and click Add-ons in the sidebar on the left.
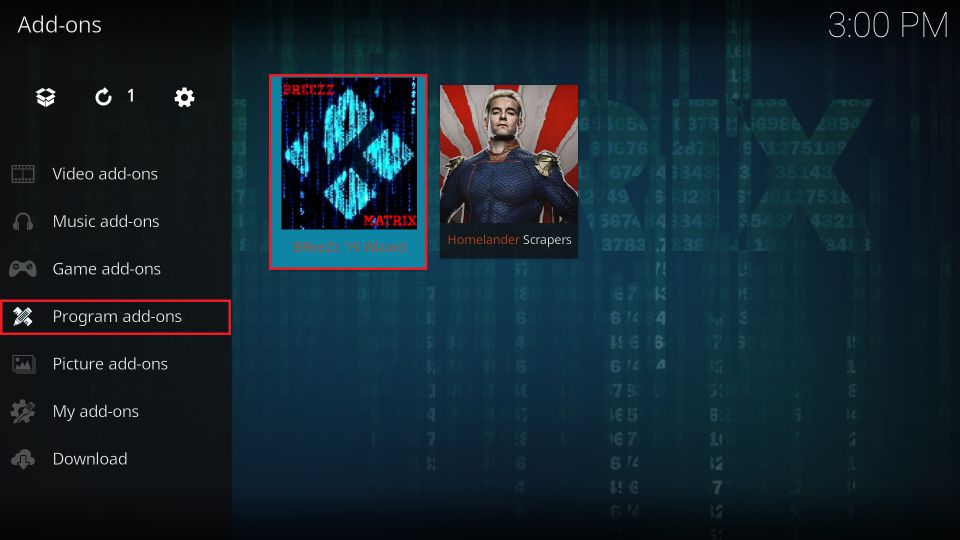
2. Hover over Program add-ons in the left sidebar on the next window (don’t click this option). Next, click the Breezz 19 Wizard icon.
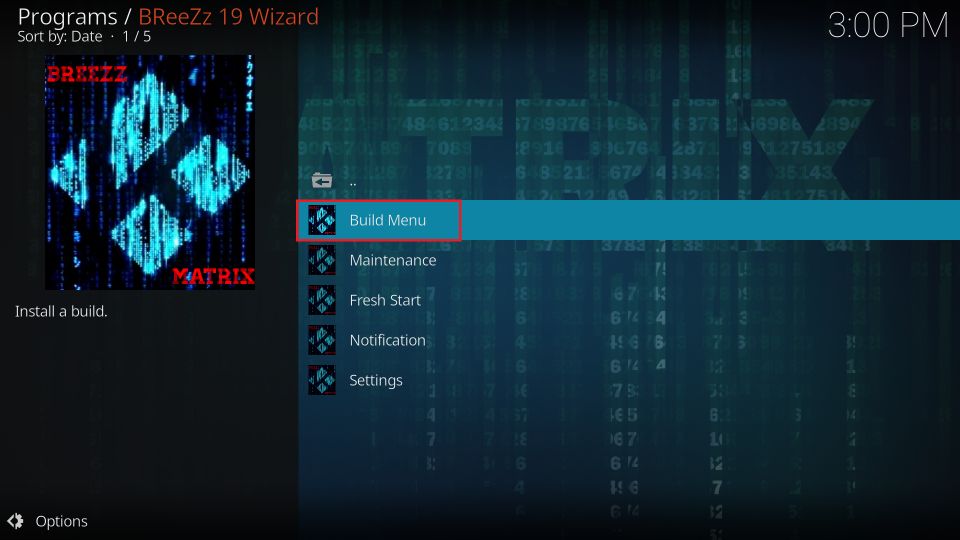
3. Open the Build Menu.
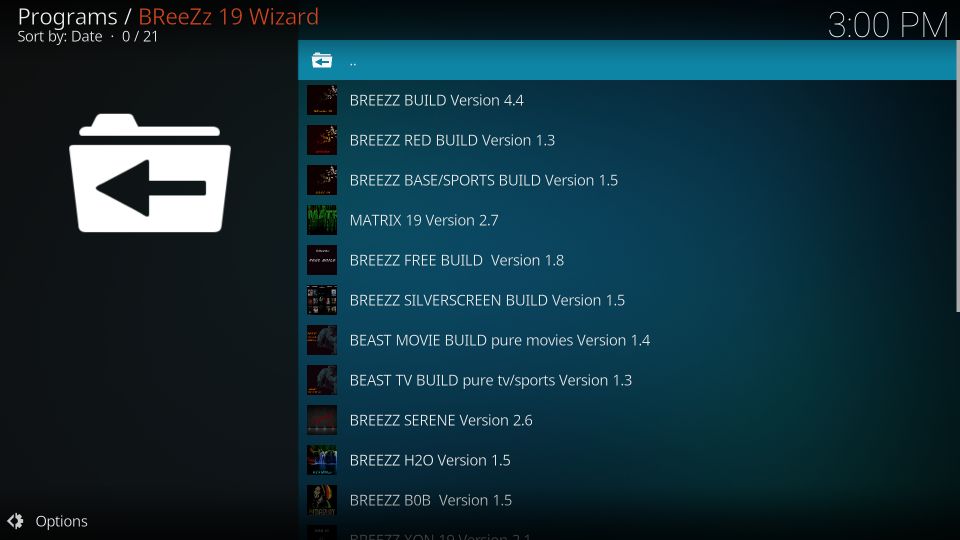
4. The following image shows the list of the builds the Wizard hosts. Scroll down.
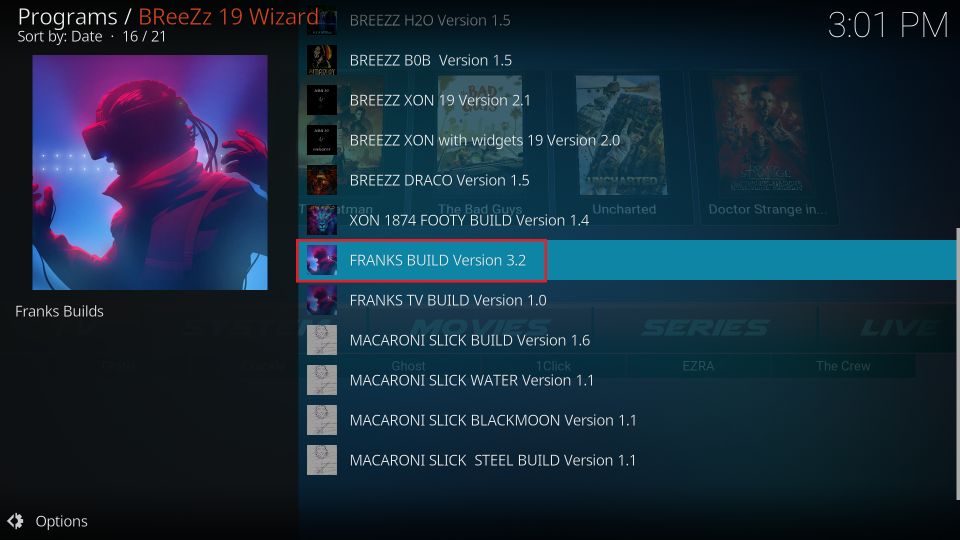
5. Locate the Franks build and click it. As I write this guide, there are two versions of the build. I am choosing the one that says Version 3.2. Both versions are essentially the same, with only minor differences.
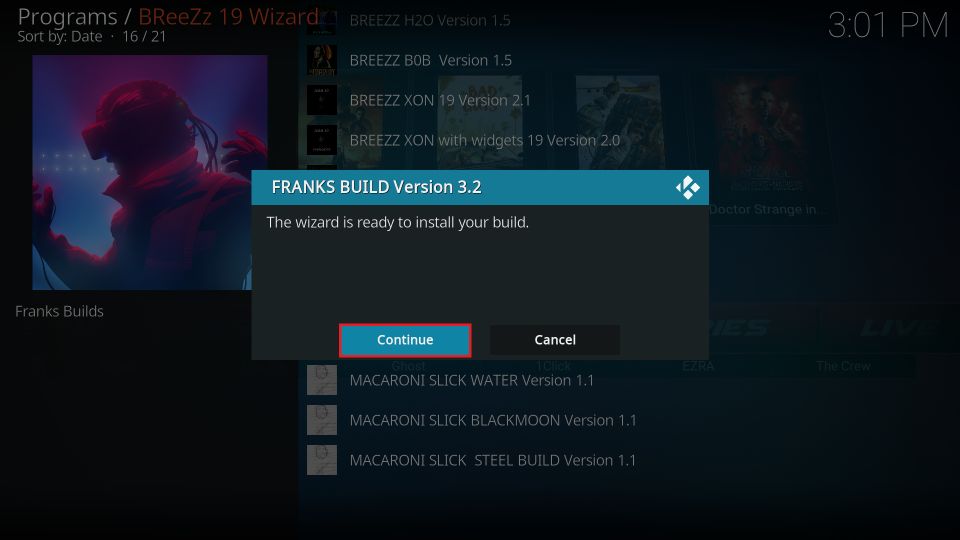
6. Click Continue when prompted.
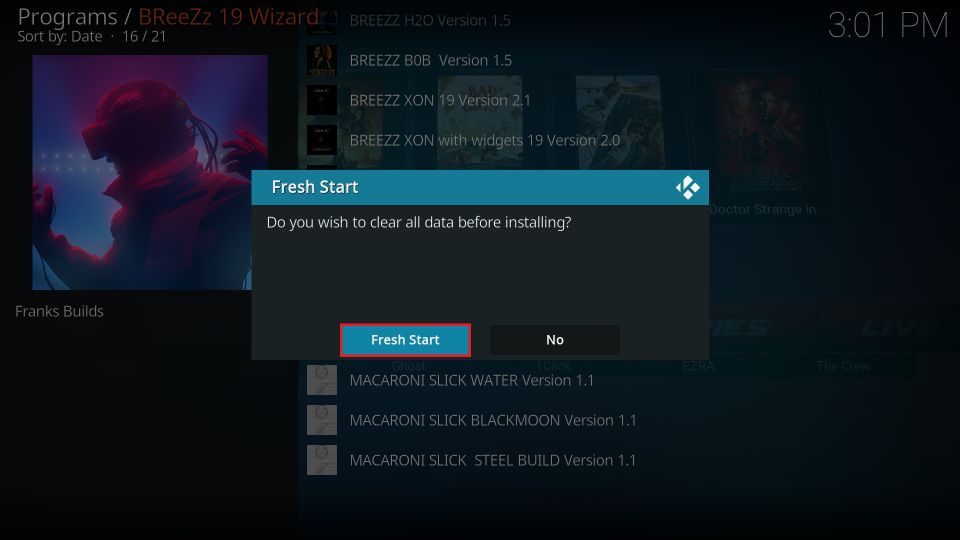
7. Click Fresh Start (recommended). I like to install a build on a clean slate for more stability. However, you may click NO if you intend to retain Kodi data and settings.
8. If you chose Fresh Start in the previous step, click Fresh Start again to confirm.

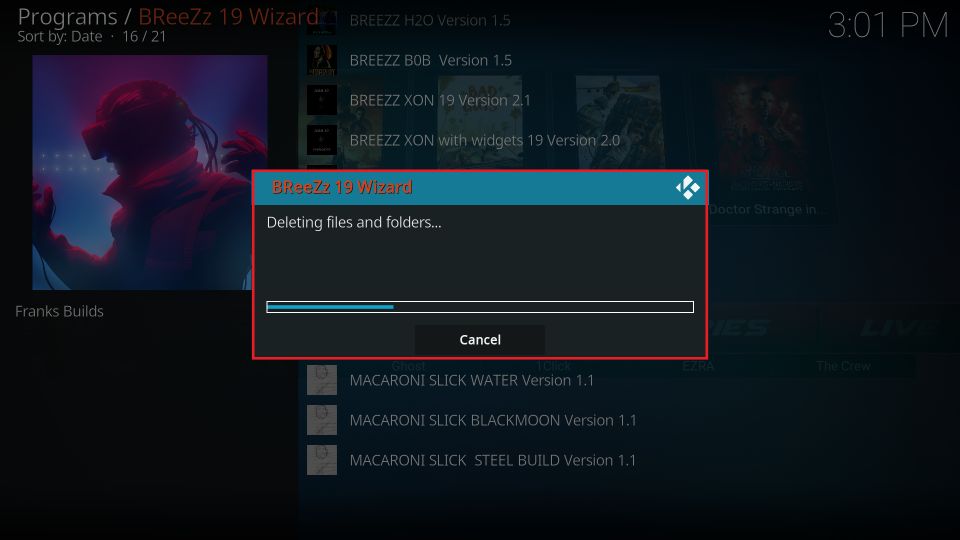
9. Wait while the Wizard deletes the files, folders, and other existing data.
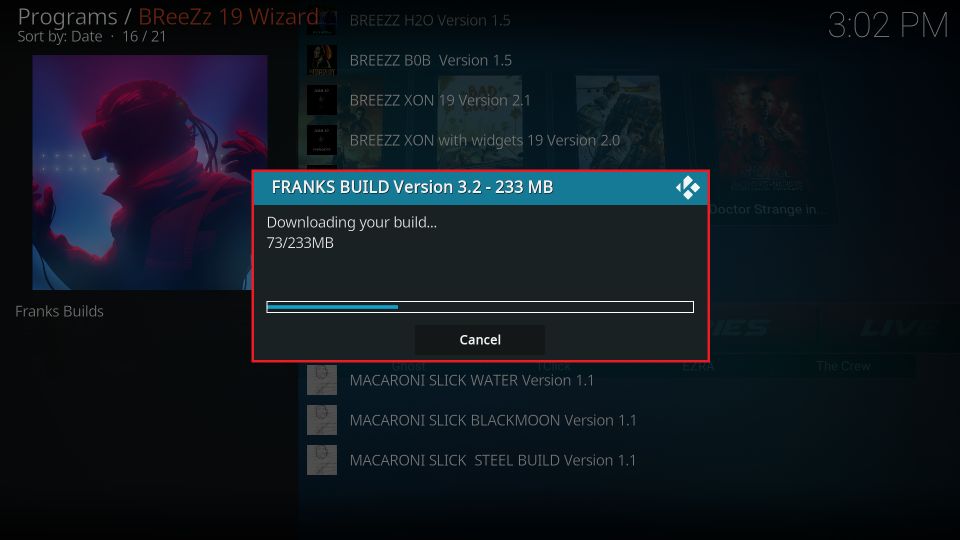
10. Now, wait for the build to download. The Wizard is downloading the Franks build installation files.
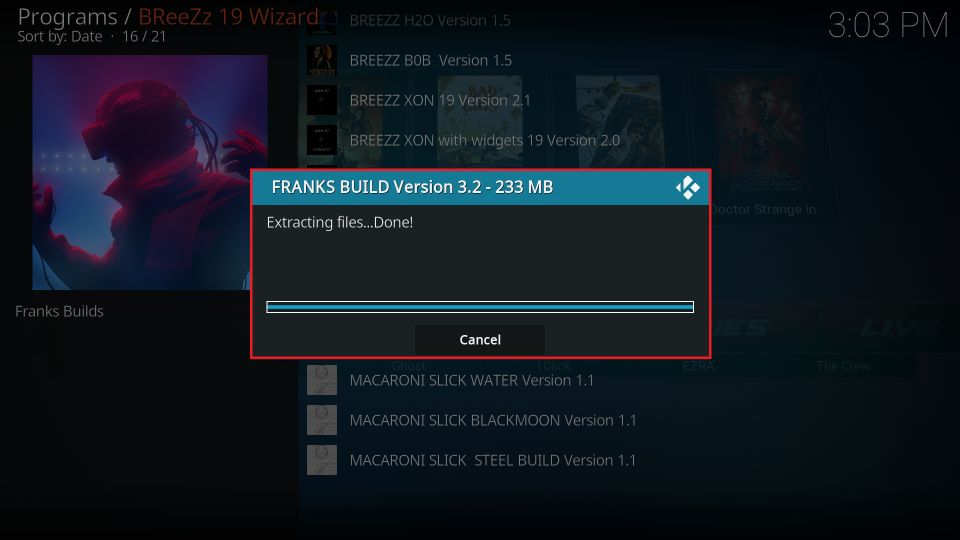
11. Wait for the Wizard to extract the files and install the Franks Kodi build. This should take about a minute.
12. Finally, this prompt appears. To finish the installation, click OK and force close the Kodi app.
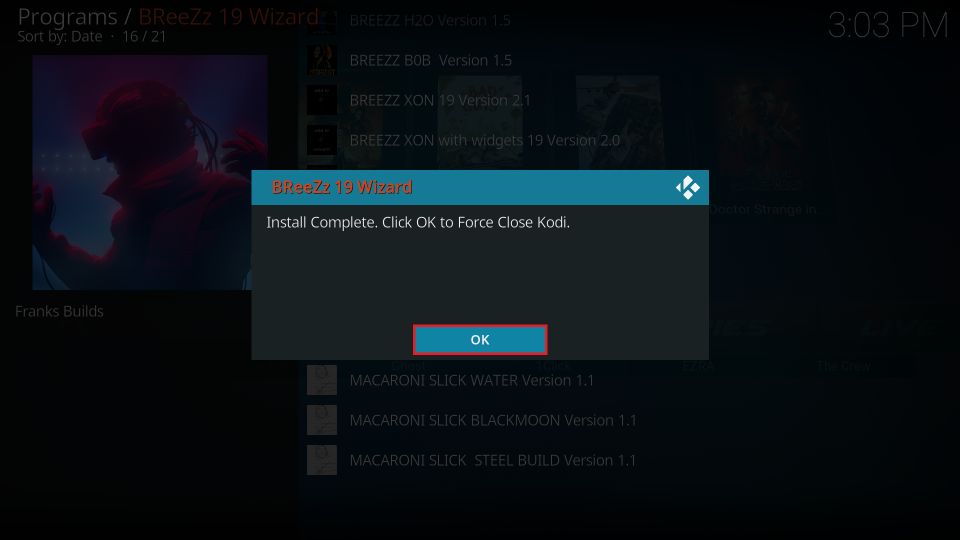
You have successfully installed the Franks Kodi Build.
Wait! It looks like you are all set to start watching your favorite content on Kodi. But have you protected your online identity yet? You are under constant surveillance by the Government and ISP. They use your IP address 35.175.39.36 to track you. Streaming free or copyrighted videos may get you into legal trouble.
Thankfully, you can use a VPN to easily protect your privacy and go invisible from your Government and ISP. I use and recommend ExpressVPN with Kodi.
ExpressVPN is the fastest, most secure, and streaming-friendly VPN. It is easy to install and set up on any Kodi device, including FireStick, Smartphones, PCs, and more.
ExpressVPN, offers an unconditional 30-day money-back guarantee. So, if you do not like the service (I don't see why), you can get a full refund within 30 days.
Please remember that we encourage you to use a VPN to maintain your privacy. However, we do not condone breaking copyright laws.
Before you start using Kodi for streaming, here is how you can protect yourself with ExpressVPN:
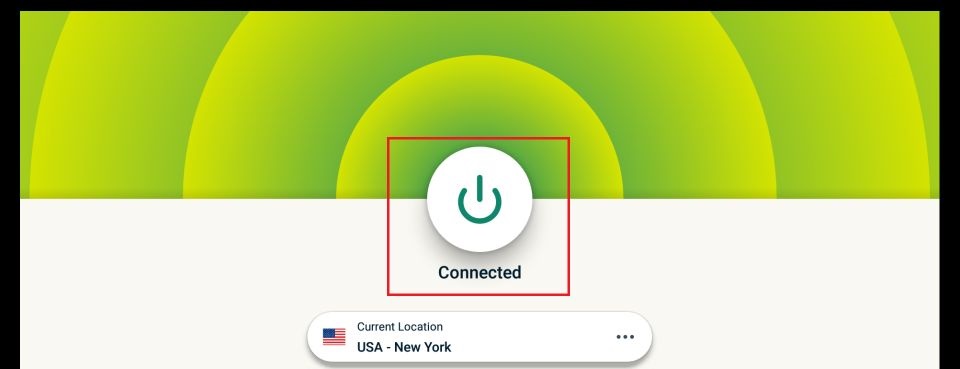
Step 1: Sign up for ExpressVPN Here
Step 2: Download ExpressVPN on your device by clicking HERE
Step 3: Open the ExpressVPN app on your device. Sign in with your account. Click the connect/power button to connect to the VPN
Great! You have successfully secured yourself with the best Kodi VPN.
Overview of the Franks Kodi Build
You can access the Franks build by relaunching the Kodi app. Remember that the build takes some time when it’s the first run. You will see several prompts and notifications of updates. Give it about 5 minutes.
The fully loaded Franks Kodi build looks like the image below (this is the new home screen of Kodi).
There is a vast difference compared to the default Kodi skin. The new theme uses red and black prominently. On the other hand, the default skin had a blue and black theme.
Apart from the color theme, you also notice the change in the interface. While following the steps to install the build, you must have noticed that the home screen of default Kodi has a vertical sidebar menu on the left. The Franks build’s menubar is horizontal. It also introduced a submenu bar below the menubar.
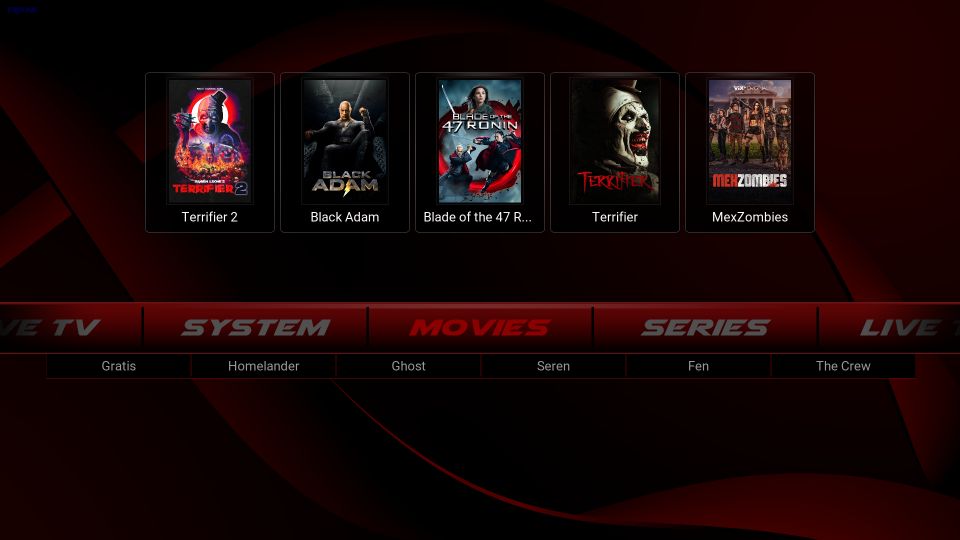
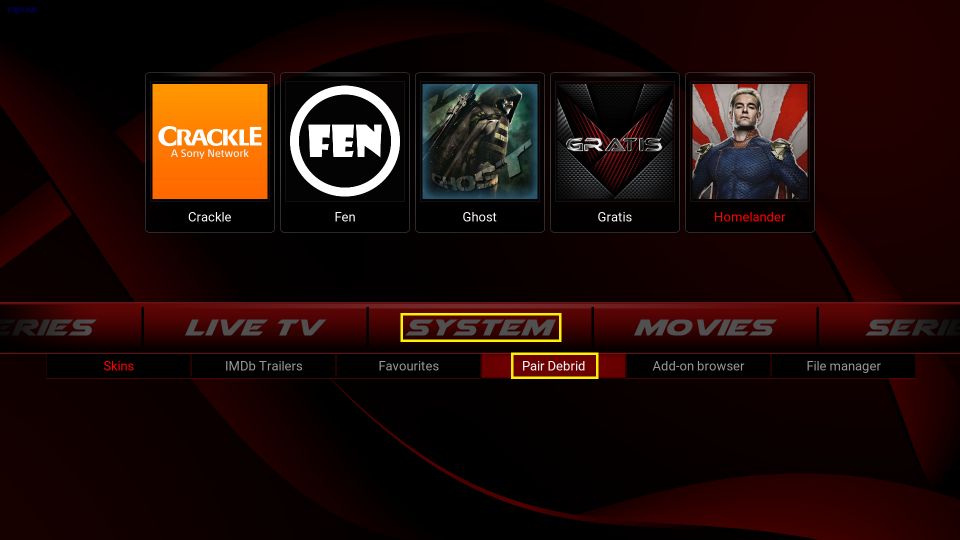
The main menu includes Movies, Series, Live TV, and a couple of other options. The submenu options display the contextual options for the main menu selection. For instance, when you select Movies in the menu, the submenu lines up the related Kodi addons. The same is the case with the Series menu.
The home screen also shows the recommended videos for the selected menu category above the menu bar.
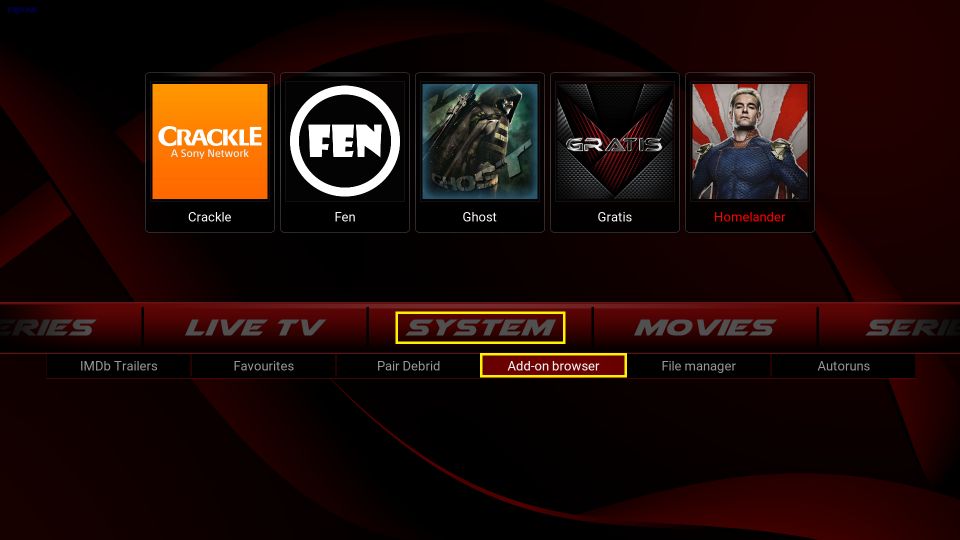
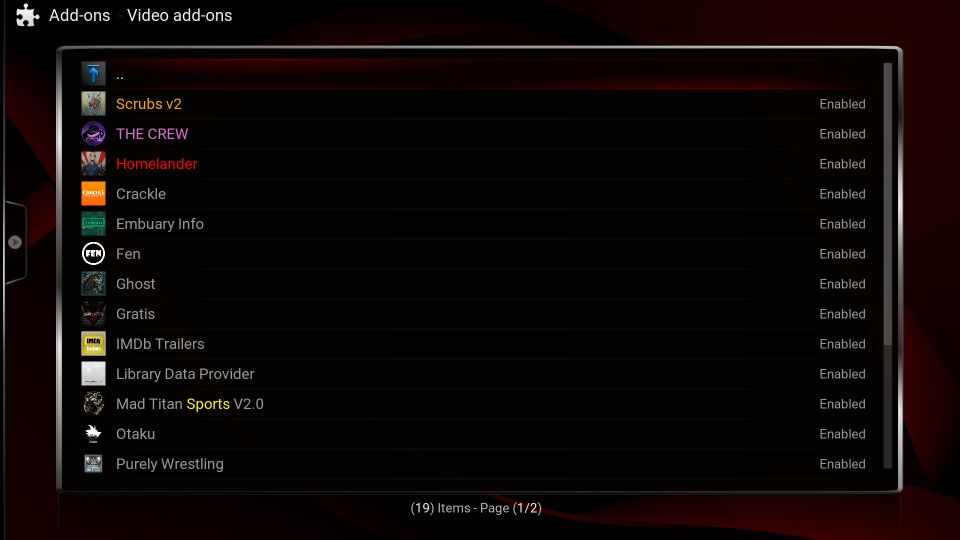
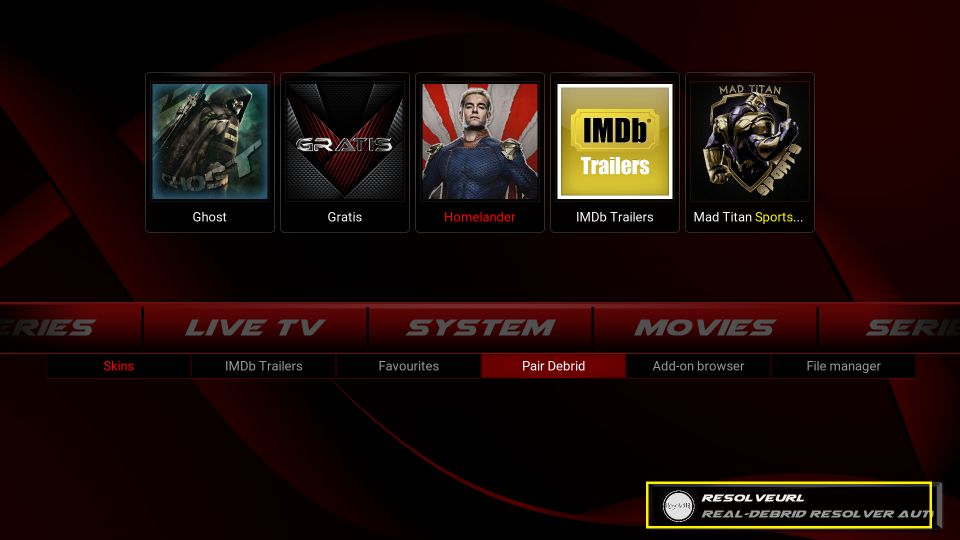
Everything you stream on the Franks build is done through the preinstalled addons. This build packs several preloaded addons, such as Homelander, The Crew, Fen, Ghost, Mad Titan, and more.
You can access all the preinstalled addons by following these steps:
First, click System > Add-on Browser on the home screen.
Click My add-ons next.
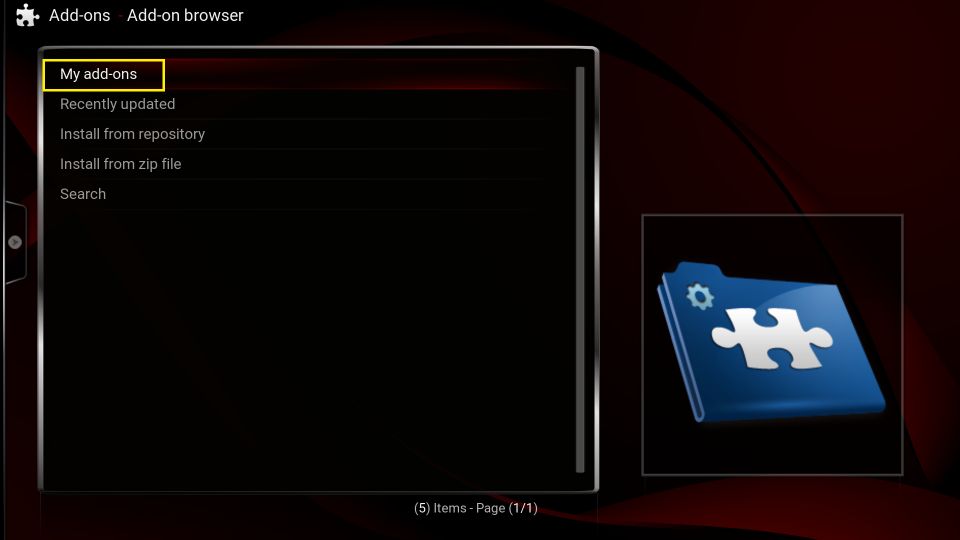
Click Video add-ons on the following screen.
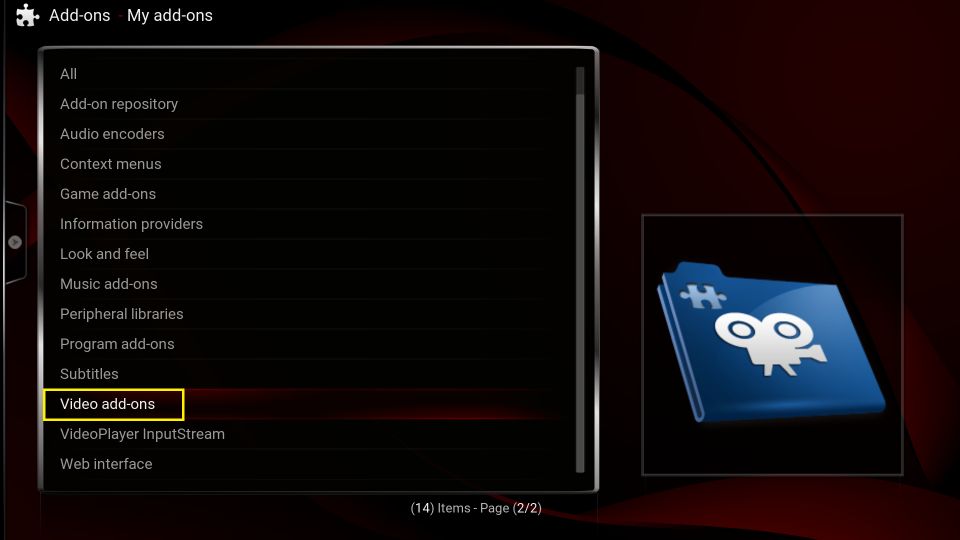
Here is your list of addons.
How to Configure Real Debrid on Franks Kodi Build
Real Debrid is a popular service. Therefore, I decided to add a separate section for it.
To know everything about Real Debrid, follow our step-by-step guide. If you wish to get a subscription, visit the official website of Real Debrid.
Follow these steps to integrate RD with the Franks build:
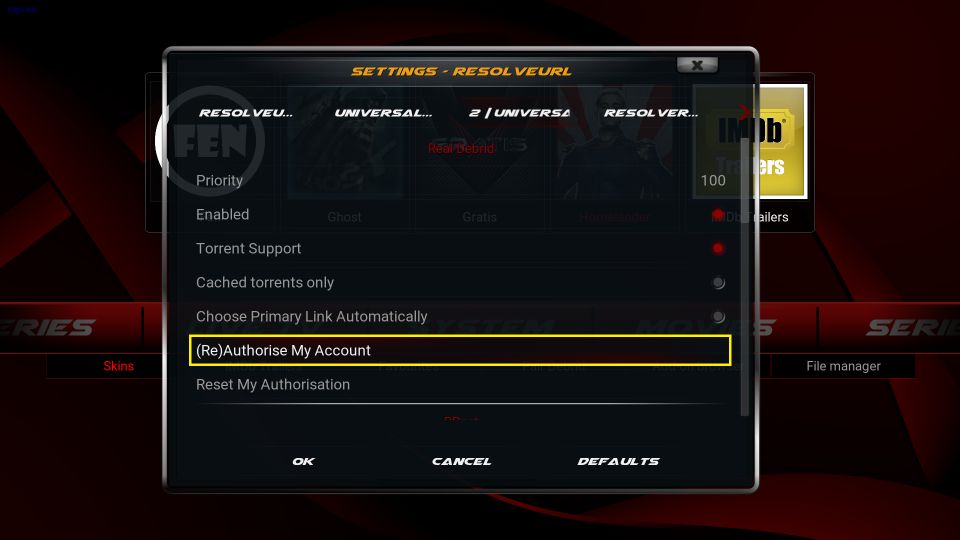
1. Click System > Pair Debrid on the home screen of the Franks build.
2. Choose the tab Universal Resolvers 2 (the third one from the left) on the following popup window.
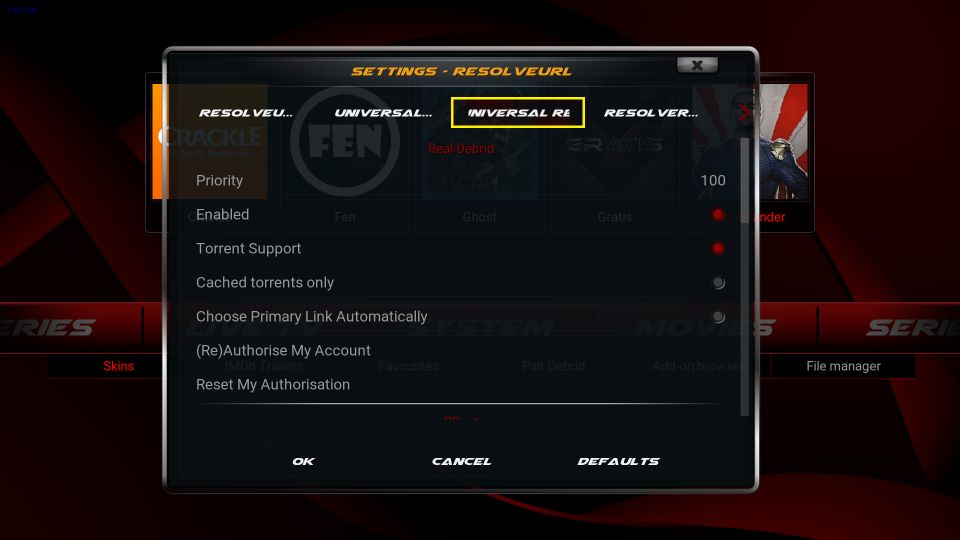
3. Please check if the option Enabled is ON. If it is off, turn it ON.
4. Click (Re)Authorise My Account next.
5. Use the code displayed on the popup on your Kodi screen to connect your Real Debrid account with the build on the website real-debrid.com/device
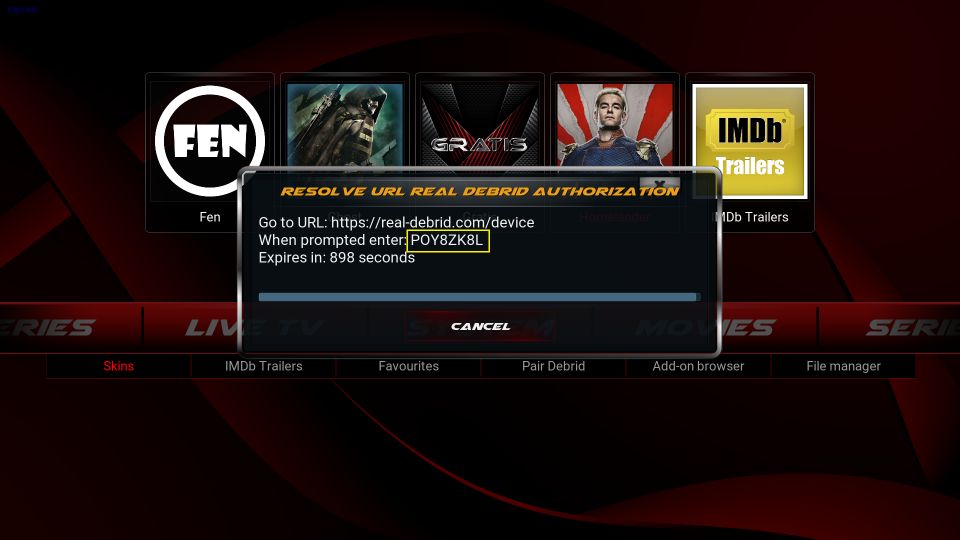
6. When the authorization is successful, you see a notification in the bottom-right corner of the screen.
Winding Up
This post demonstrated how to install Franks Kodi Build. With this build, enjoy the new interface of Kodi and several preinstalled addons. How do you like it? Let us know in the comments section below.
Related:
Leave a Reply