This tutorial provides detailed steps to install HardNox Ultra Kodi Build. HardNox build works on all Kodi-compatible devices, including Android Smartphones, iOS, FireStick, Windows, macOS, Raspberry Pi, Linux, and more.
What Is HardNox Ultra?
HardNox Ultra is a Kodi build that gives you a new interface and plenty of preinstalled addons. This build completely transforms the interface of Kodi. It makes Kodi more intuitive and user-friendly.
One of the most significant benefits of HardNox build is that it packs tons of popular preloaded addons. As a result, you will probably not need to sideload any addon separately. HardNox is one of the lightweight Kodi builds. Therefore, you can use it hassle-free on FireStick or any other low-storage TV device.
Attention KODI Users: Read before you continue
Government and ISPs endlessly monitor your online activities using your IP address 35.175.39.36 (exposed to everyone). Kodi is an excellent platform for streaming movies, TV shows, and sports, but streaming copyrighted content can get you into legal trouble.
You should use a reliable Kodi VPN and protect your streaming activities and privacy. A VPN will hide your IP address and bypass government surveillance and geo-restrictions.
I trust and use ExpressVPN, the fastest and most secure Kodi VPN. It's easy to install on any Kodi device, including Amazon FireStick, PCs, and Smartphones. In addition, it offers a 30-day money-back guarantee, and 3 free months with the annual plan.
Read: How to Install & Use the best VPN for Kodi.
Is HardNox Kodi Build Safe?
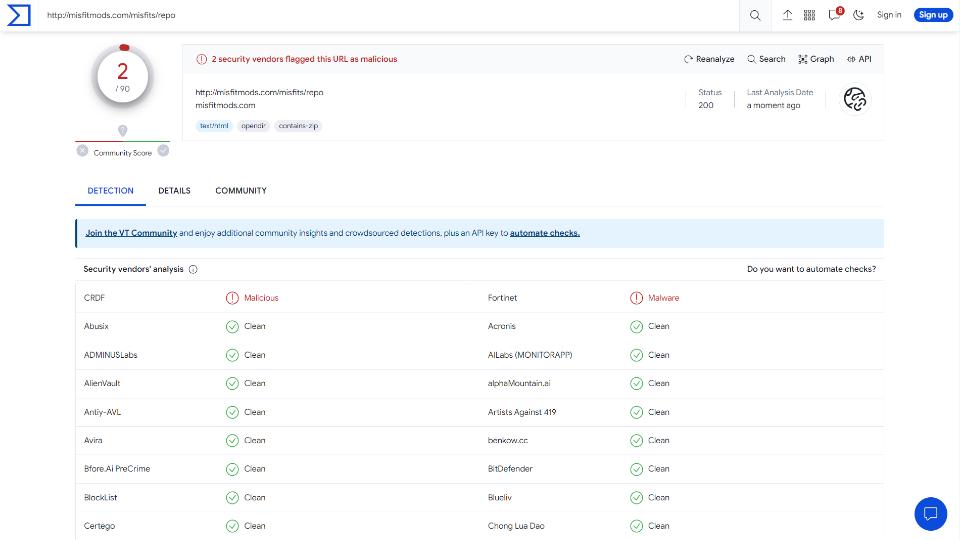
To determine whether this build is safe, I scanned its repository’s zip file through Virus Total. Virus Total is one of the most reputed online antiviruses. Virus Total ran the zip file through 80 security vendors. Only one of them flagged it as malicious.
I have also installed this build on my computer. I haven’t seen anything harmful. However, since 2 out of 90 vendors marked it malicious, please use your discretion before installing this build. Here is a copy of the scan result.
Is HardNox Ultra Legal?
We can’t say! The build may or may not be legal. It has numerous third-party addons. We don’t know if these addons have obtained the streaming rights from the copyright holders.
Firstly, use these third-party addons to watch content in the public domain. Secondly, always use ExpressVPN with HardNox to hide your streaming data from the authorities.
Features of HardNox Build
Here are the top features of this build:
- Minimal build with an easy-to-use interface.
- Tons of preinstalled addons for movies, shows, live TV, and more.
- Lightweight and fast build on all devices.
- Remote-compatible build, suitable for FireStick and other TV devices.
- Real-Debrid and Trakt friendly.
How to Install HardNox Ultra Kodi Build
You will install the Ultra HardNox build from a third-party developer. The unofficial builds require plenty of additional steps compared to the official ones. So, allow me to divide the instructions into a few smaller parts. This will make the process a lot easier to follow. Here is what you are going to do:
- Part 1: Remove the default sideloading restriction on Kodi.
- Part 2: Add the source path for the repository.
- Part 3: Download and install the Misfit Mods Wizard on Kodi.
- Part 4: Install the HardNox Ultra build from the Wizard.
The detailed steps are as follows:
Part 1: Remove the Default Sideloading Restriction on Kodi
The third-party addons and builds are not always trustworthy. Therefore, Kodi places a built-in restriction to prevent the automatic installation of such addons. However, you can easily remove the sideloading restriction. Here are the steps:
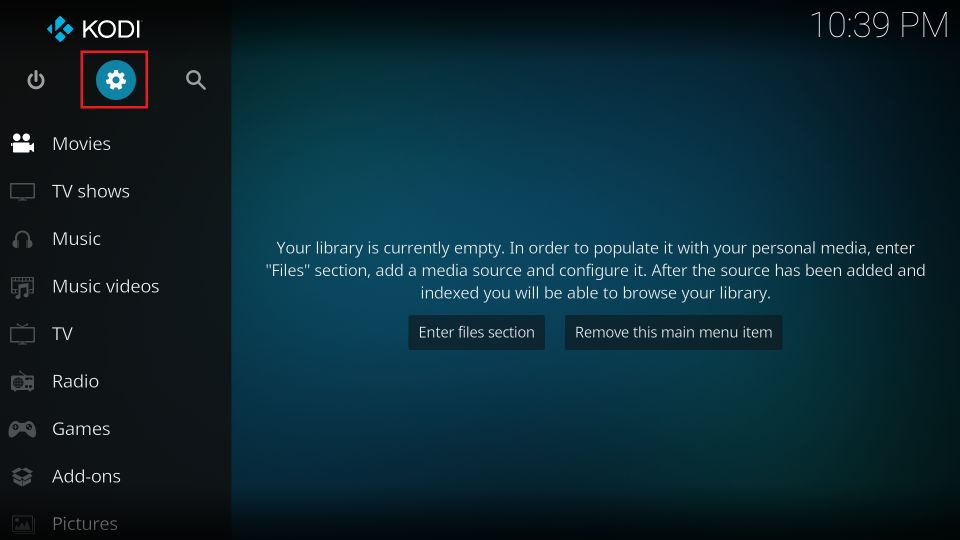
1. Go to the Kodi Settings page. You can do that by clicking the cog button on the home screen.
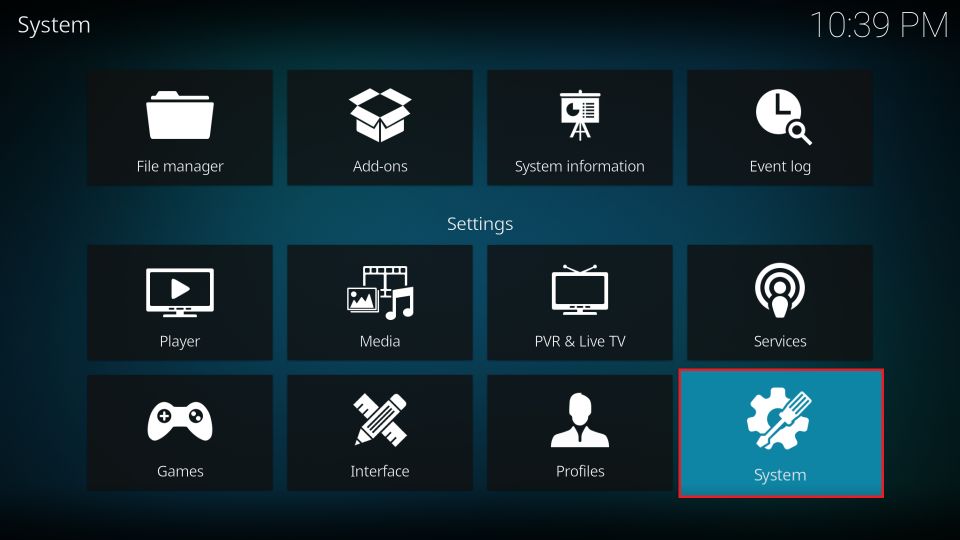
2. You now see the Settings menu. Click System.
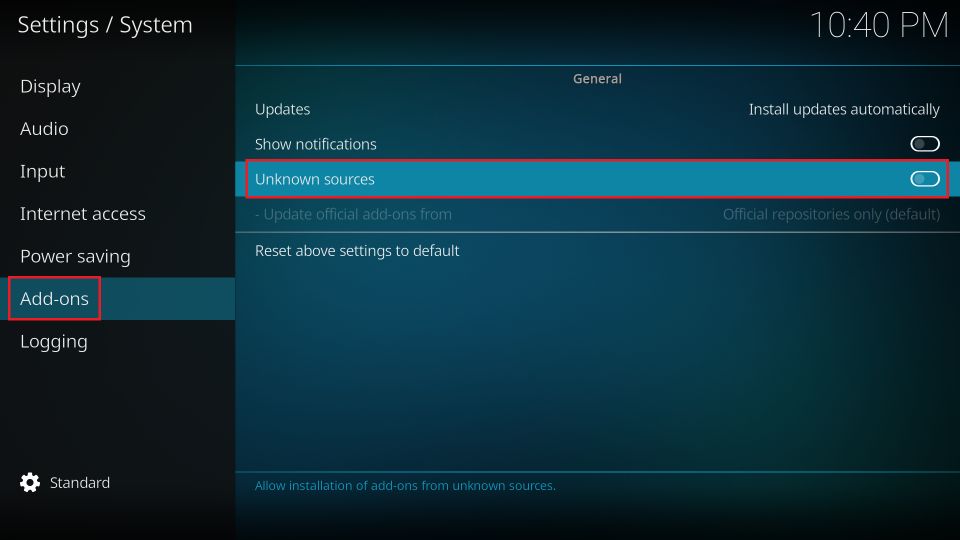
3. The System menu is now open. Hover over and highlight Add-ons in the menu on the left. Next, turn on Unknown Sources on the same window on the right.
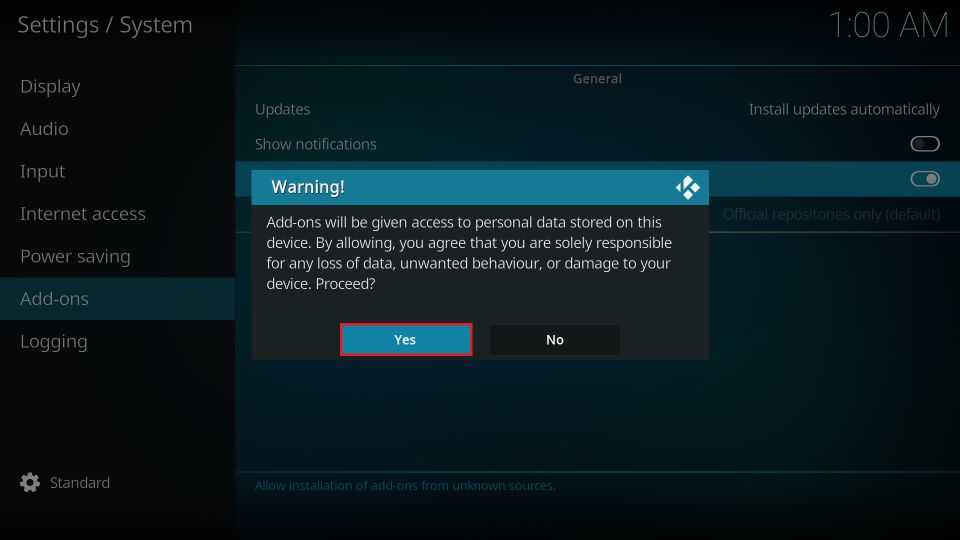
4. You may dismiss this warning now by choosing Yes on this prompt.
You will notice that the Unknown Sources is now enabled. So let’s go to the next section, where we add the source path on Kodi.
Part 2: Add the Source Path for the Repository
In this section, we are pointing Kodi to the website from where you will download the Misfit Mods Repository. Here is how it is done:
1. You want to open Settings again.
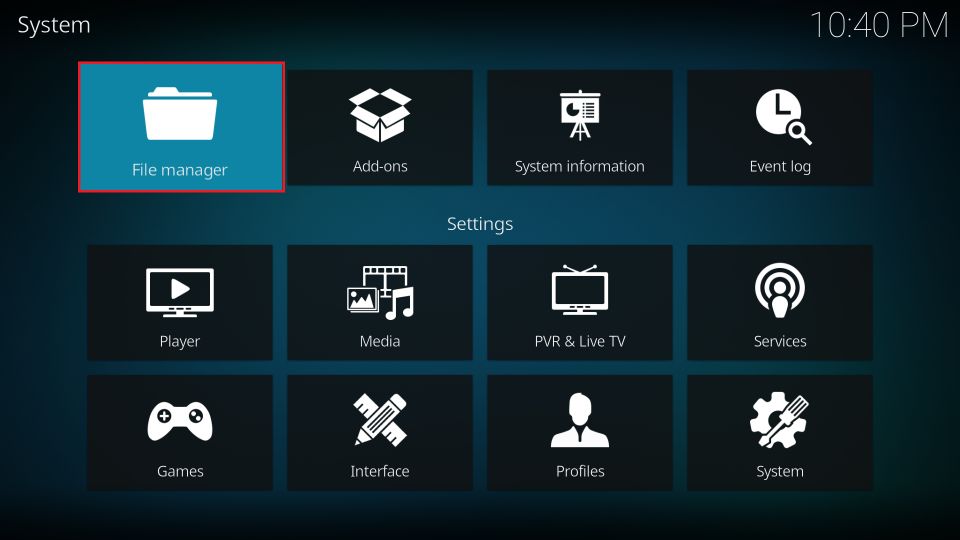
2. In the Settings menu, choose File manager.
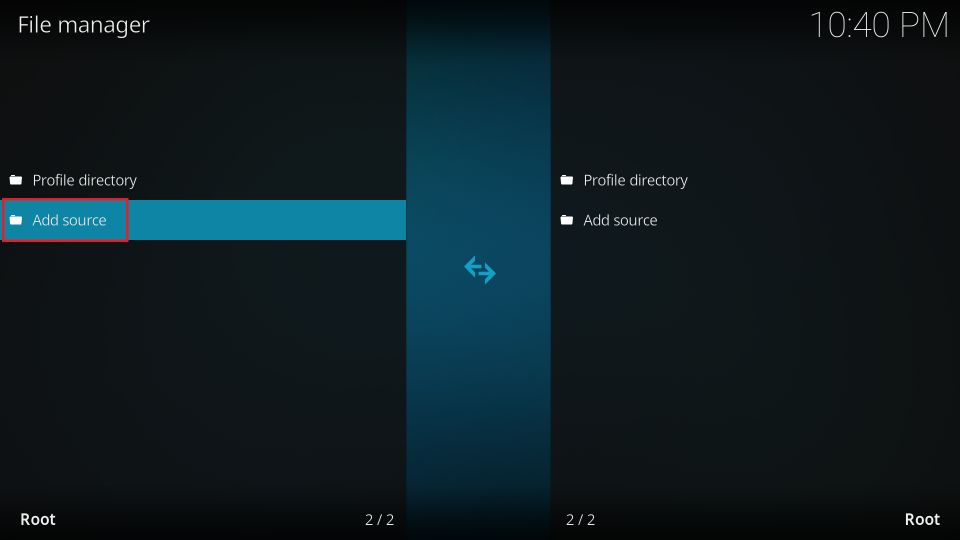
3. This window displays Add source on both sides. You may click any one of them.
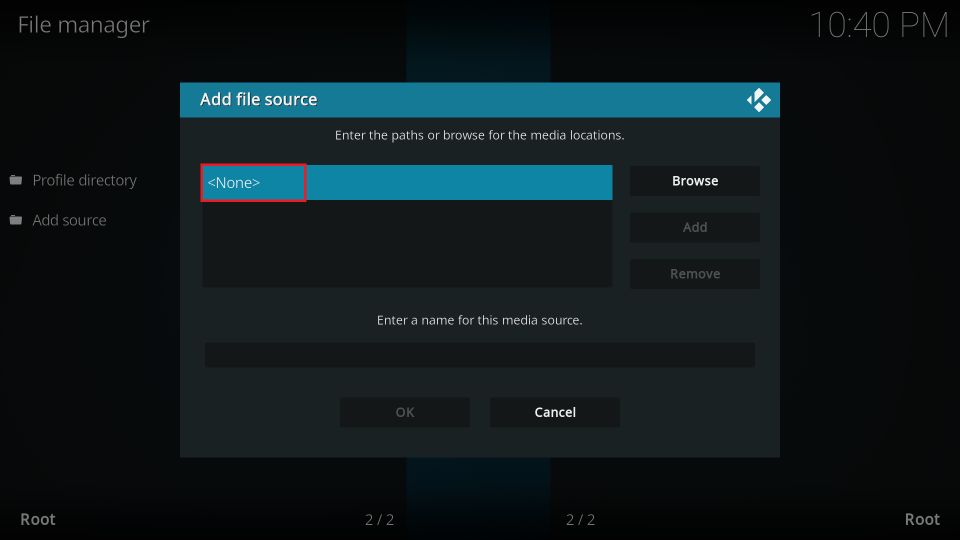
4. Go ahead and click <None>.
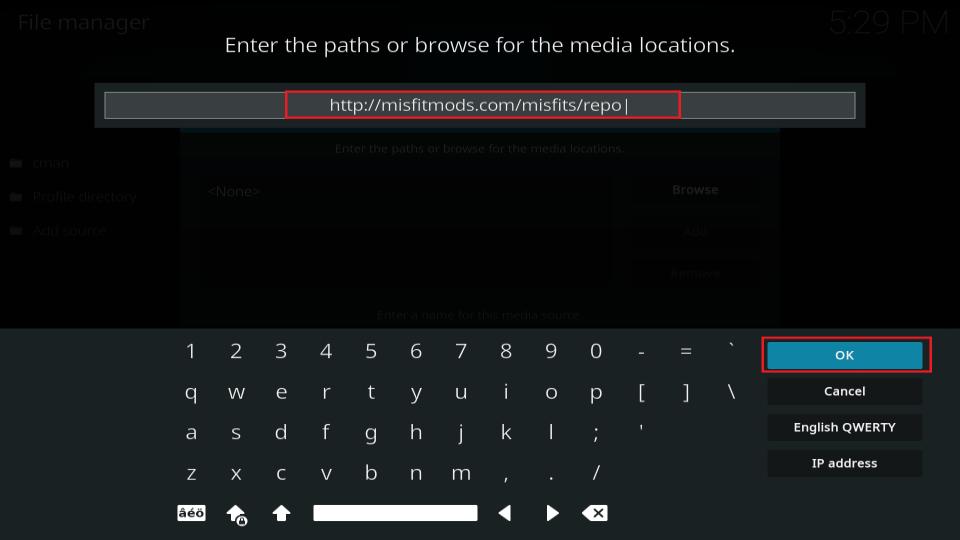
5. On this screen you add the source path http://misfitmods.com/misfits/repo
You would want to proofread this link to ensure there aren’t any typos. Click OK when you are sure about it.
Note: The URL above points directly to the website of the developers of the Misfit Mods Repository. FireStickHow has no affiliation with the developers or the repository.
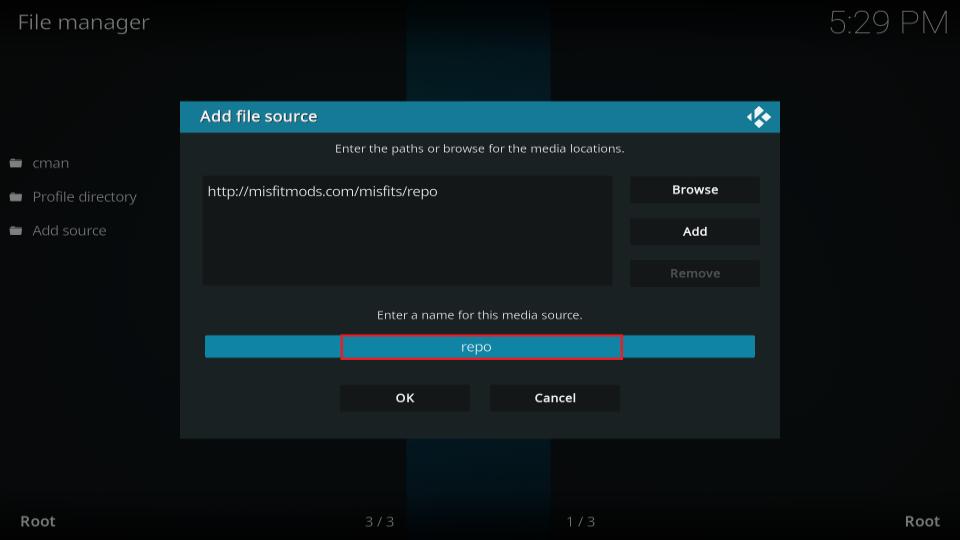
6. You see that the text box for the source name is automatically filled with repo. I am going to use a more memorable name instead. Click the text field marked in the image below.
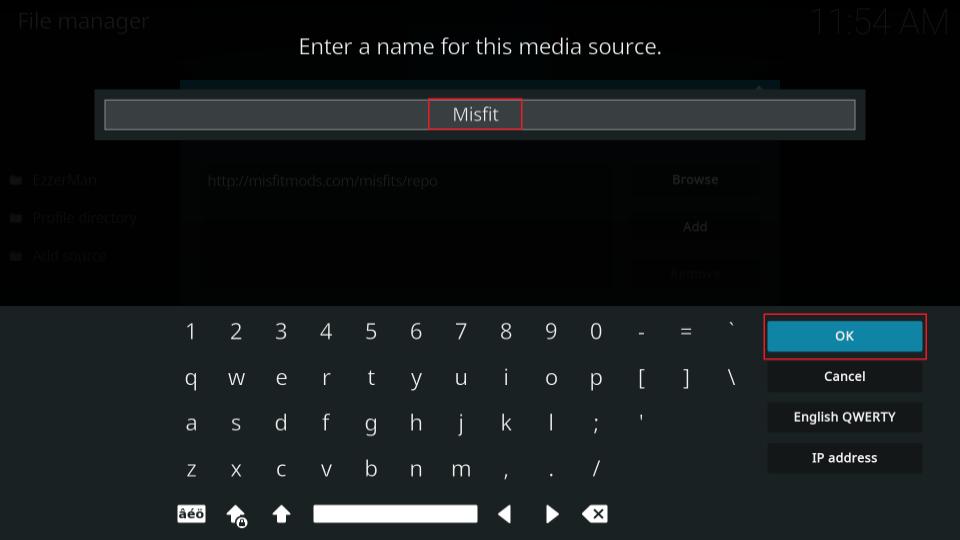
7. Type Misfit or any other custom source name you like and click OK.
This is how you add the source path on Kodi.
Part 3: Download the Misfit Mods Wizard
The repository hosts the Misfit Mods Wizard, and the Wizard lets you install the build. So let’s install the repository now:
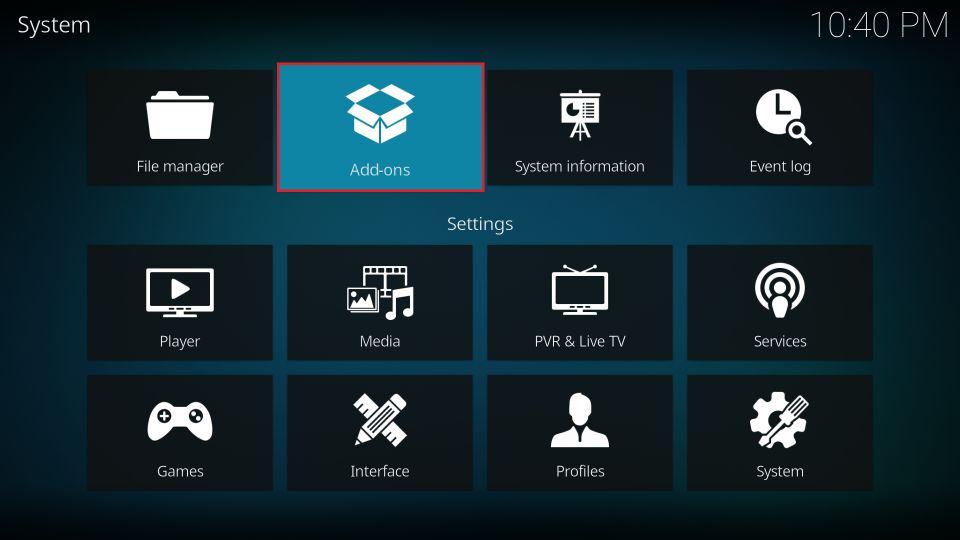
1. Go back to the Settings menu window and click Add-ons.
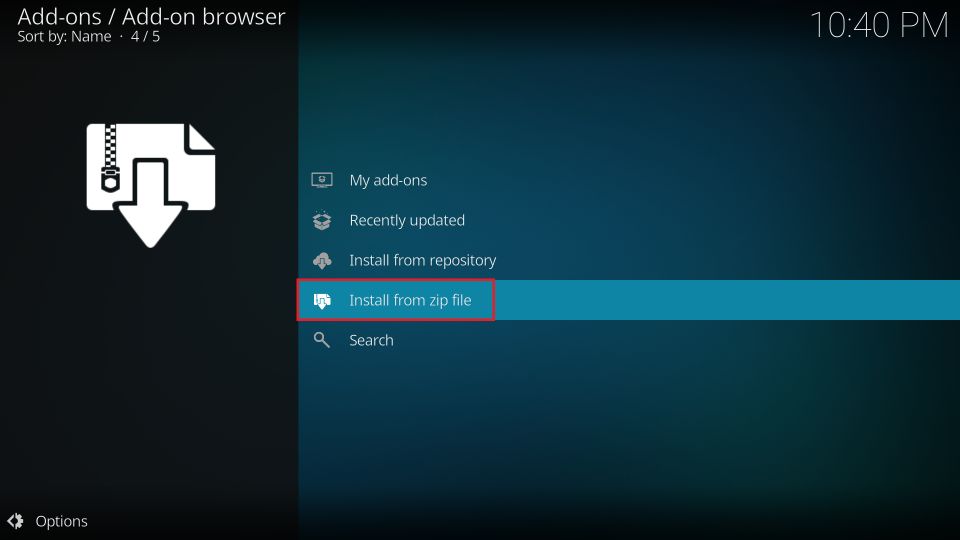
2. You will now click Install from zip file.
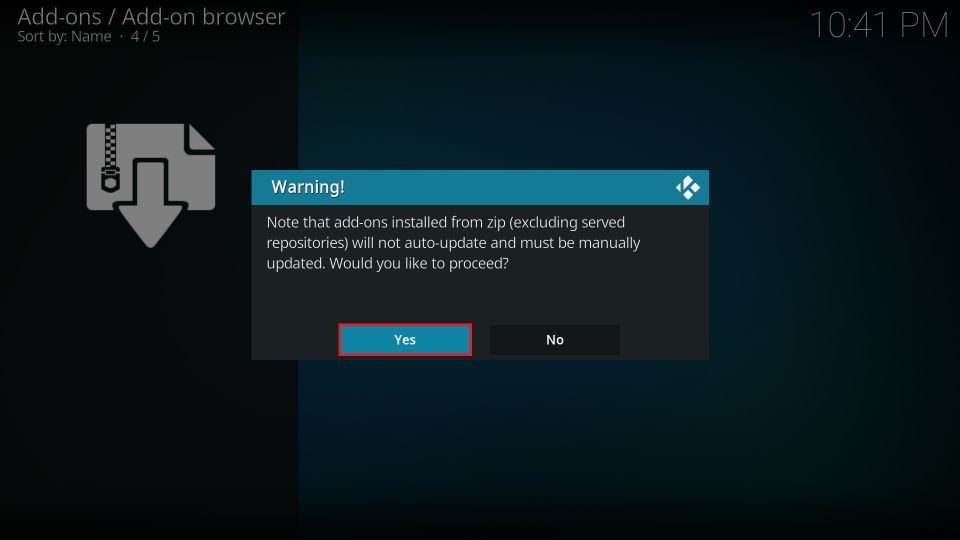
3. Click Yes and ignore this prompt.
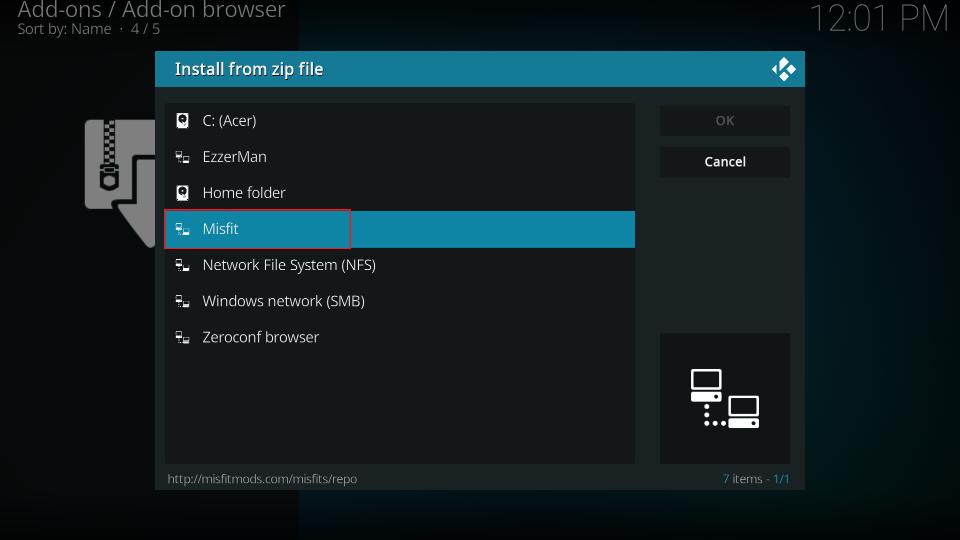
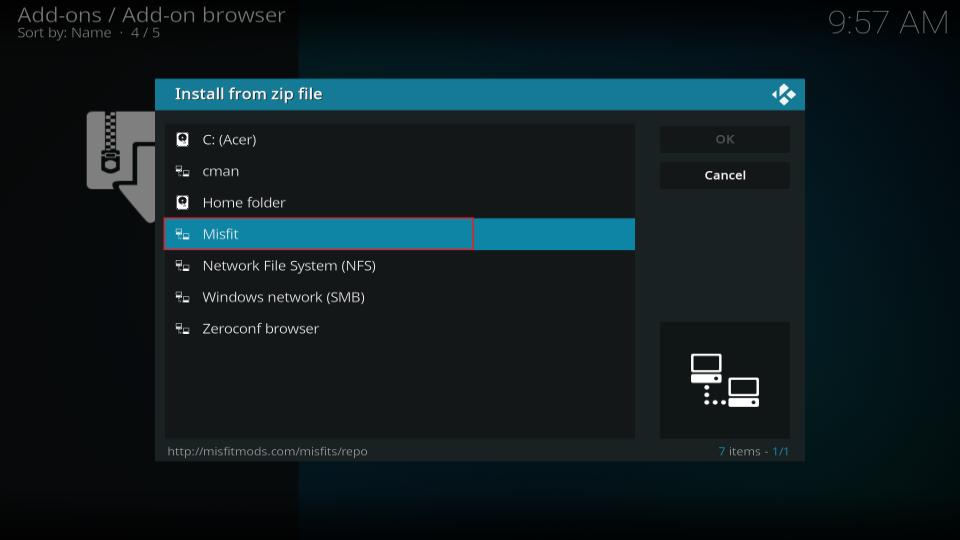
4. You should see the custom source name misfit we added earlier (or the one you chose). Click it.
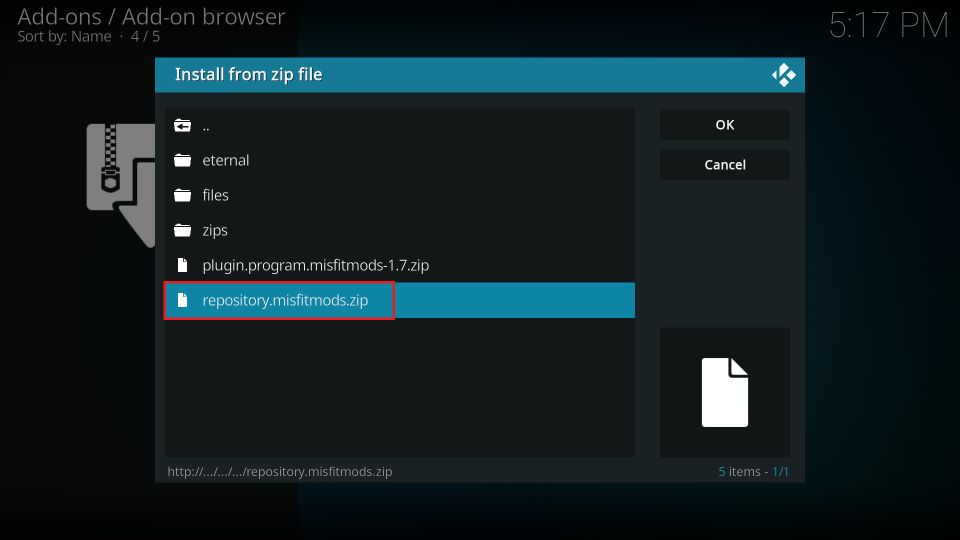
5. Open the repository zip file named repostiory.misfitmods.zip.
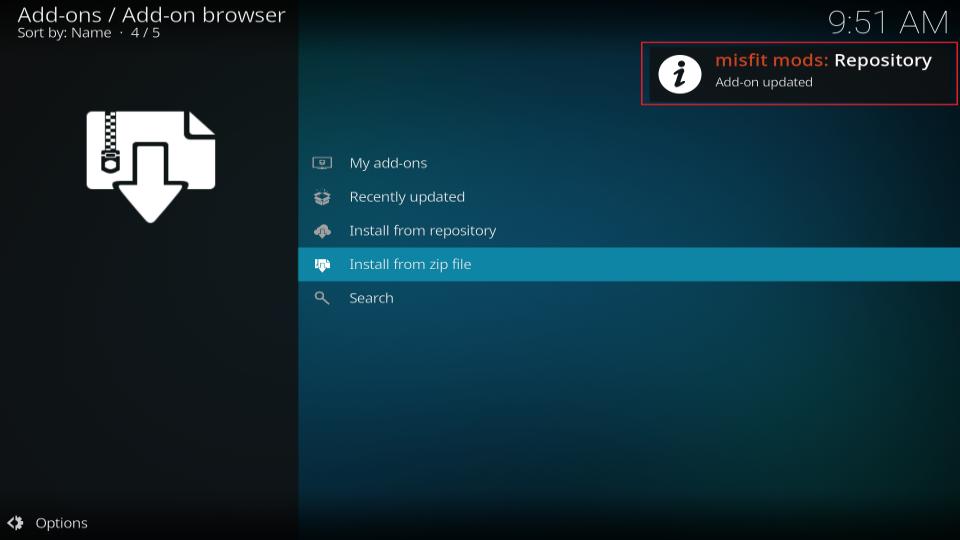
6. It only takes a few seconds to install the repository. You should see the repository installed notification in the upper-right area.
7. On the same window, click Install from zip file.
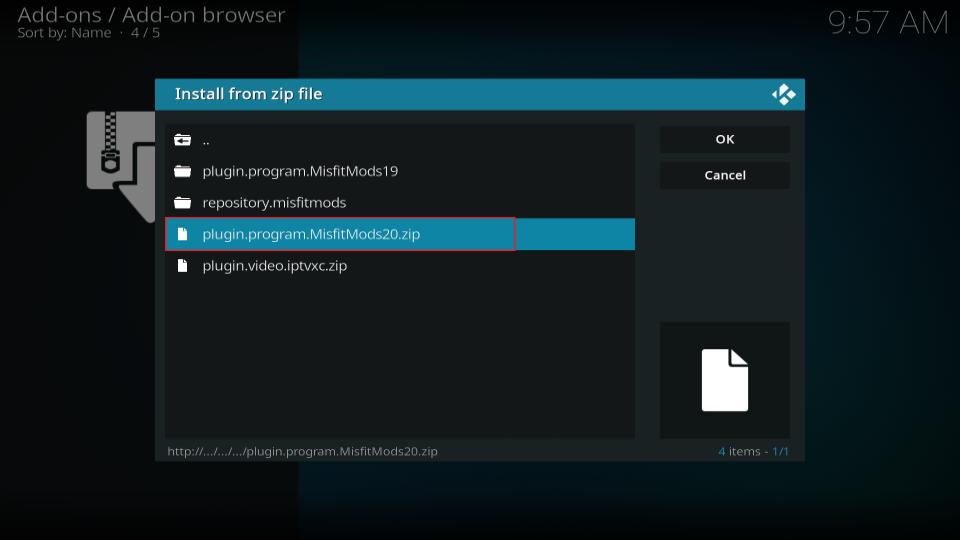
8. Select plugin.program.MisfitMods20.zip.
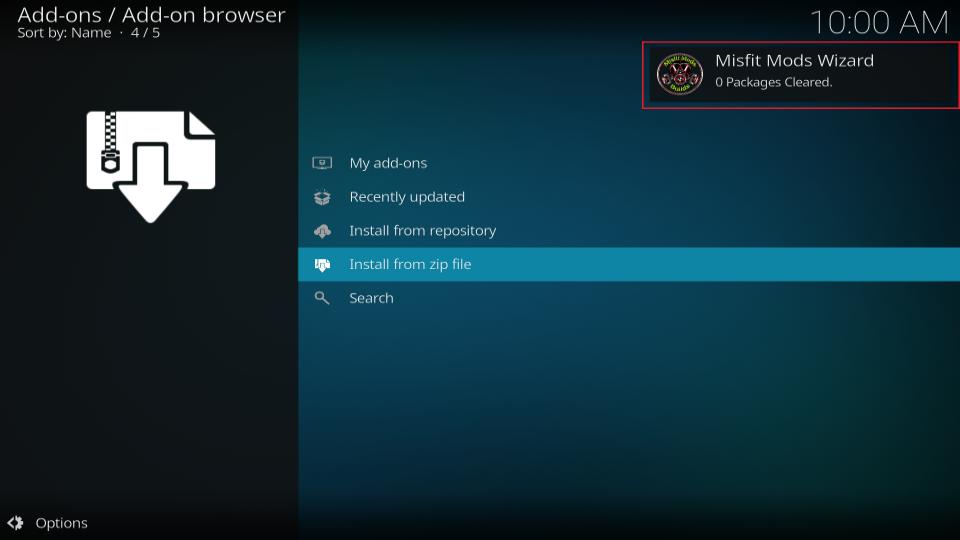
9. After some time you will see misfit mods wizard cleared notification at the top right of your screen.
Part 4: Install the HardNox Ultra Build from the Wizard
Now that you have installed the Wizard, the only thing left is to install the HardNox Ultra build. Follow the steps below:
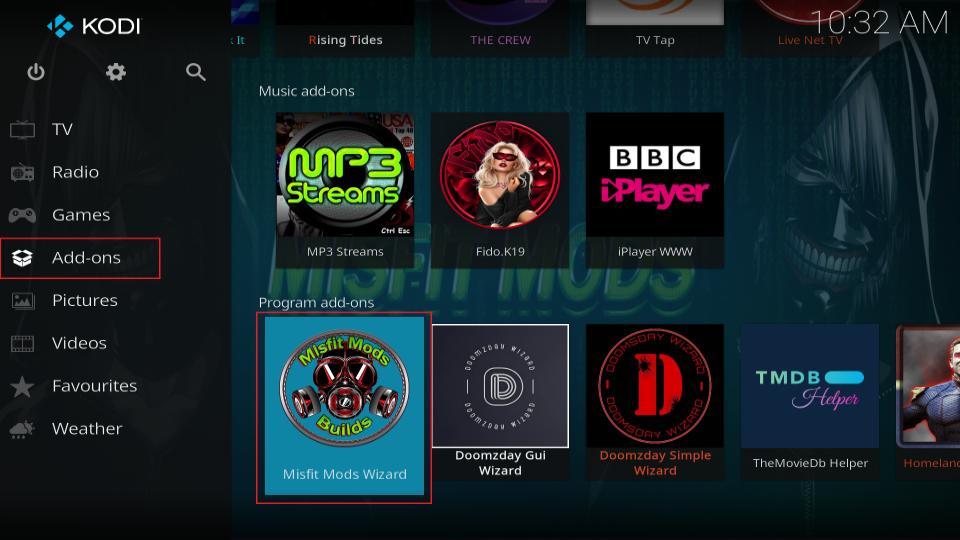
1. Go to the home screen of the Kodi app again (you may need to press the back button several times). Click Add-ons on the left and then Misfit Mods.
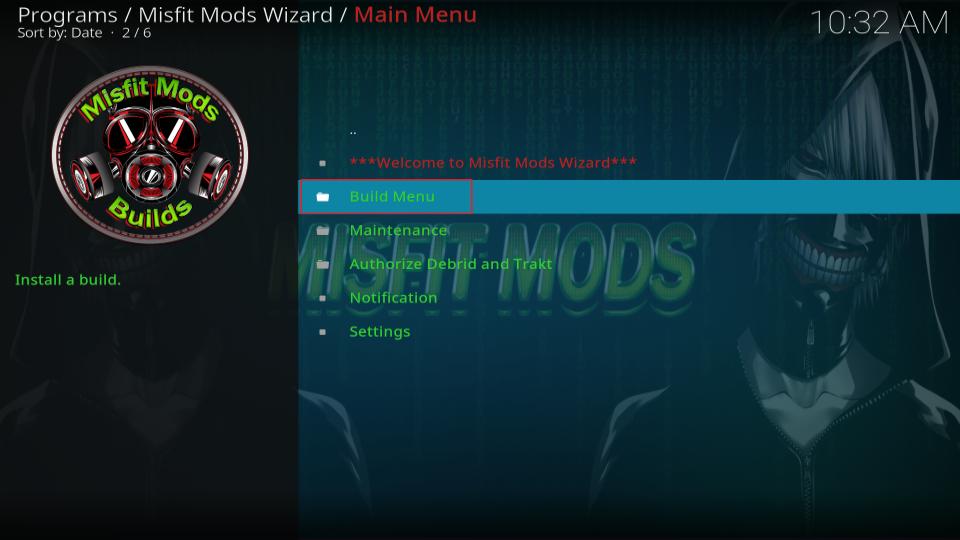
2. Open the builds menu on the following window.
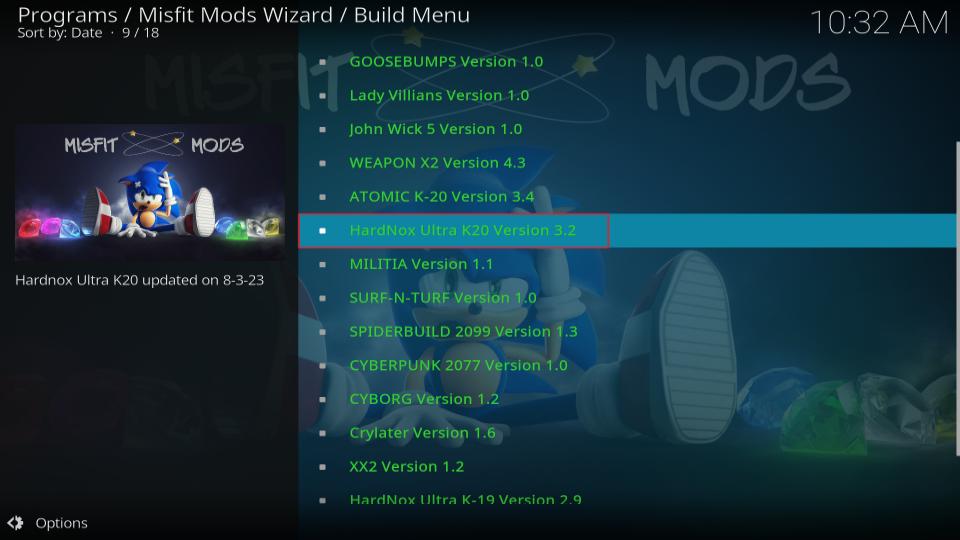
3. The Wizard lists the HardNox build by the name Hardnox Ultra K20 in the build menu. However, you can see in the preview on the left that it says HardNox Ultra. Click the Ultra build.
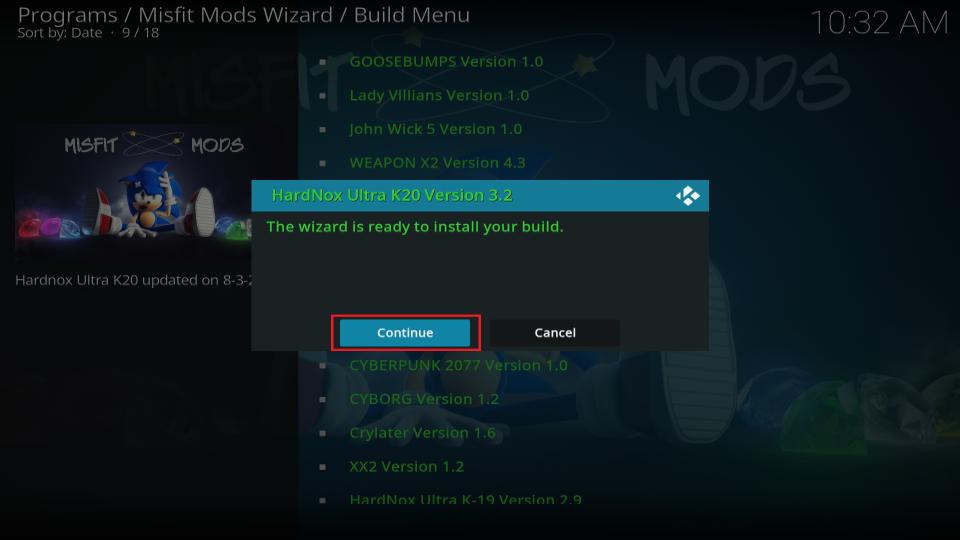
4. Confirm that you intend to install the build by clicking Yes, Install.
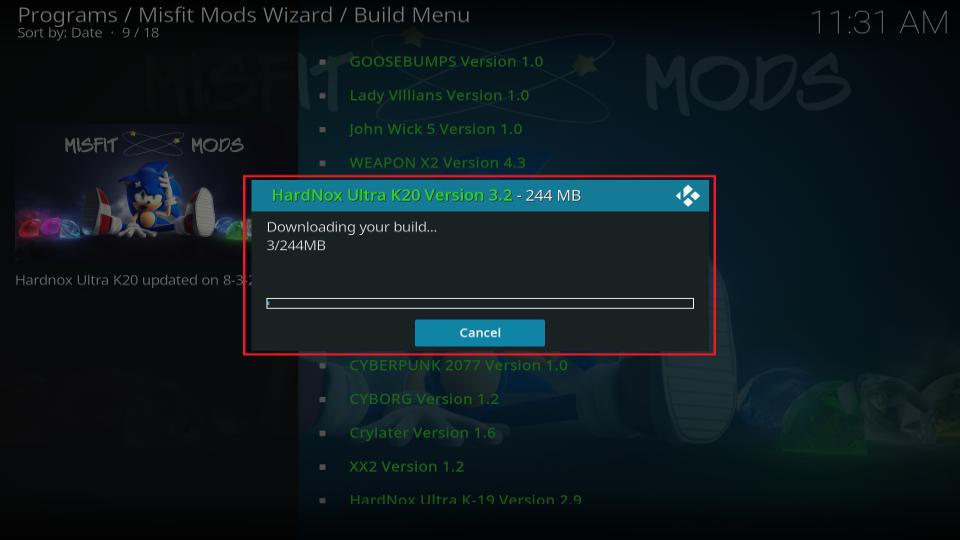
5. Within a few moments, the build will begin to download. This will take about a couple of minutes.
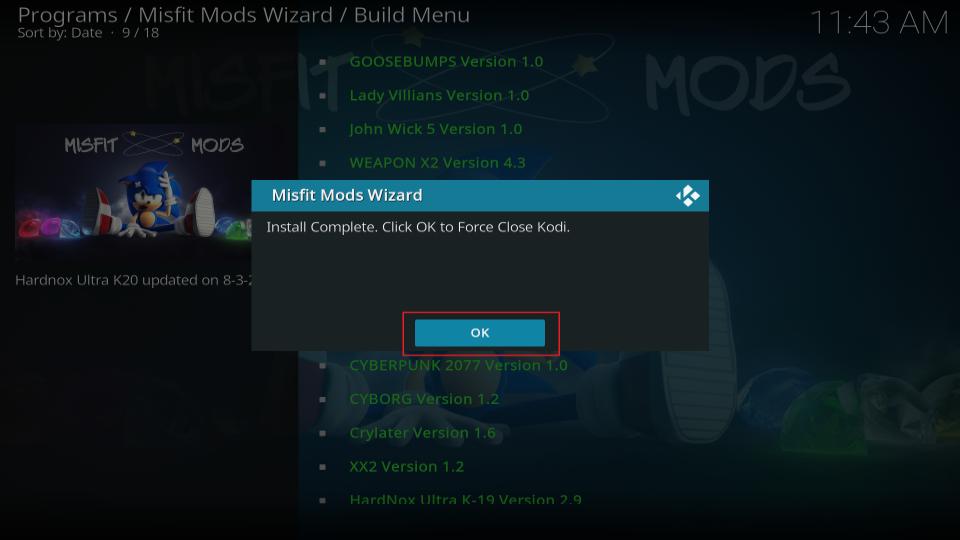
6. Once the build installation is complete, you must click OK to force close Kodi.
This is how you install the Misfit Mods Wizard – Ultra HardNox build on Kodi.
Wait! It looks like you are all set to start watching your favorite content on Kodi. But have you protected your online identity yet? You are under constant surveillance by the Government and ISP. They use your IP address 35.175.39.36 to track you. Streaming free or copyrighted videos may get you into legal trouble.
Thankfully, you can use a VPN to easily protect your privacy and go invisible from your Government and ISP. I use and recommend ExpressVPN with Kodi.
ExpressVPN is the fastest, most secure, and streaming-friendly VPN. It is easy to install and set up on any Kodi device, including FireStick, Smartphones, PCs, and more.
ExpressVPN, offers an unconditional 30-day money-back guarantee. So, if you do not like the service (I don't see why), you can get a full refund within 30 days.
Please remember that we encourage you to use a VPN to maintain your privacy. However, we do not condone breaking copyright laws.
Before you start using Kodi for streaming, here is how you can protect yourself with ExpressVPN:
Step 1: Sign up for ExpressVPN Here
Step 2: Download ExpressVPN on your device by clicking HERE
Step 3: Open the ExpressVPN app on your device. Sign in with your account. Click the connect/power button to connect to the VPN
Great! You have successfully secured yourself with the best Kodi VPN.
Overview of the HardNox Ultra Kodi Build
Begin by starting the Kodi app again. The build will immediately load the skin, and you can see how different the interface is from the original Kodi.
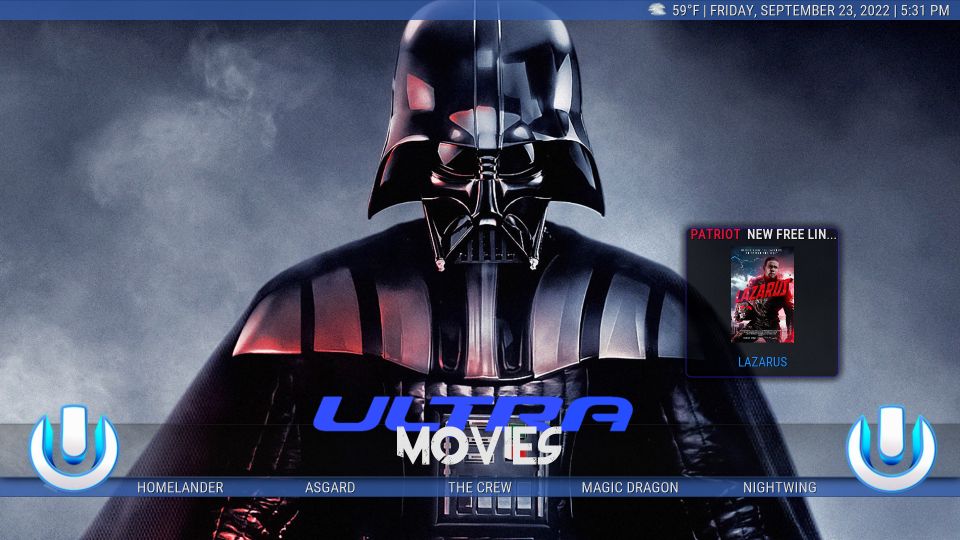
The Ultra HardNox build may seem unresponsive when you run it the first time. That’s because it configures everything. Therefore, when you open the build the first time, allow it at least 5 minutes to be ready. Here is the Kodi interface with the HardNox build:
You will notice that the build lines up the main menu and the submenu entries near the bottom. For instance, the Movies item is selected in the main menu in the image above. The corresponding submenu items appear underneath it (such as Search Movies, Homelander, Asgard, The Crew, Magic Dragon, etc.).
In addition to Movies, the build offers various categories, including TV Shows, Heroes, Kids, Horror, Fan Favs, Grit, Sportz, Doc Spot, Muzic, and more. Each category or menu item has its own set of submenu options.
The HardNox build comes with a variety of preloaded addons, such as Kodiverse, Homelander, Rising Tides, The Crew, Magic Dragon, EZ, and many more. These addons let you watch movies, shows, sports, music videos, videos for kids, horror movies, live TV, documentaries, and any content you can think of. You may not need to install any addon separately.
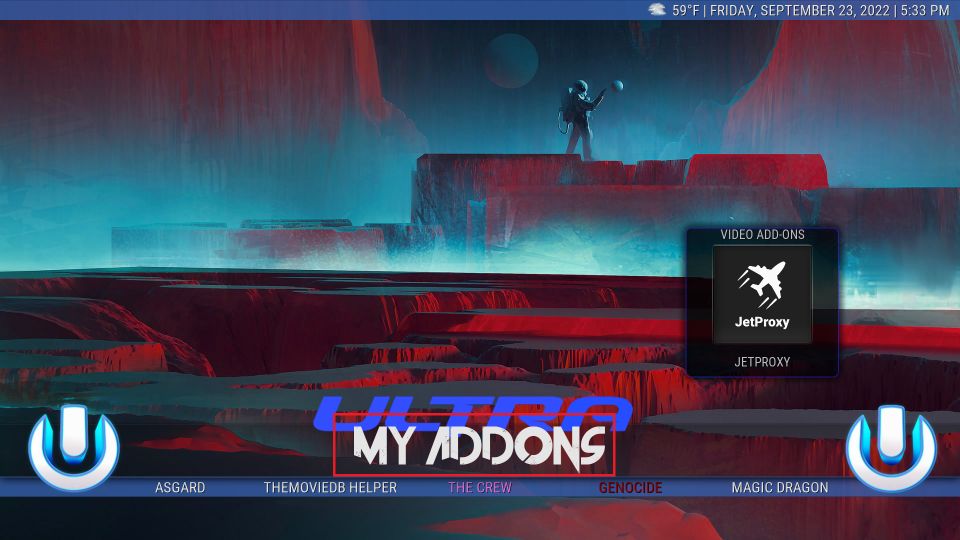
To view the addons list, click the My Addons option in the main menu on the home screen.
A lot of preinstalled addons on HardNox Ultra build support Real Debrid. If you want to sign in with your Real Debrid account, you can do it right from the home screen.
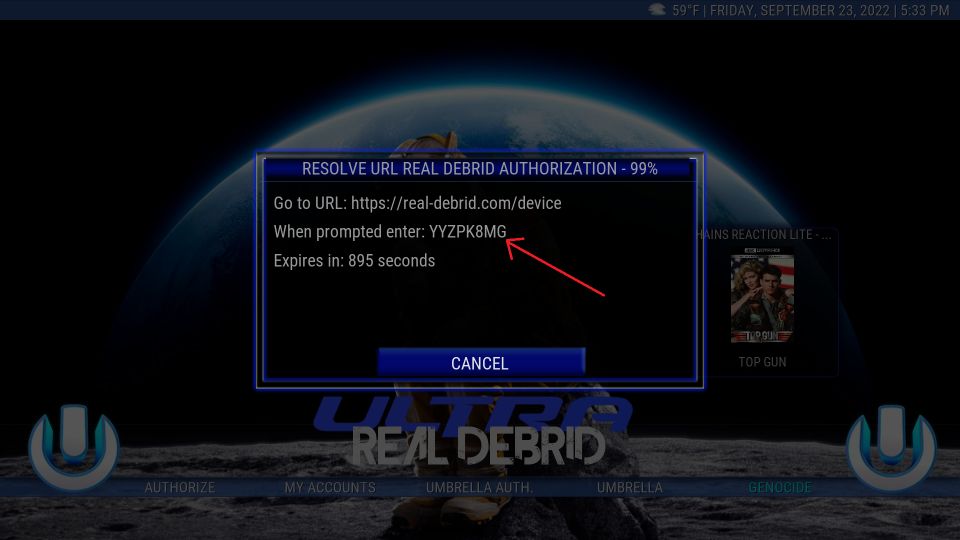
Select Real Debrid in the main menu. Click Authorize in the submenu.
A popup appears with the verification code. Enter this code on real-debrid.com/device in any browser of your choice.
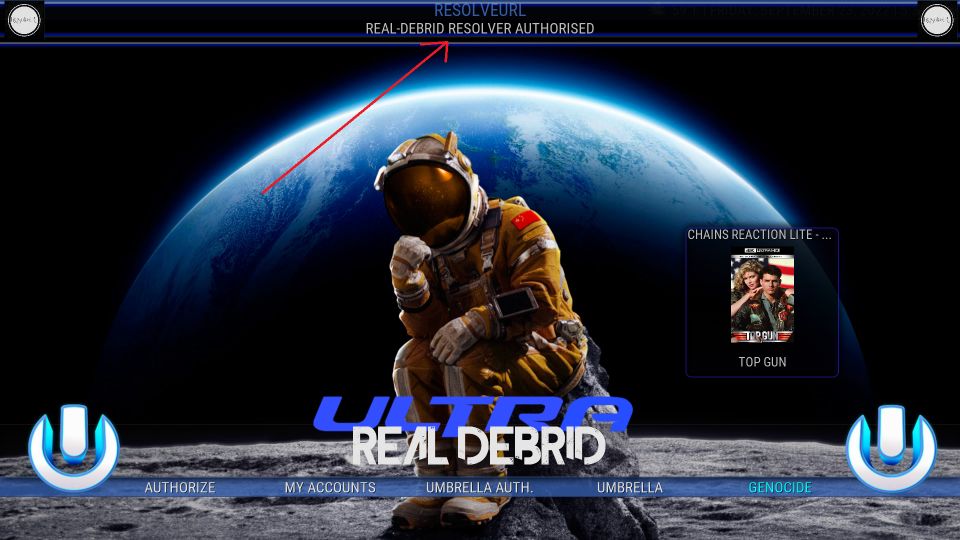
You should see the notification at the top saying, Real Debrid Resolver Authorized upon successful authorization.
Wrapping Up
You learned how to install the HardNox Ultra Kodi build in this post. It is a neat, easy-to-use build. It comes with several preinstalled addons. Let us know your feedback in the comments section below.
Related:


Leave a Reply