This article covers how to install Fetch Kodi addon. Similarly, it tells you about what’s Fetch, some of its features, how to use it, etc. You can follow the guide on any Kodi-compatible device like Amazon FireStick, Windows PC, Mac OS machine, Android TV Boxes, Android phones/tablets, and more.
What Is Fetch Addon?
Fetch is a product of Doomzday Repo that lets you stream international and English channels from around the world. Sports, classics, lifestyle, action, animation, cooking, and you name it, all types of channels are available on the addon.
On Fetch, you can stream thousands of live TV channels for free. Also, you can save them to your favorites list to watch later. Moreover, the addon lets you quickly find any channel using the built-in search function.
With Fetch, you can stream multiple video quality channels like 480p, 720p, or 1080p. Furthermore, you can filter and customize channels by tweaking the options inside the settings menu.
If you want to watch free channels, Fetch is one of the best addons on Kodi to help you out.
Attention KODI Users: Read before you continue
Government and ISPs endlessly monitor your online activities using your IP address 35.175.39.36 (exposed to everyone). Kodi is an excellent platform for streaming movies, TV shows, and sports, but streaming copyrighted content can get you into legal trouble.
You should use a reliable Kodi VPN and protect your streaming activities and privacy. A VPN will hide your IP address and bypass government surveillance and geo-restrictions.
I trust and use ExpressVPN, the fastest and most secure Kodi VPN. It's easy to install on any Kodi device, including Amazon FireStick, PCs, and Smartphones. In addition, it offers a 30-day money-back guarantee, and 3 free months with the annual plan.
Read: How to Install & Use the best VPN for Kodi.
Is Fetch Addon Safe?
Well, it may be safe or not. Let me explain. Unlike official addons, Fetch doesn’t have a safety guarantee simply because it’s found on a third-party repo called Doomzday Repo.
As Kodi prescribes no official way to check the safety of third-party add-ons, Fetch remains in the middle of nowhere. At FireStickHow, we also don’t have the resources to verify whether it’s 100% safe for your device.
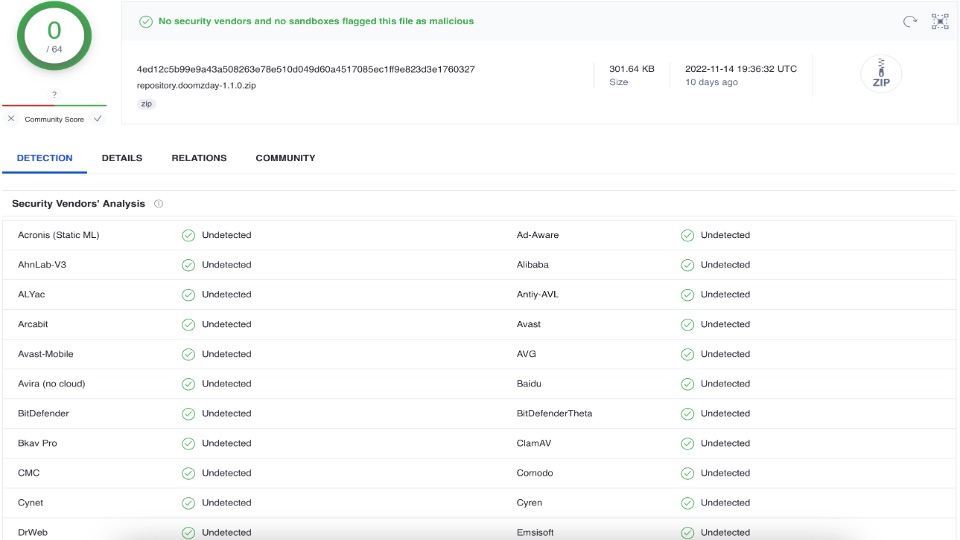
However, out of curiosity, I checked the zip file of Doomzday Repo on VirusTotal. And gladly, it aced all the tests – take a look:
Is Fetch Addon Legal?
Kodi doesn’t give support to any third-party addon. So, there’s no way to check whether Fetch is legal or illegal. Fetch might be scraping the free-to-stream channels available on the internet. Or, it may be fetching premium channels from unknown sources.
My team and I at FireStickHow don’t have the equipment to check whether Fetch is legit. It’s best to use a trusted VPN like ExpressVPN to hide your online identity while streaming.
Features of Fetch Addon
Here are some reasons why Fetch is one of the best free live TV streaming addons:
- Thousands of free channels from every part of the world
- Special section for English channels
- Features a built-in search function to find a channel in a snap
- Huge range of 1080p FHD channels
How to Install Fetch Kodi Addon
I have divided the installation of the Fetch Kodi addon into three parts. The first one shows how to enable unknown sources. Next, how to add Doomzday Repo. And finally, use the repo to install Fetch.
Part 1: Turn On Unknown Sources
Here’s the breakdown of how to turn on Unknown Sources in Kodi:
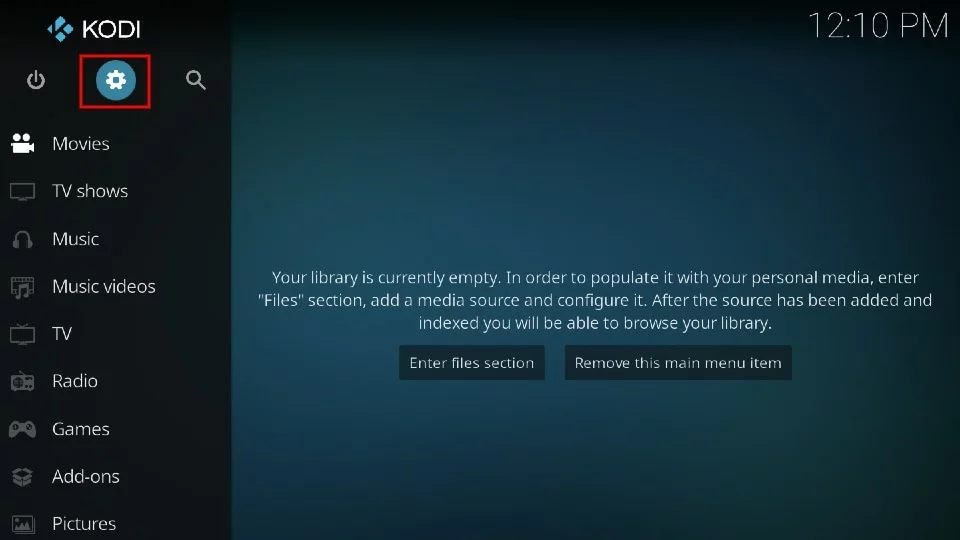
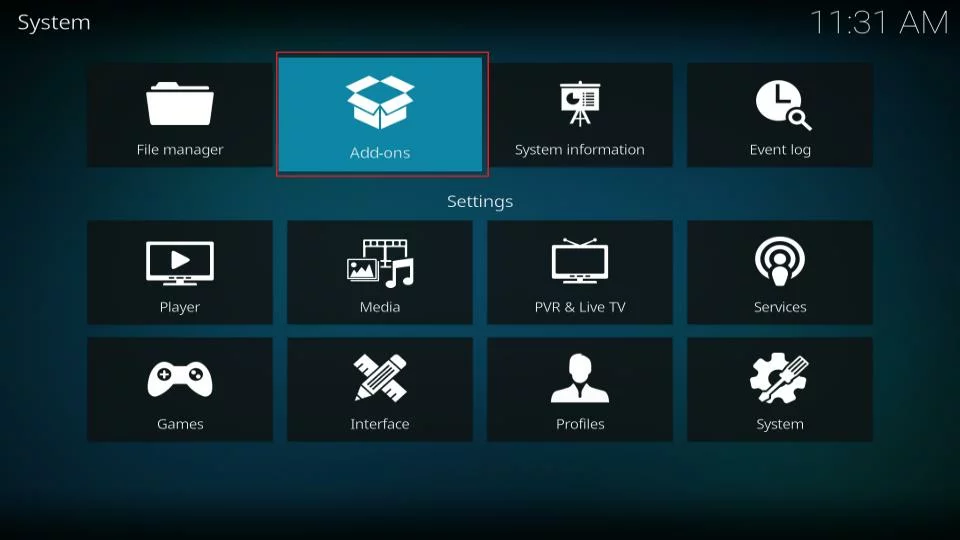
1. Fire up Settings Cog under the Kodi logo on the app’s home page.
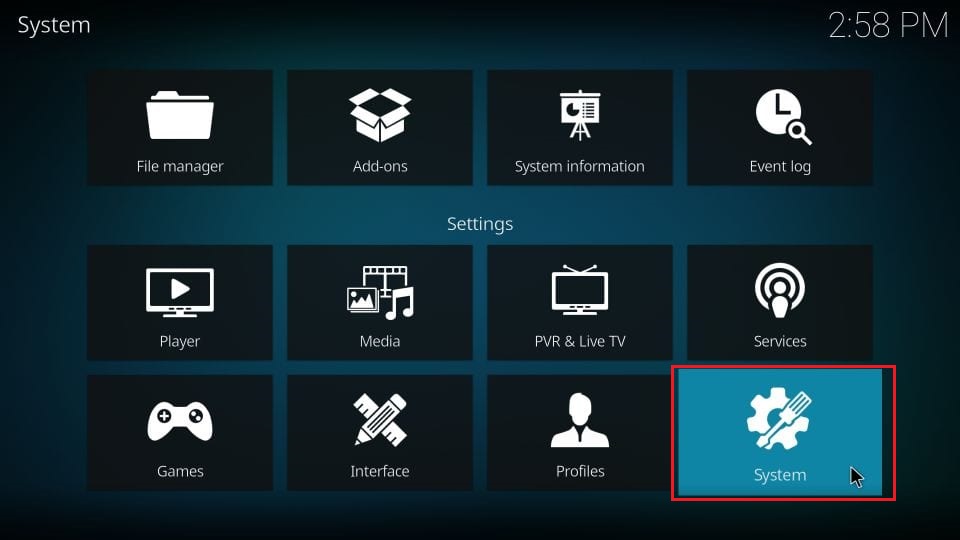
2. Open System.
3. Roll down to Add-ons using the left menu panel. Under General on your right, navigate to Unknown sources and turn it on.
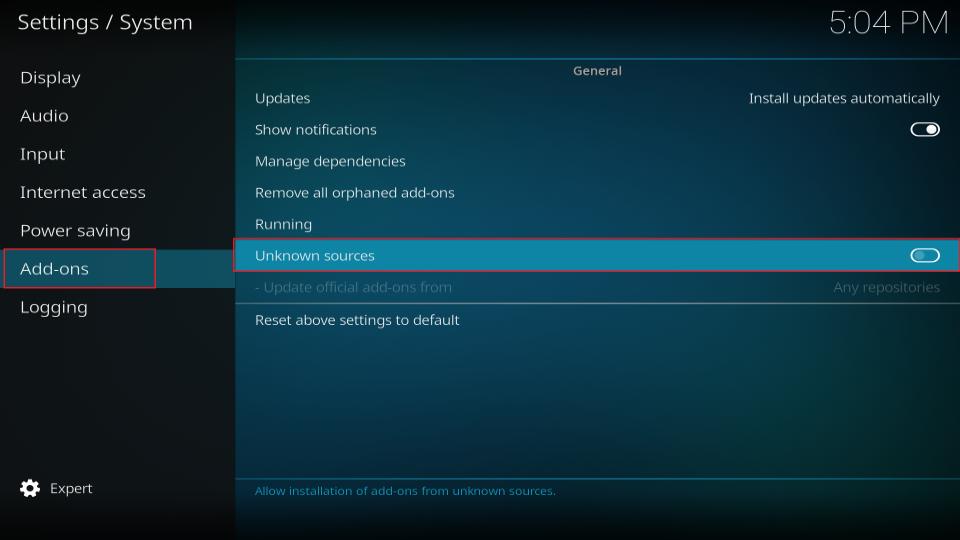
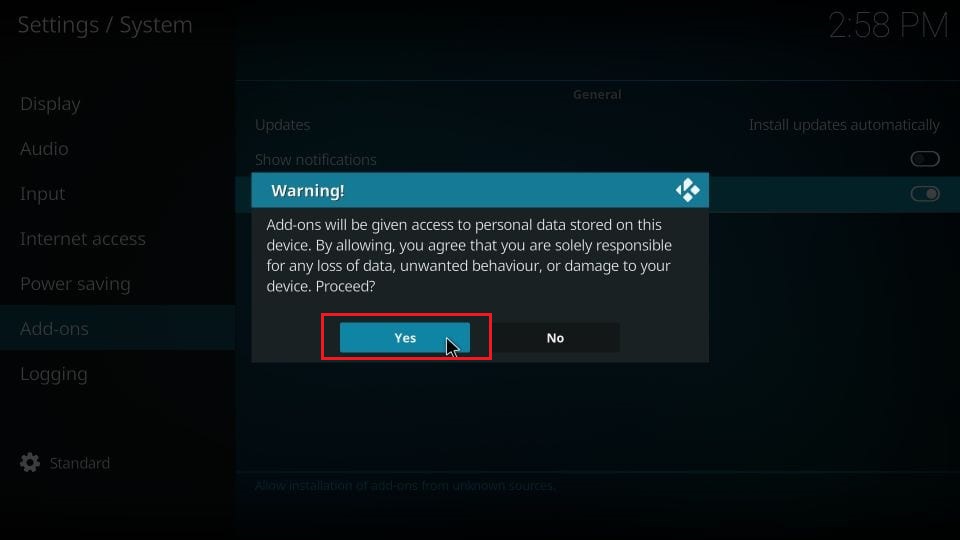
4. A warning message by Kodi will appear telling you about the consequences of adding unknown addons. Press Yes to proceed.
Part 2: Install Doomzday Repo
Use the steps below to install Doomzday Repo on your Kodi app:
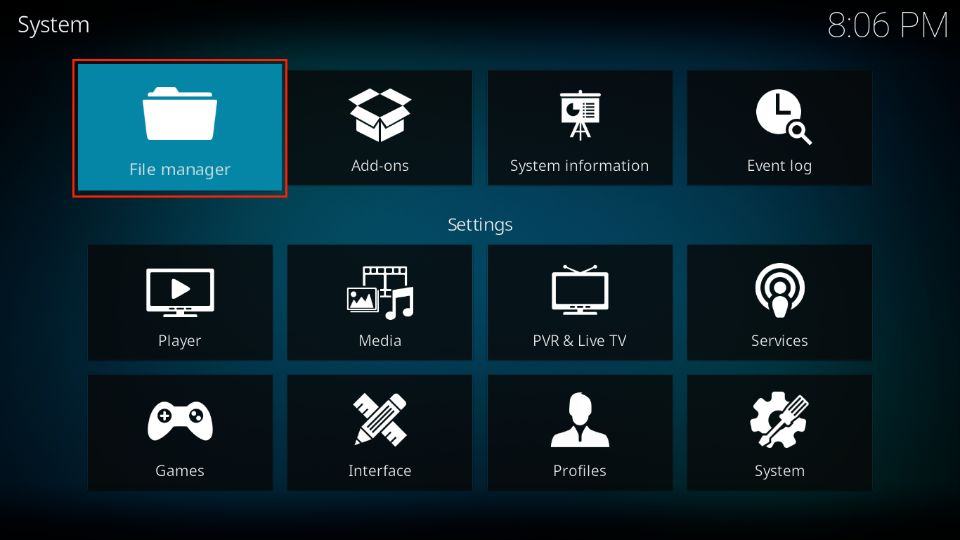
1. Under the Kodi logo on the home, hit Settings Cog Gear.
2. On Kodi settings, press File manager on your top left.
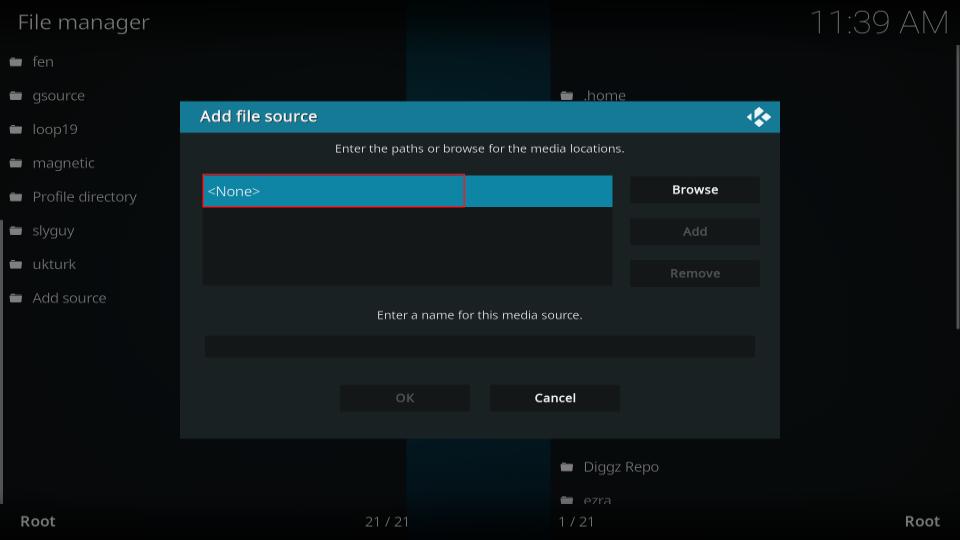
3. To access Add file source, select Add source.
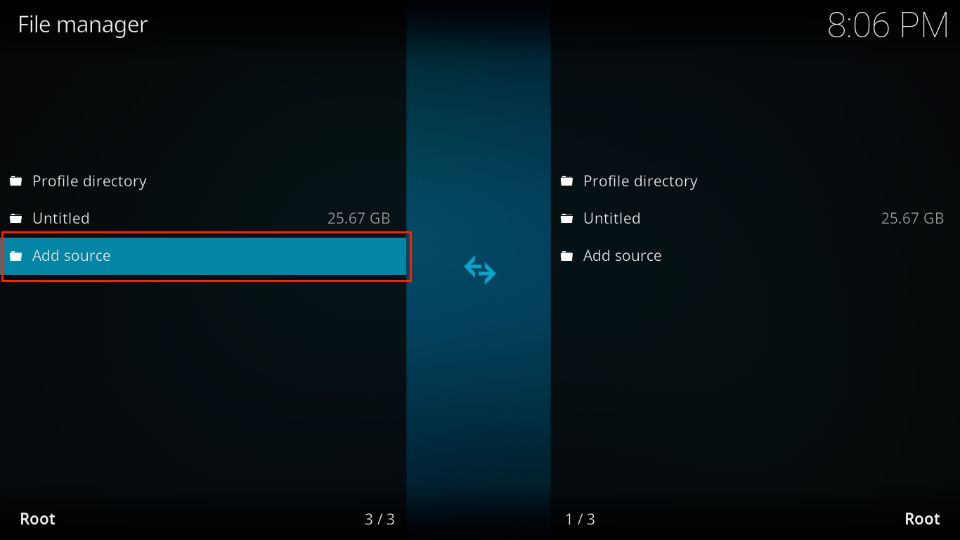
4. On the new window, under Enter the paths or browse… open <None>.
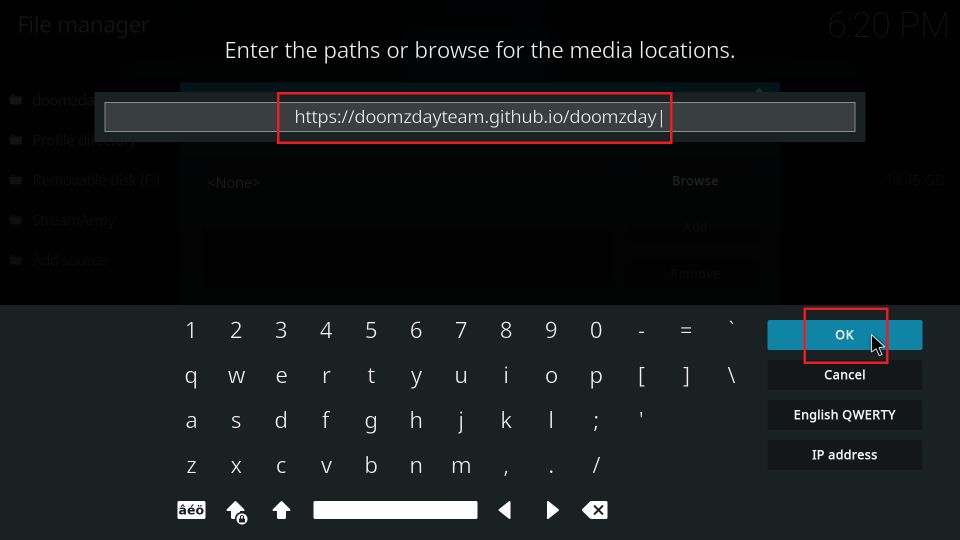
5. Enter https://doomzdayteam.github.io/doomzday. Then, hit OK.
Note: The above URL is the official site to access the Doomzday Repo zip file. At FSH, we don’t promote third-party repos/addons. That said, I have added the URL for educational purposes only.
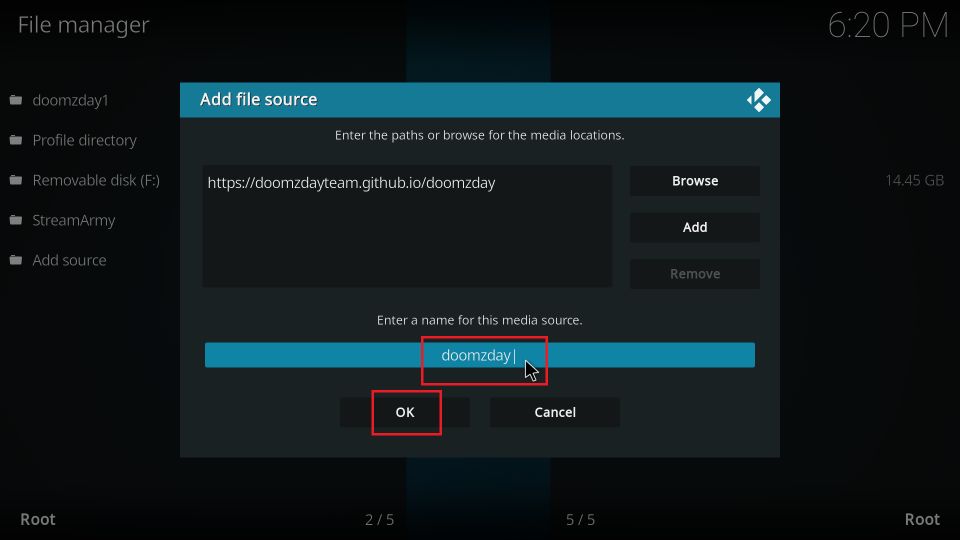
6. The source will be given a default name, doomzday. To save everything, press OK.
Note: To change the default name, select the name to open the edit window. Then, clear the alias, set a new keyword, and press OK. But make sure to pick a simple name to recall it easily.
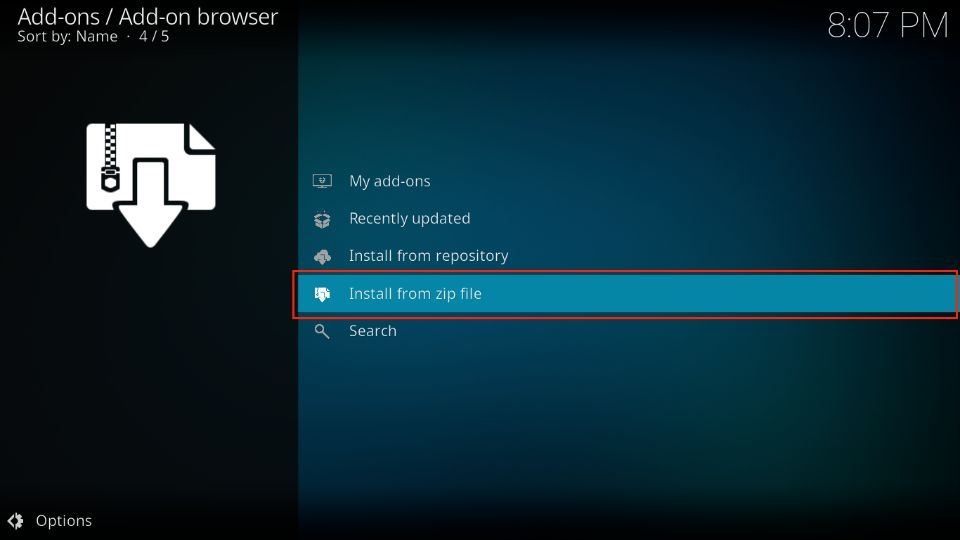
7. Return where you saw a bunch of Kodi settings tiles. After that, choose Add-ons.
8. From the available options, choose Install from zip file to access the Doomzday Repo zip file.
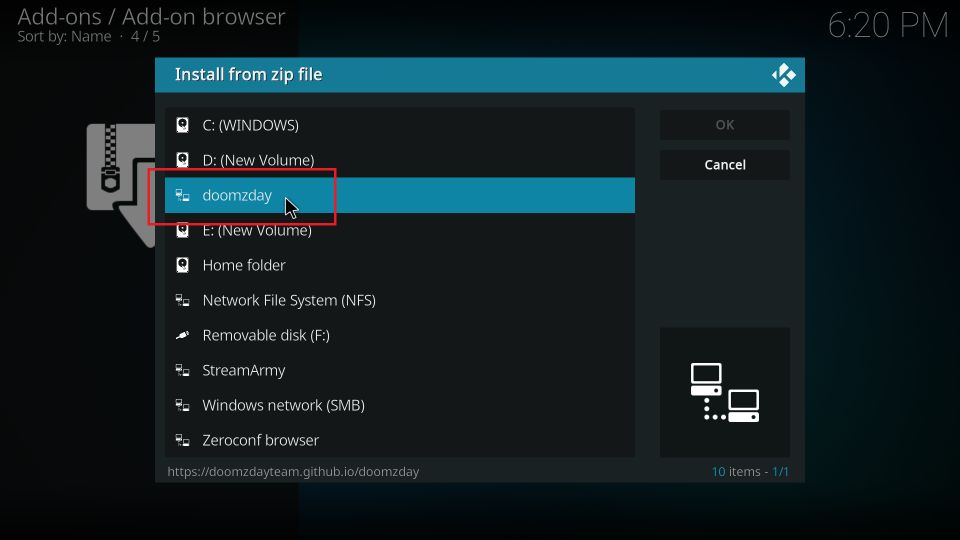
9. Locate and select the repo name from the list you have set in step number 6. For me, it’s doozmday.
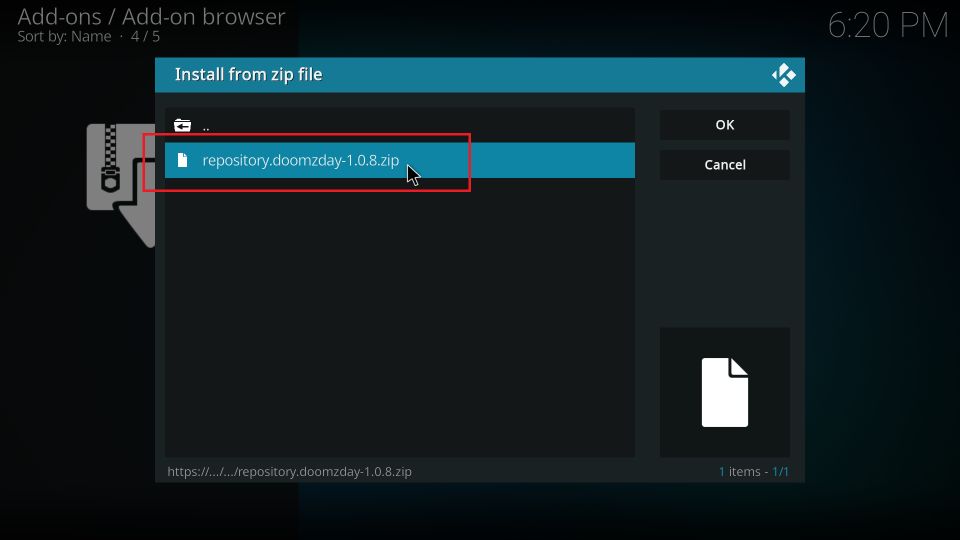
10. Open repository.doomzday-x.x.x.zip.
Note: When demonstrating, the repo version of Doomzday was 1.1.0. However, it may change when you are accessing it.
11. On the completion of installation, a message will come forward – Doomzday Repo Add-on installed.

Now, you can access all the addons available on the Doomzday Repo.
Part 3: How to Install Fetch Addon
Finally, here’s how to load Fetch using the Doomzday Repo:
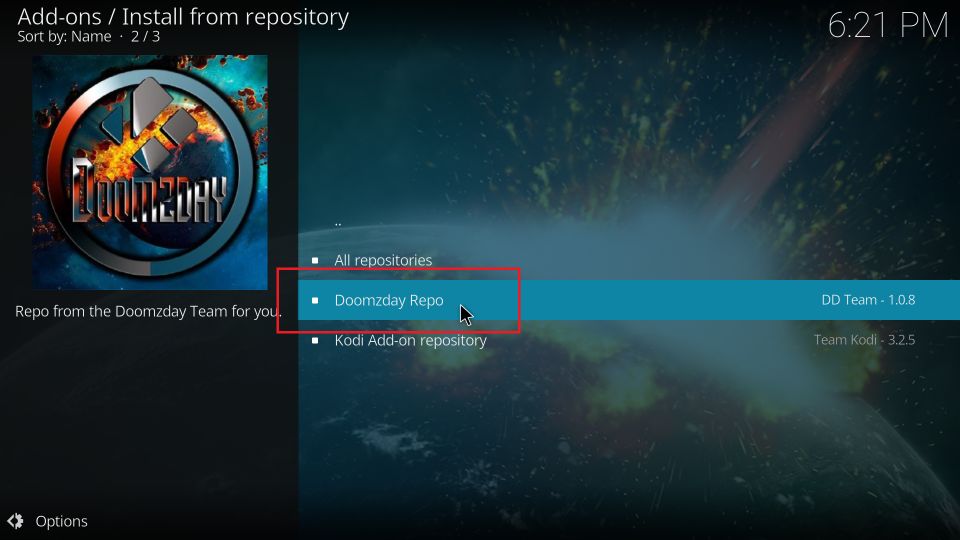
1. On the Add-ons browser menu, choose Install from repository to access Doomzday Repo.

2. Open Doomzday Repo.
3. From three available sections, choose the last one, Video add-ons.
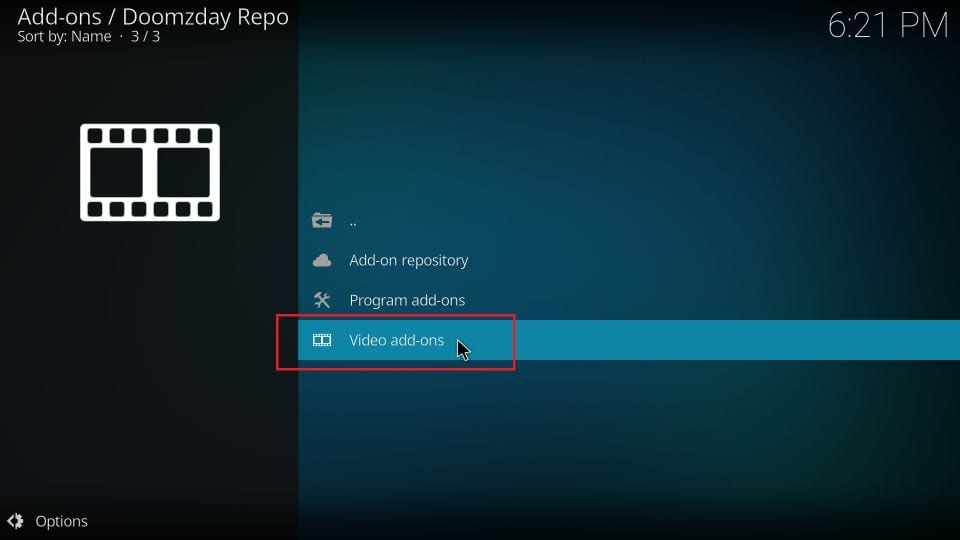
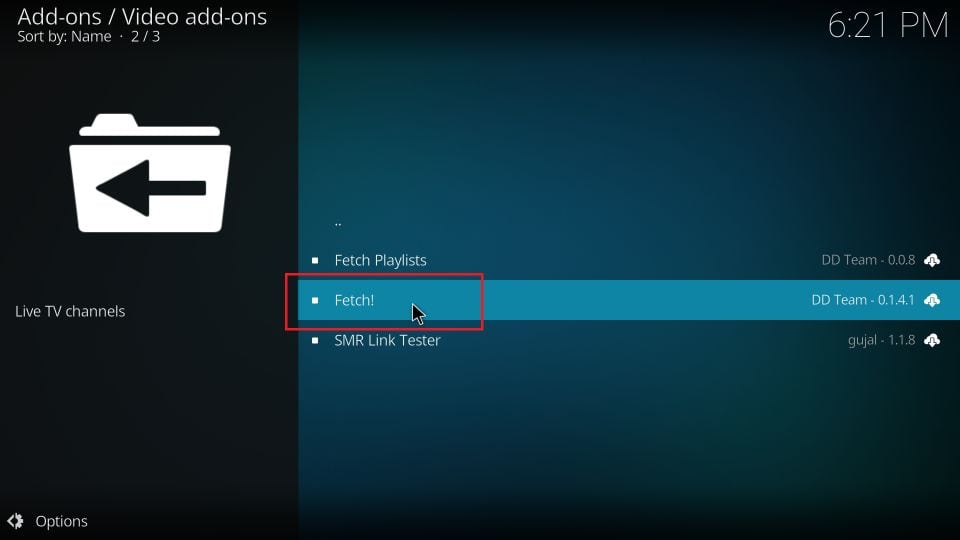
4. Open Fetch!
Note: Don’t open Fetch Playlists.
5. You’ll see info regarding Fetch, like its Category, Origin, Description, and more. Select Install.
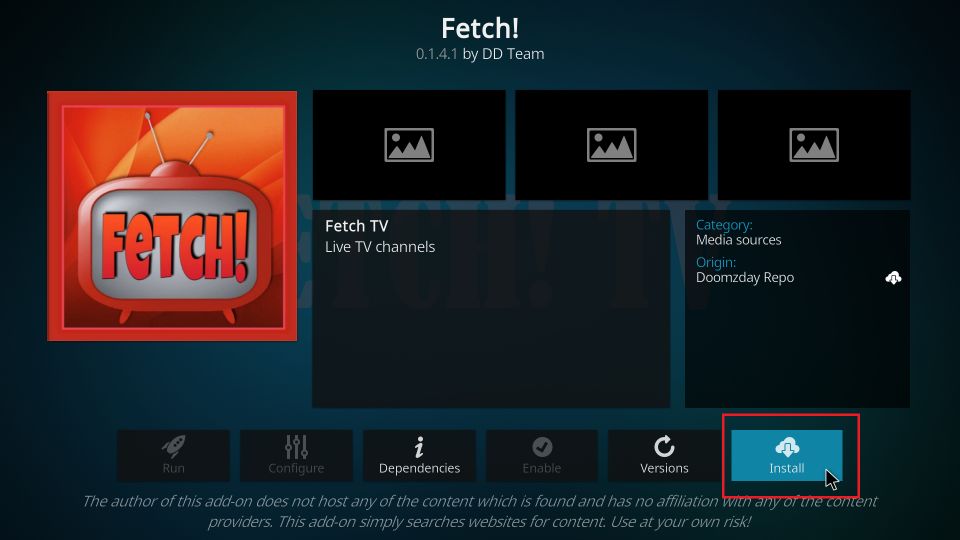
6. Finally, a notification will pop up on your screen’s top right – Fetch! Add-on installed.

Hurray! The Fetch addon is now installed on your Kodi app.
Wait! It looks like you are all set to start watching your favorite content on Kodi. But have you protected your online identity yet? You are under constant surveillance by the Government and ISP. They use your IP address 35.175.39.36 to track you. Streaming free or copyrighted videos may get you into legal trouble.
Thankfully, you can use a VPN to easily protect your privacy and go invisible from your Government and ISP. I use and recommend ExpressVPN with Kodi.
ExpressVPN is the fastest, most secure, and streaming-friendly VPN. It is easy to install and set up on any Kodi device, including FireStick, Smartphones, PCs, and more.
ExpressVPN, offers an unconditional 30-day money-back guarantee. So, if you do not like the service (I don't see why), you can get a full refund within 30 days.
Please remember that we encourage you to use a VPN to maintain your privacy. However, we do not condone breaking copyright laws.
Before you start using Kodi for streaming, here is how you can protect yourself with ExpressVPN:
Step 1: Sign up for ExpressVPN Here
Step 2: Download ExpressVPN on your device by clicking HERE
Step 3: Open the ExpressVPN app on your device. Sign in with your account. Click the connect/power button to connect to the VPN
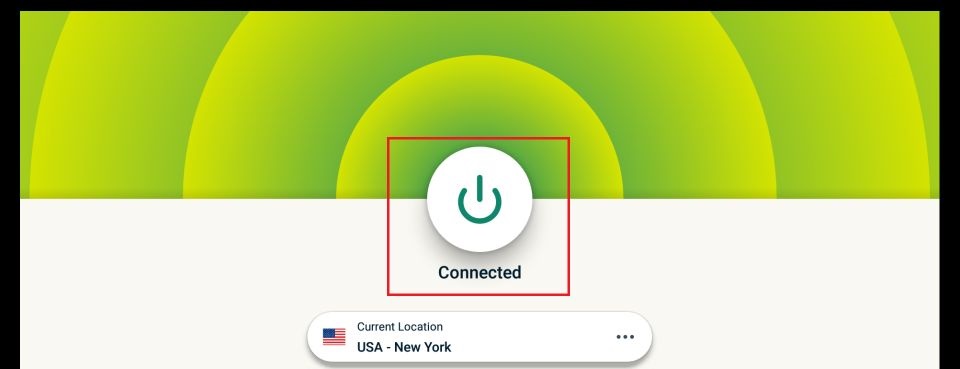
Great! You have successfully secured yourself with the best Kodi VPN.
How to Use Fetch Kodi Addon
Excited to see what’s featured inside Fetch? Well, you can take a look at it by following this walkthrough:
To access Fetch, open the Add-ons tab on the Kodi app’s home page. While you are on Video add-ons, open Fetch!

On Fetch welcome screen, you’ll see several different sections (as shown in the image below).
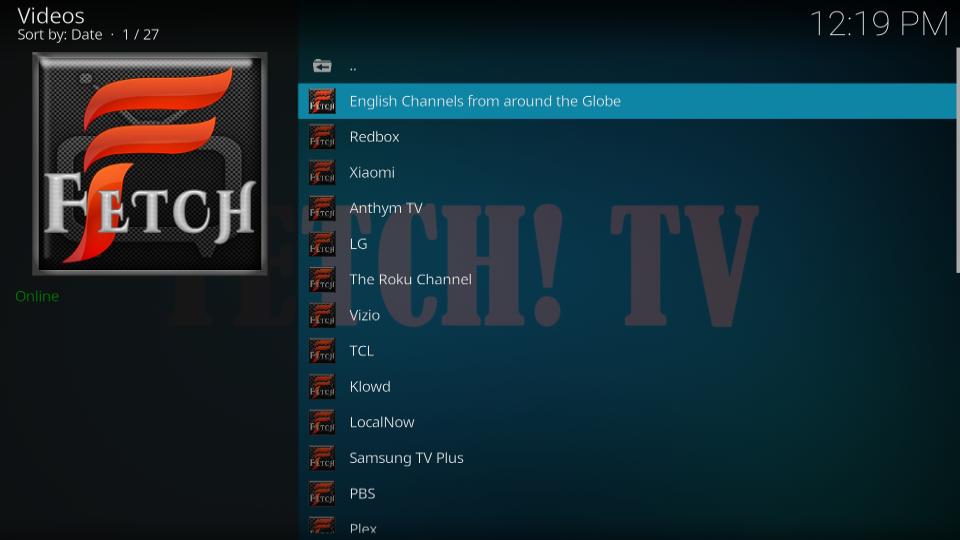
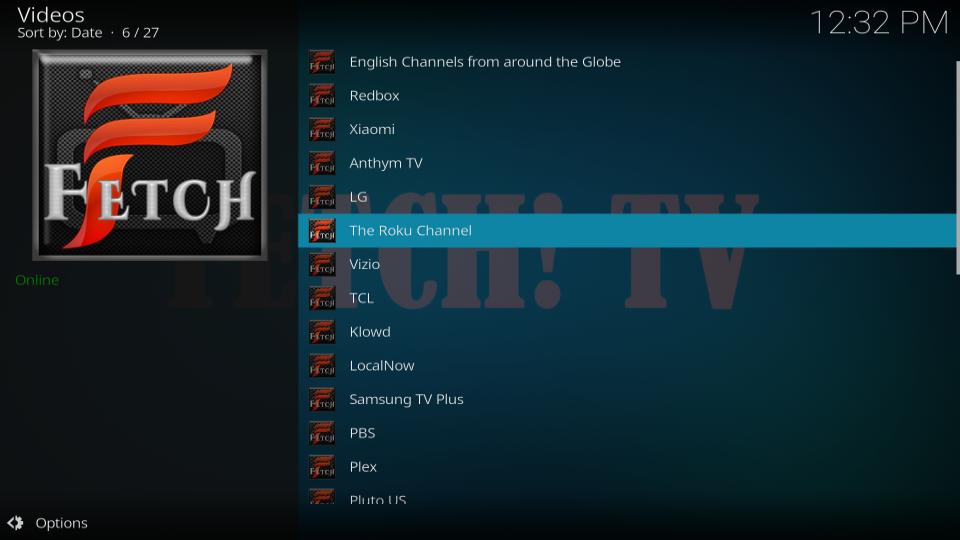
To watch Roku Channels, select The Roku Channel
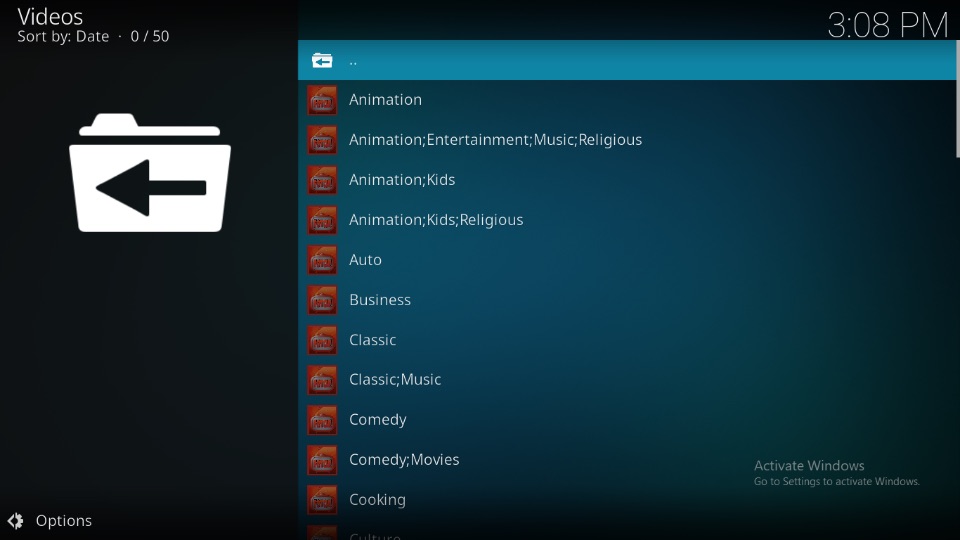
This section feature 50 categories of channels like Animation, Auto, Business, Classic, Comedy, Cooking, etc.
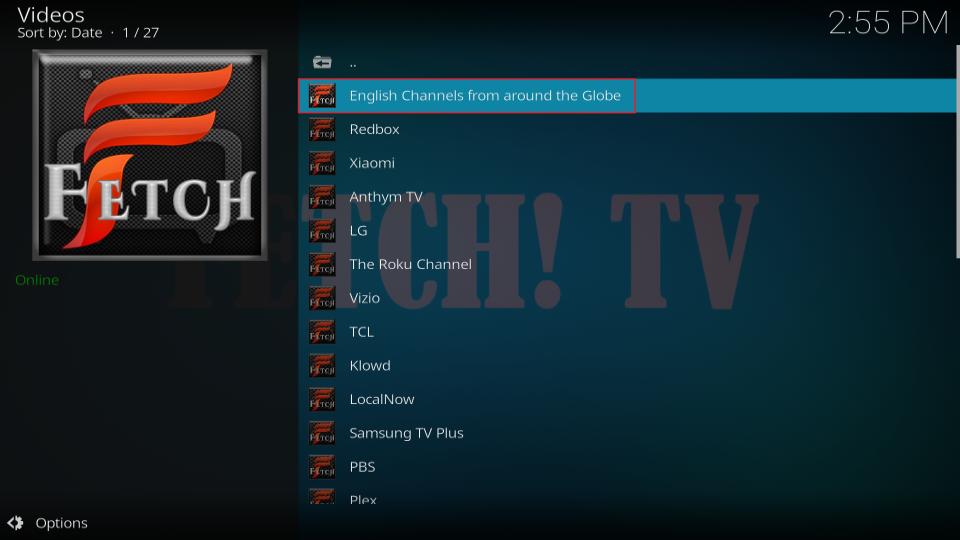
There’s another main tab of Fetch, English Channels, that only contains channels that are in the English language.
Similar to International Channels, this section features 42 categories of live TV channels, including Culture, Cooking, Auto, and more.

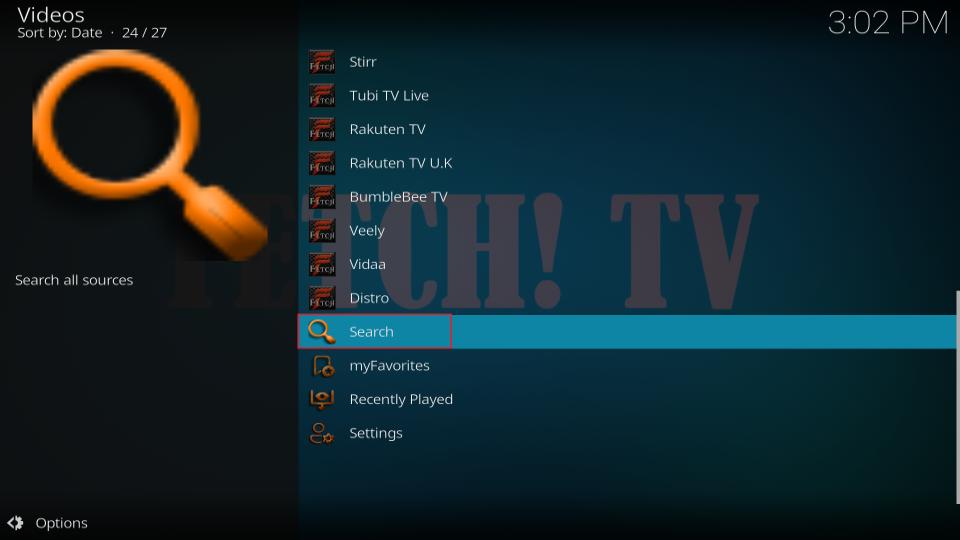
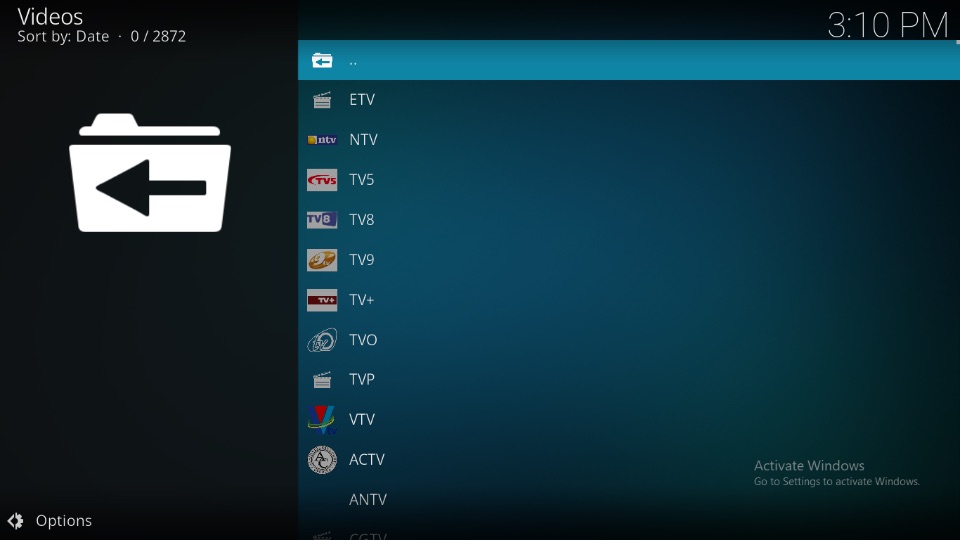
If you want to find a channel on Fetch, select Search on the addon’s home page.
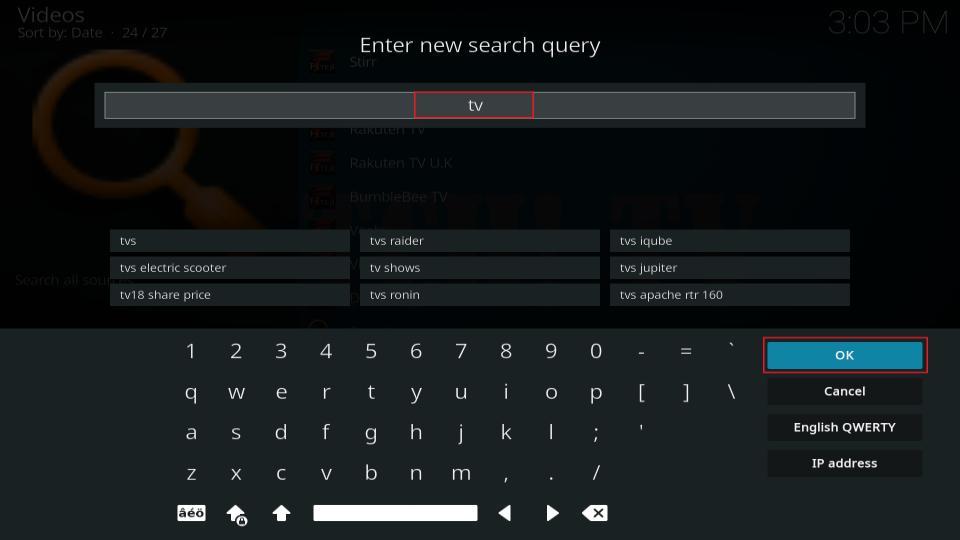
Then, enter your search terms and click OK.
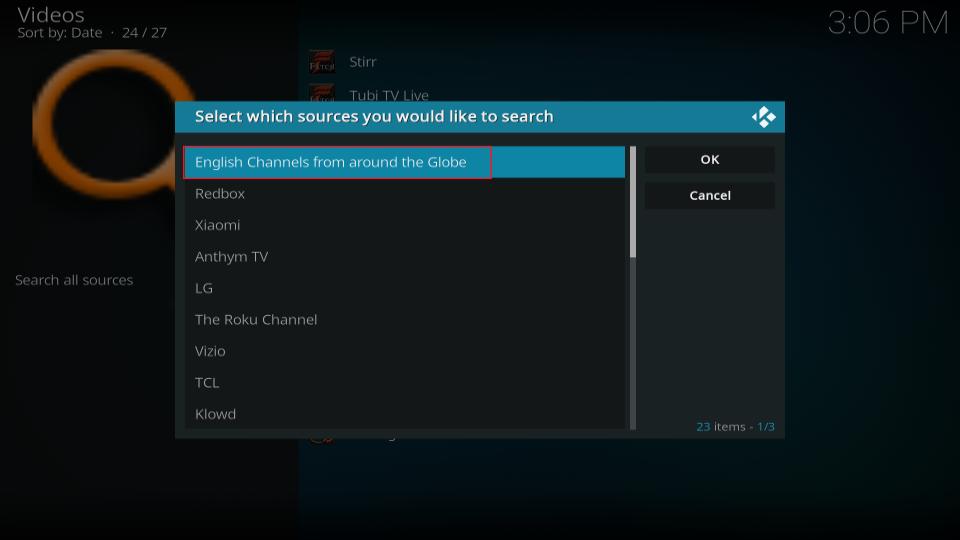
Next, choose which source you would like to select, English Channels across the globe.
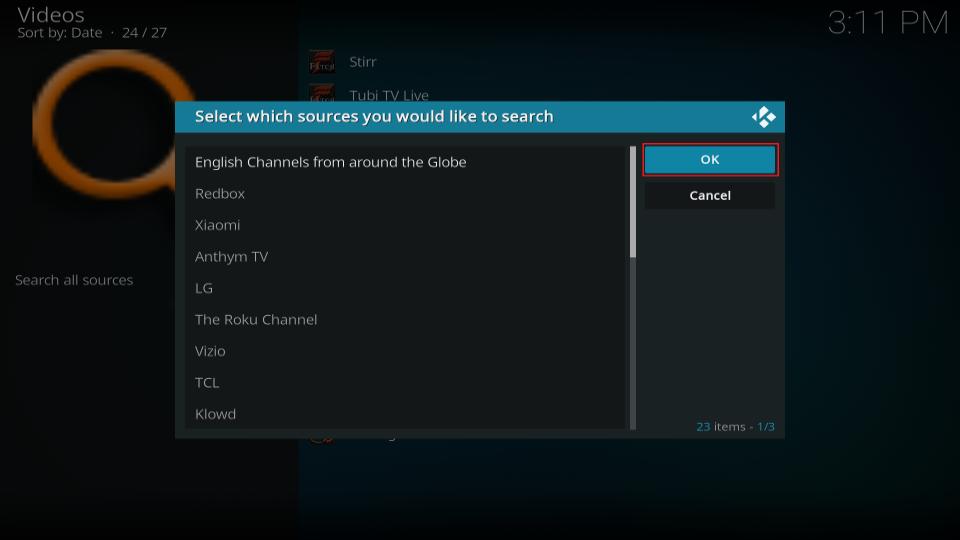
Pick one and click OK.
As I searched for TV, I got a list containing 2,872 channels containing the term TV.
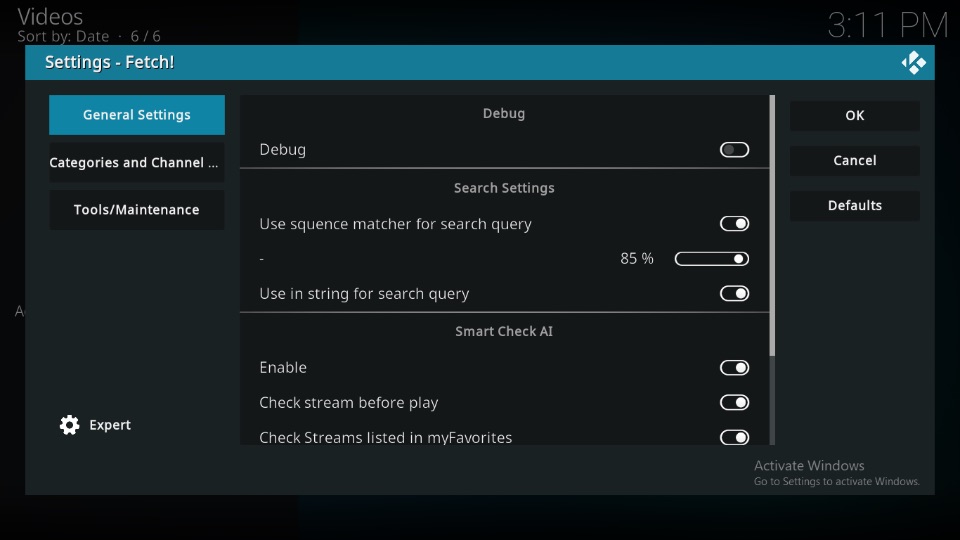
To customize Fetch, open Settings.
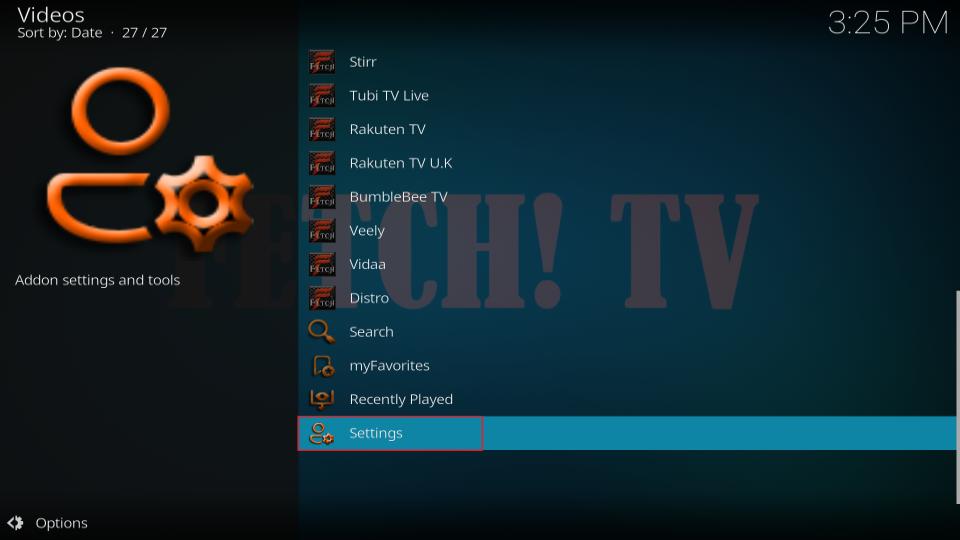
Here, you’ll see three tabs, General Settings, Categories and Channels, and Tools/Maintenace.
To access the channels you have saved, open myFavorites. And lastly, open Recently Played to see your watch history.
Conclusion
Cooking, films, news, sports, and you name it, Fetch lets you stream all types of channels for free! In this guide, I shared how to install Fetch Kodi addon. If you want me to cover other addons, please comment below.
Related:
Leave a Reply