The following guide will provide you a detailed process to install the Loki Addon on Kodi. The steps mentioned below work on Kodi 18.1 and 18.0. You can follow the steps to install Loki Addon on Kodi irrespective of the device you are using. Whether you are using Kodi on Fire Stick, Windows PC, Mac, Android mobile phones, Android TVs, etc., the steps remain the same.
So, what is Loki Addon? The Loki Addon on Kodi provides a large database of Movies and TV shows. Along with the large database of movies and shows, the fast sources to stream the content work as icing on the cake.
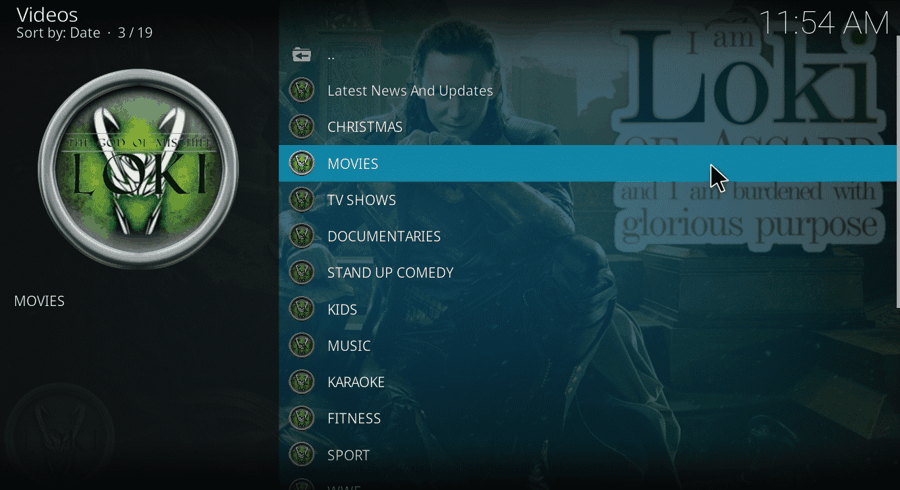
The Loki Addon on Kodi provides its content to you in various categories and sub-categories. This makes it really easy to find a movie or a TV show on this addon. Among the main categories, you will find Movies, TV Shows, Documentaries, Stand Up Comedy, Kids, Music, Sports, WWE, and more. In the Movies category, you can look for movies under sub-categories such as New Releases, 3D Movies, Horror, Popular, or you can even search for a movie by typing its name. The TV Shows subcategories let you browse shows based on Popularity, Airing Today, Genres, and more.
If you have a Real Debrid account, you can integrate it with the Loki Kodi addon for this addon to work smooth. If not, you can pair Loki Addon for Kodi with download sites such as Openload, Flashx, Vevio, Videoshare, etc. Setting these up is easy and I will let you know about the same later in this guide.
Attention KODI Users: Read before you continue
Government and ISPs endlessly monitor your online activities using your IP address 35.175.39.36 (exposed to everyone). Kodi is an excellent platform for streaming movies, TV shows, and sports, but streaming copyrighted content can get you into legal trouble.
You should use a reliable Kodi VPN and protect your streaming activities and privacy. A VPN will hide your IP address and bypass government surveillance and geo-restrictions.
I trust and use ExpressVPN, the fastest and most secure Kodi VPN. It's easy to install on any Kodi device, including Amazon FireStick, PCs, and Smartphones. In addition, it offers a 30-day money-back guarantee, and 3 free months with the annual plan.
Read: How to Install & Use the best VPN for Kodi.
Let us see know how to install Loki Addon on Kodi in the section below.
Steps To Install Loki Addon on Kodi
To install the Loki Addon on Kodi, you just need to follow the simple steps given below. These steps need to be followed carefully. The installation is divided into 3 parts for your convenience. And the screenshots provided with the steps will make things, even more, easier for you. Let us begin:
Part 1: Enabling Addon installation from Unknown Resource
Part 2: Adding Kodi UK Repository path to Kodi
Part 3: Installing the KodiUK Repository and the Loki Addon on Kodi
Part 1: Enabling Addon installation from Unknown Resource
If you try to install an add-on from unknown sources or a third party, Kodi will restrict the action by default. Loki addon is installed on Kodi from a third party resource, therefore you will need to enable Addon installation from Unknown Resource first. Here are the steps:
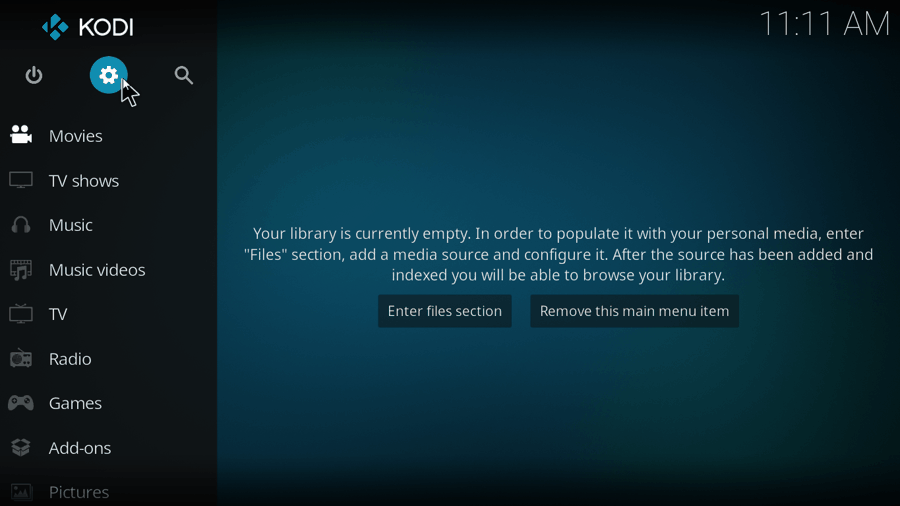
Step 1: On the Kodi main page, click on the Settings icon (gear icon) present at the top of the left panel.
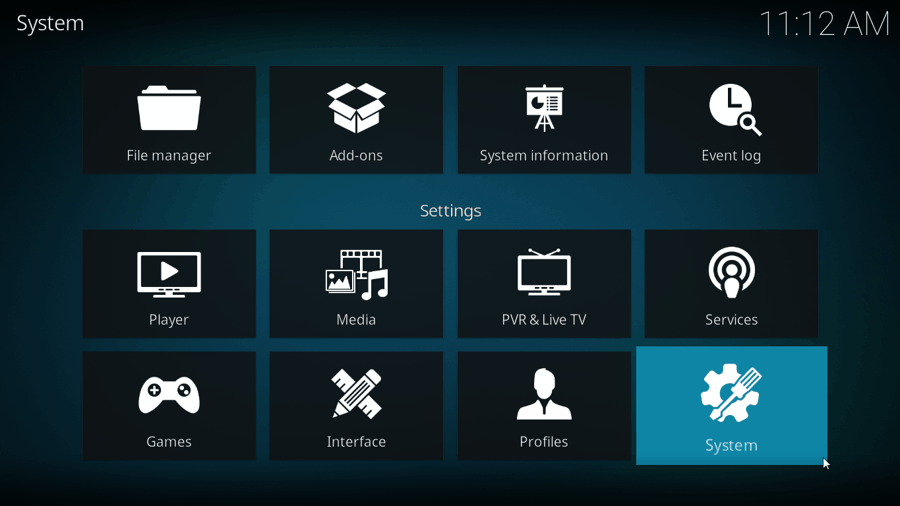
Step 2: In the Settings page, scroll down and open the System icon available at the bottom right part.
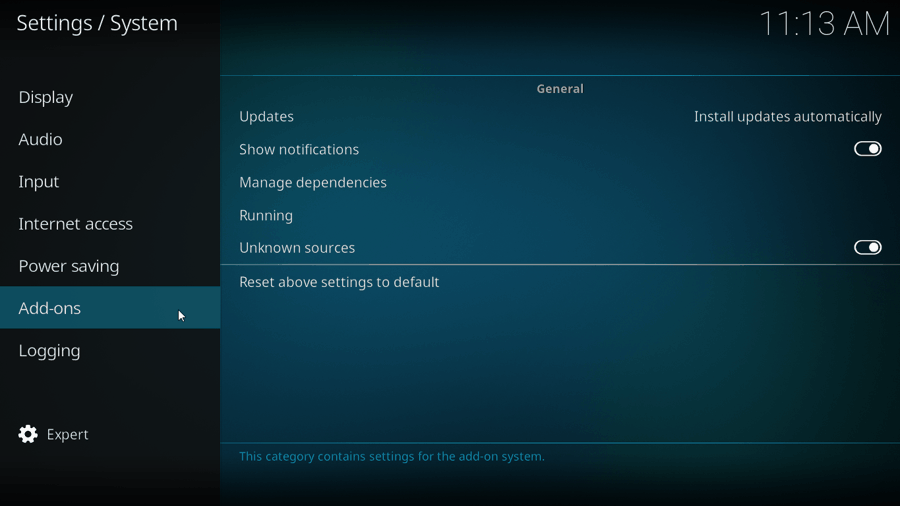
Step 3: From the left panel, select the Add-ons option.
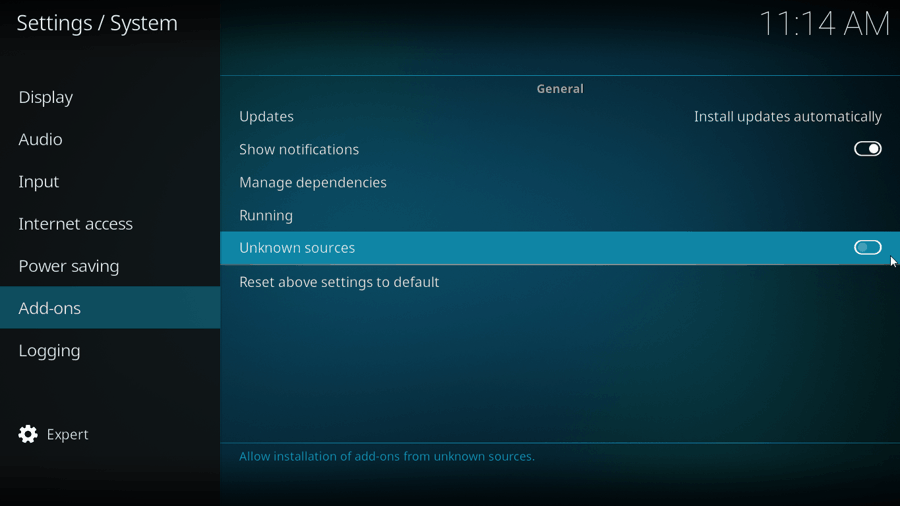
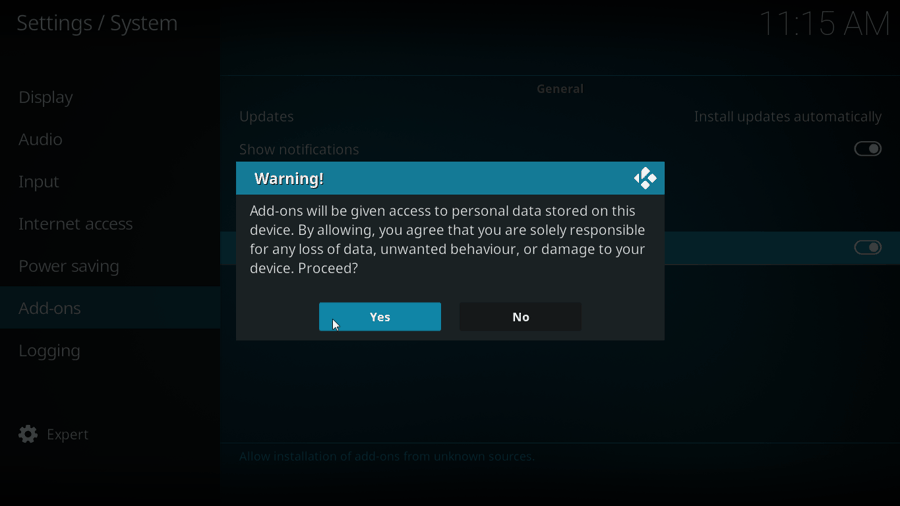
Step 4: On the right panel, add-ons settings will open. Select the Unknown Sources Toggle switch to turn it On. The toggle switch is turned off by default in Kodi.
Step 5: A pop-up will show up where you will be prompted about what happens when you turn on add-on installation from Unknown Sources. Click on Yes.
Note: Loki Addon is safe to use as we have tested it on our systems. You can enable the installation for Loki and disable it again after the installation process if you want to keep it safe.
Part 2: Adding Kodi UK Repository path to Kodi
The Kodi UK Repository is the place from where you will get and install the Loki Addon on Kodi. You will need to add the Kodi UK repository via a URL in order to install Loki addon. Follow these steps:
Step 1: Open Settings option in Kodi like you did in Part 1 > Step 1.
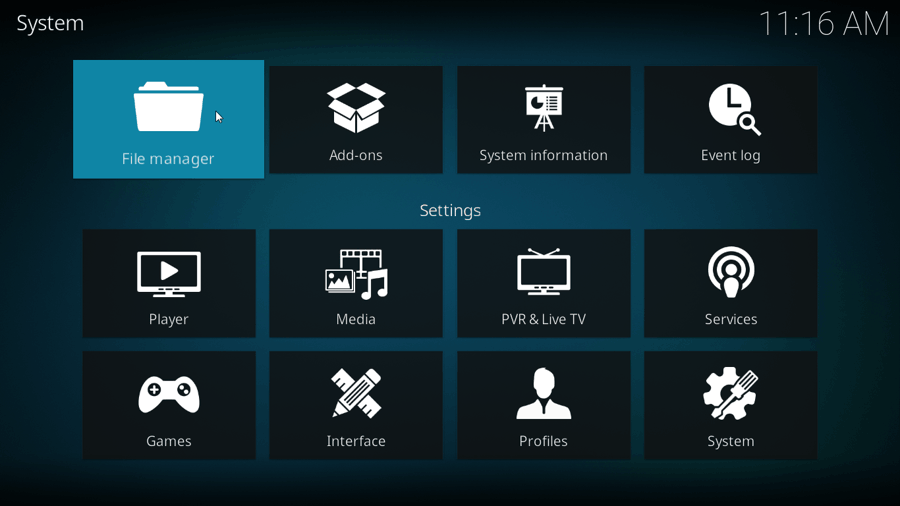
Step 2: From the Settings menu, select the File Manager option.
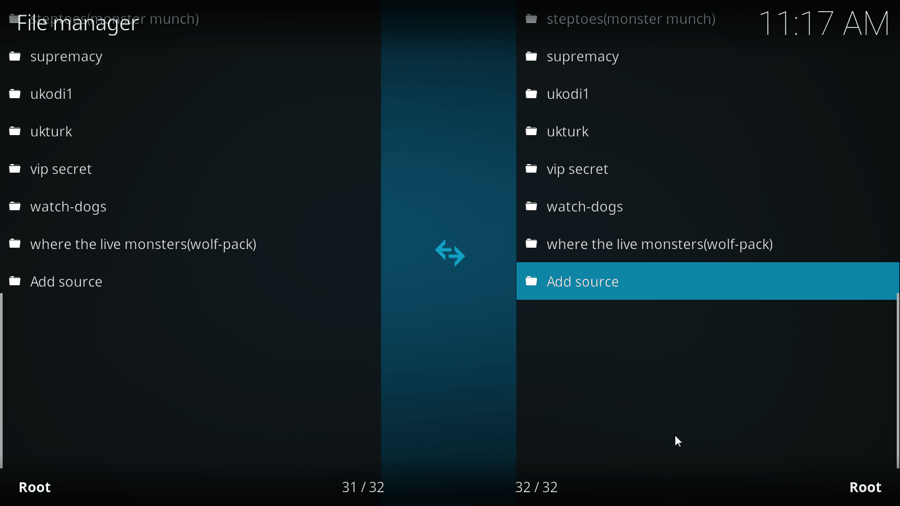
Step 3: From the next screen, click on the Add Source option.
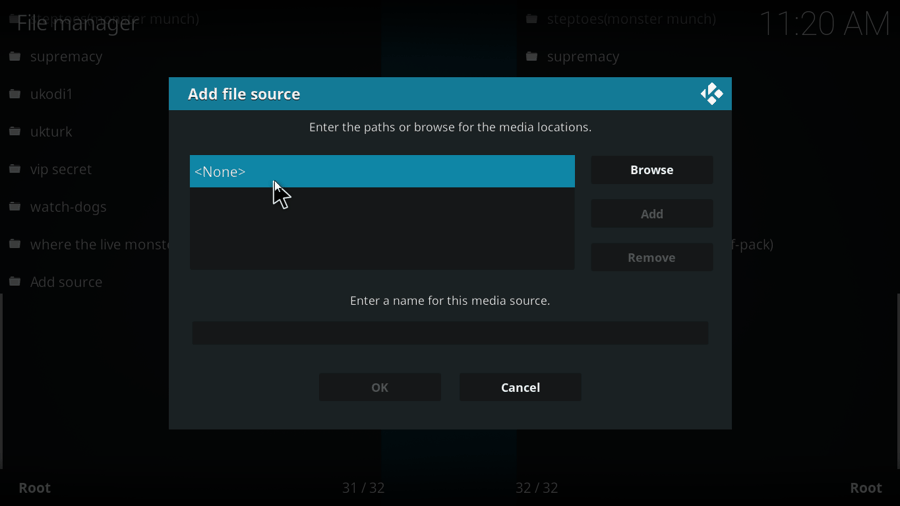
Step 4: A window will pop-up where you will need to click on the <None> option.
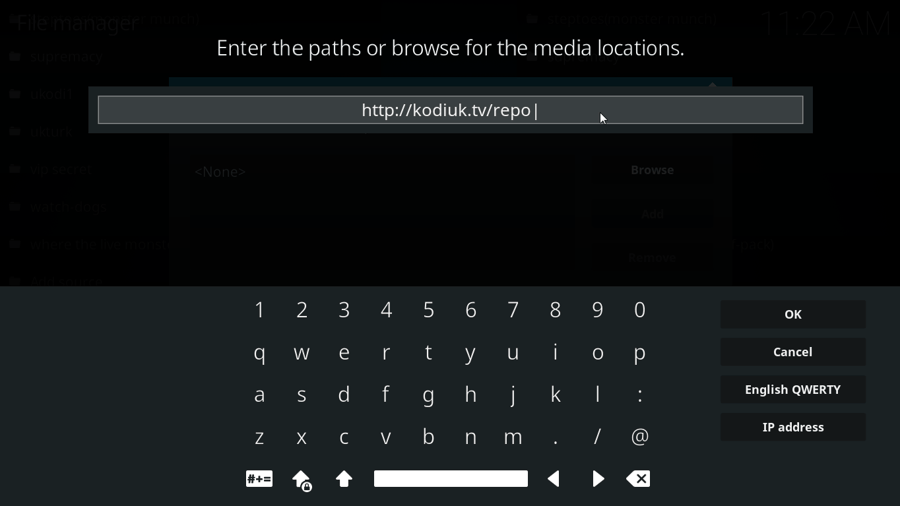
Step 5: A space to enter URL will open up. There, enter the following URL exactly as following: http://kodiuk.tv/repo
Then, click on Ok.
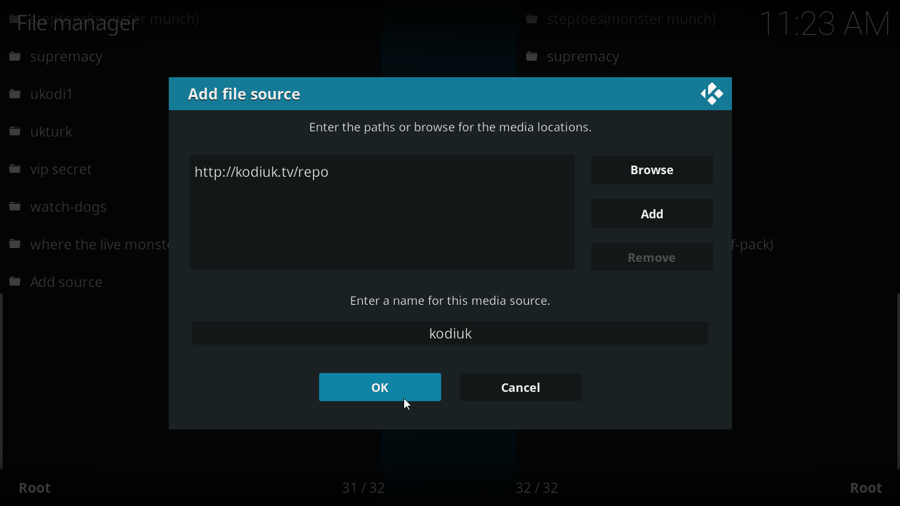
Step 6: In this step, you will need to enter a name for the media source you are installing through the URL in the previous step. You can name it as kodiuk.
When done, click on Ok.
This ends Part 2, which is adding the Kodi UK repository/media source to Kodi.
Part 3: Installing the KodiUK Repository and the Loki Addon on Kodi
Once you add the Kodi UK repository, you will now need to install it on Kodi. Once done, you may proceed to install the Loki Addon on Kodi. Here are the steps:
Step 1: Go to the main page of Kodi. There, on the left panel, select the Setting option.
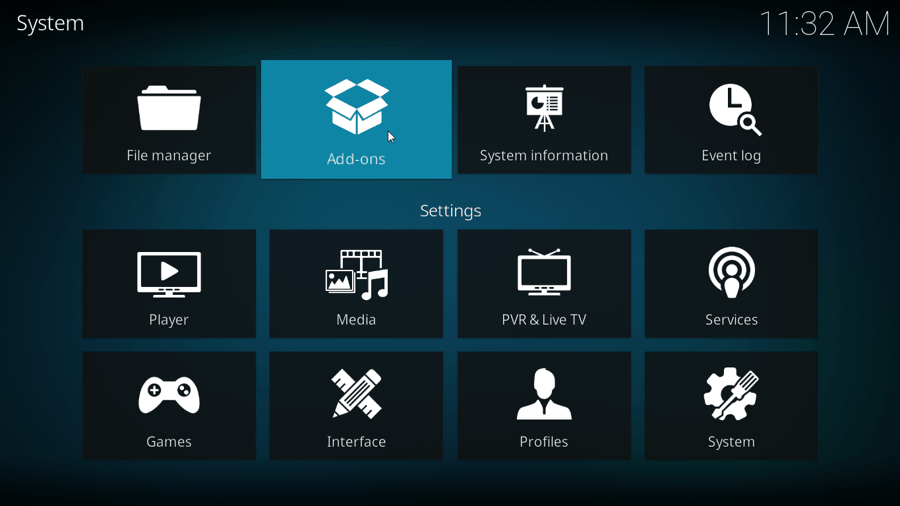
Step 2: In the next screen, select the Add-ons option from the Settings menu.
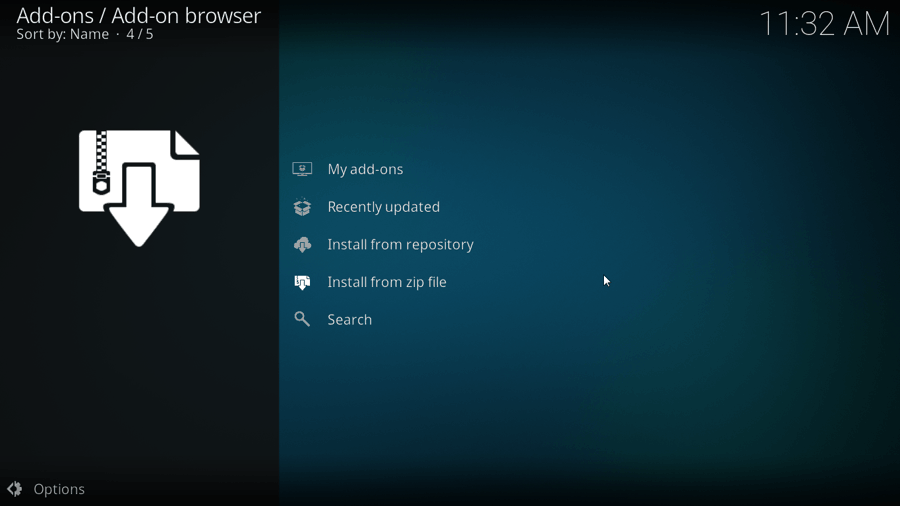
Step 3: Now, click on the Install from zip file option.
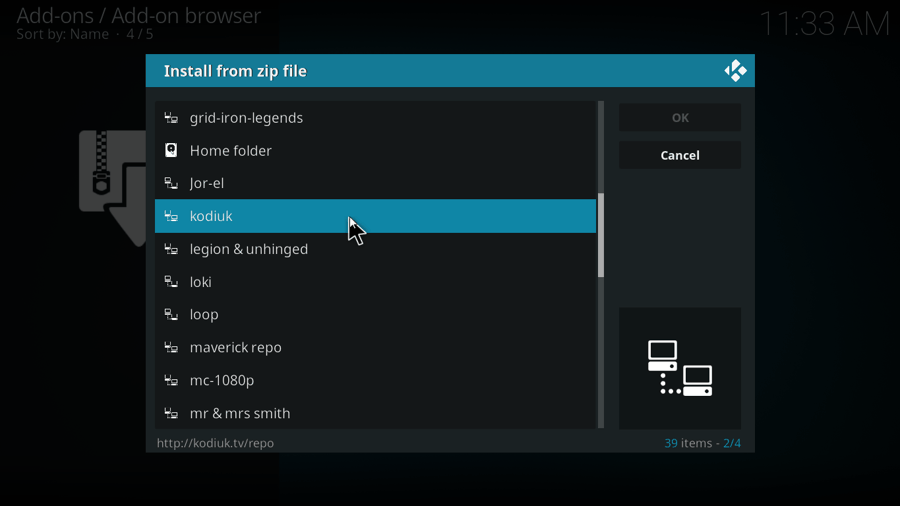
Step 4: A pop-up window will open with the list of zip files available. Select the kodiuk package that you added to Kodi in Part 2.
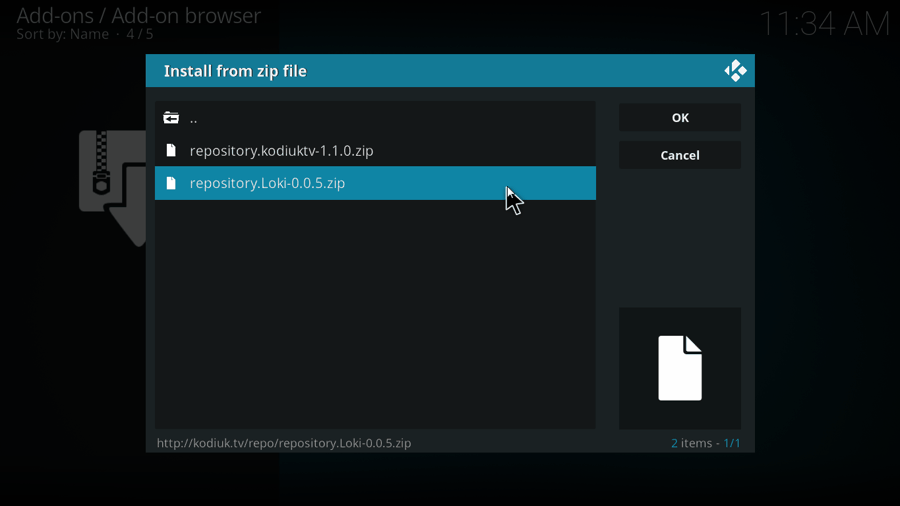
Step 5: From the next screen, select the repository.Loki-0.0.5.zip option, which is the Loki add-on package.
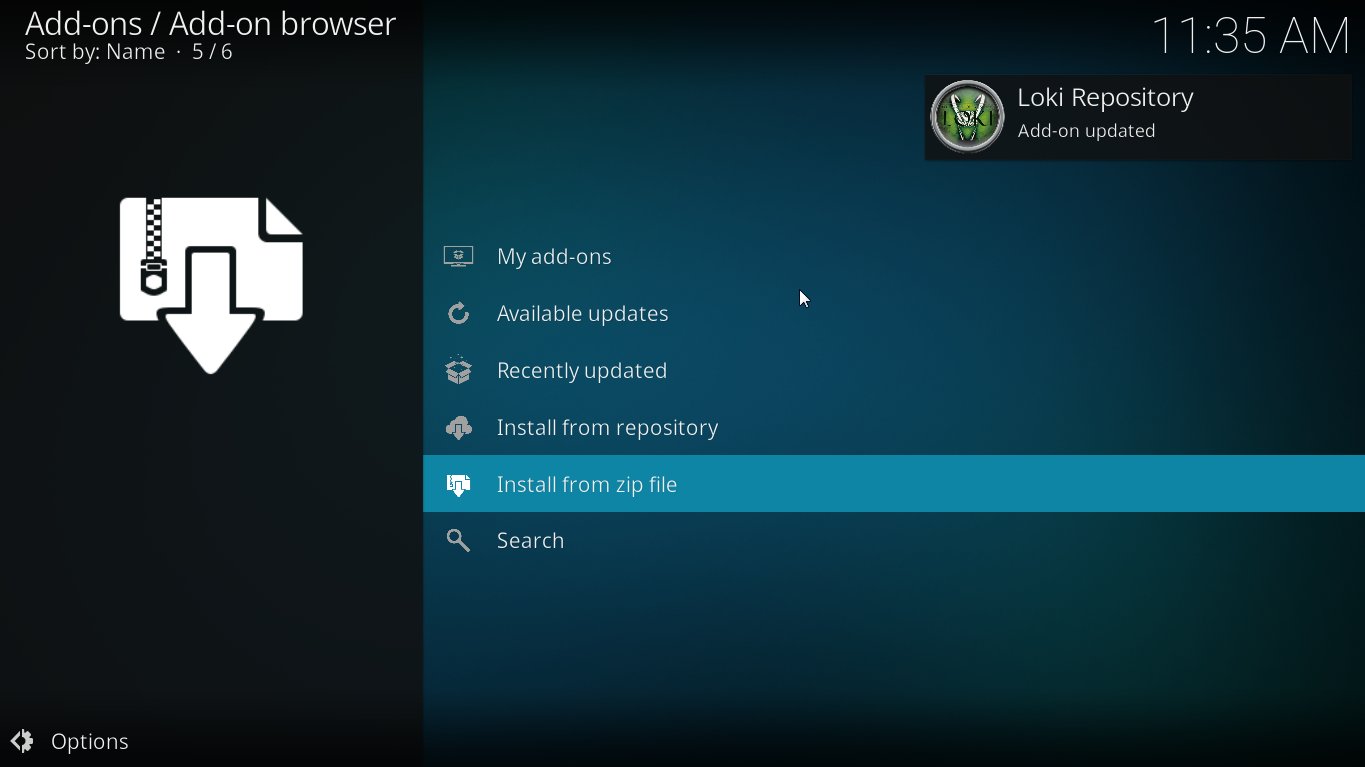
Step 6: The Loki Repository will be downloaded to your system. A prompt at the top right corner of the screen saying “Loki Repository Installed” will pop up when Loki Repository is installed.
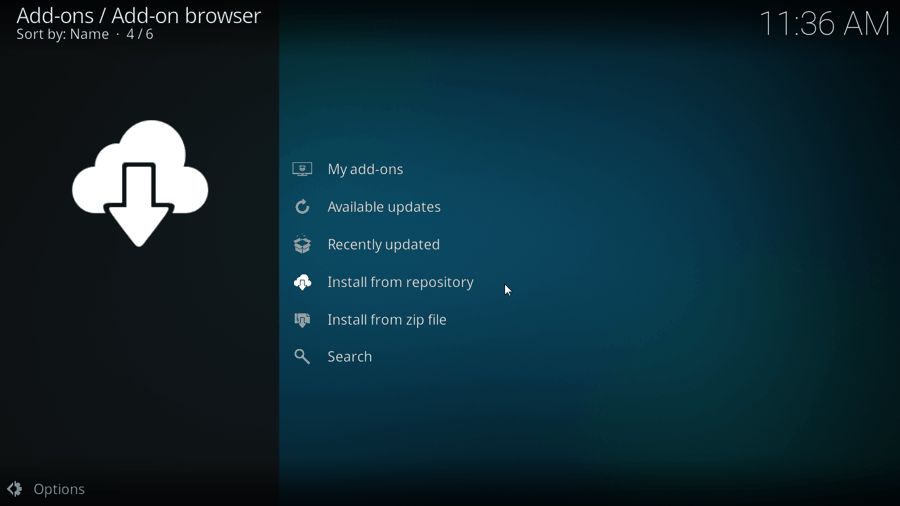
Step 7: Now, again go to the add-on settings page, where you will need to select the Install from repository option.
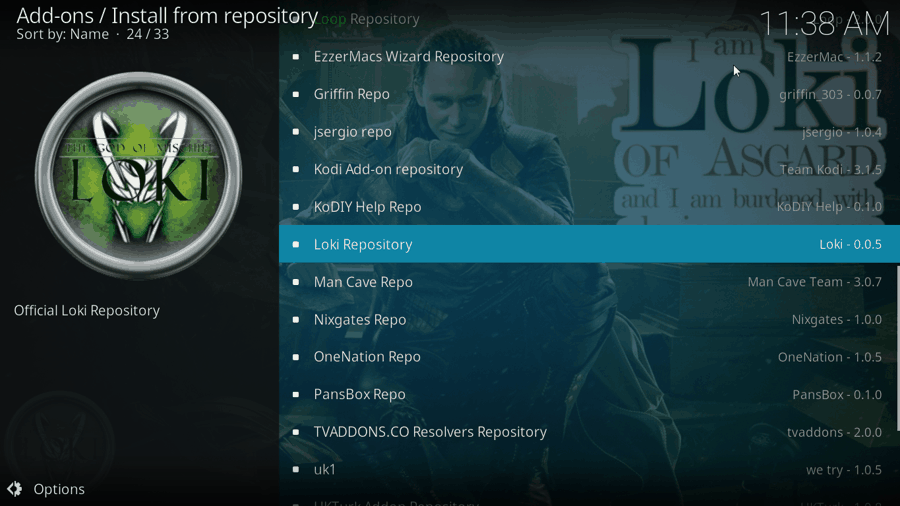
Step 8: In the next screen, select the Loki Repository option.
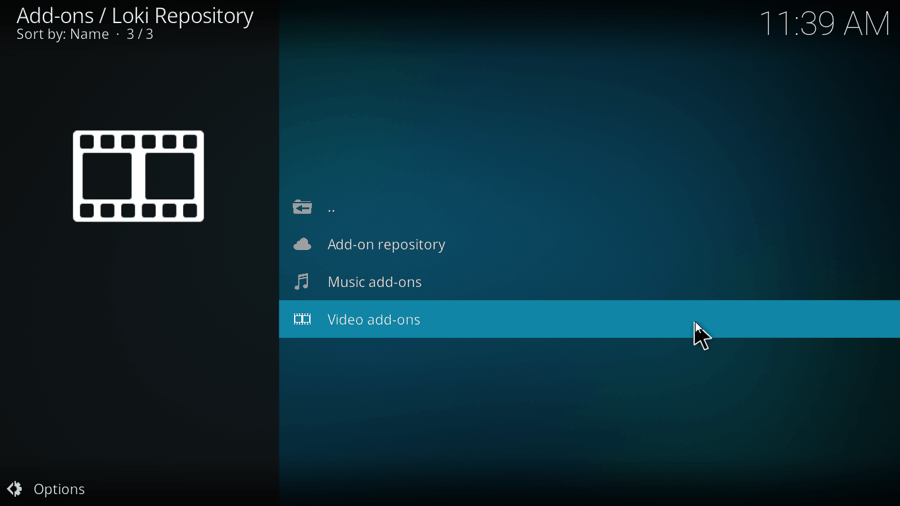
Step 9: Now, select the Video add-ons option from the next screen.
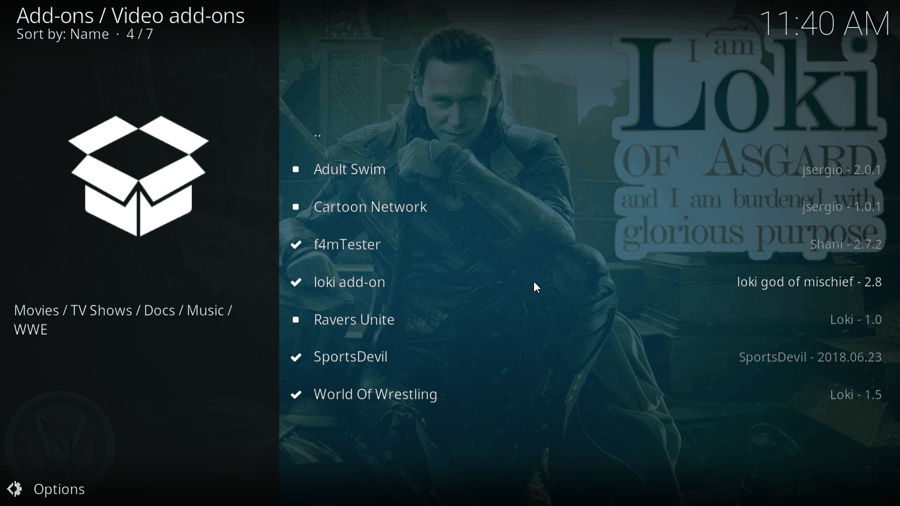
Step 10: Again from the next screen, select the Loki add-on option.
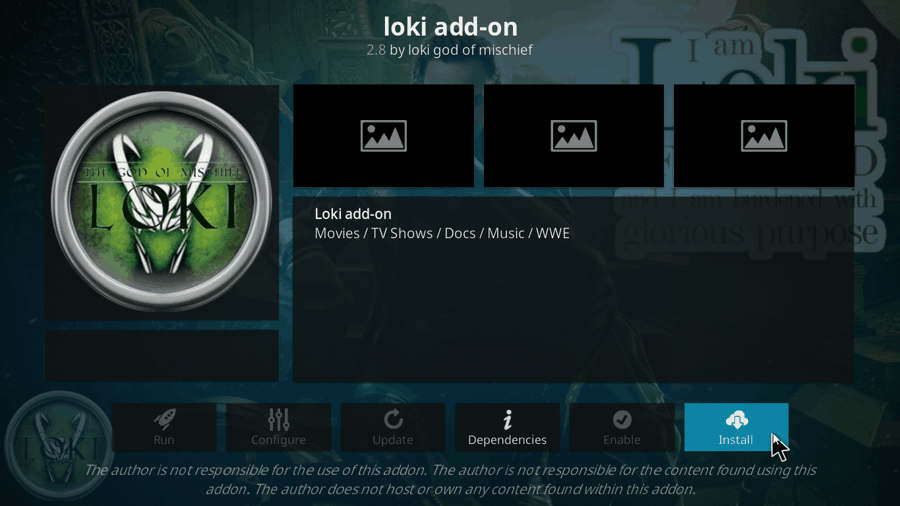
Step 11: The Loki Add-on page will open; click on the Install button.
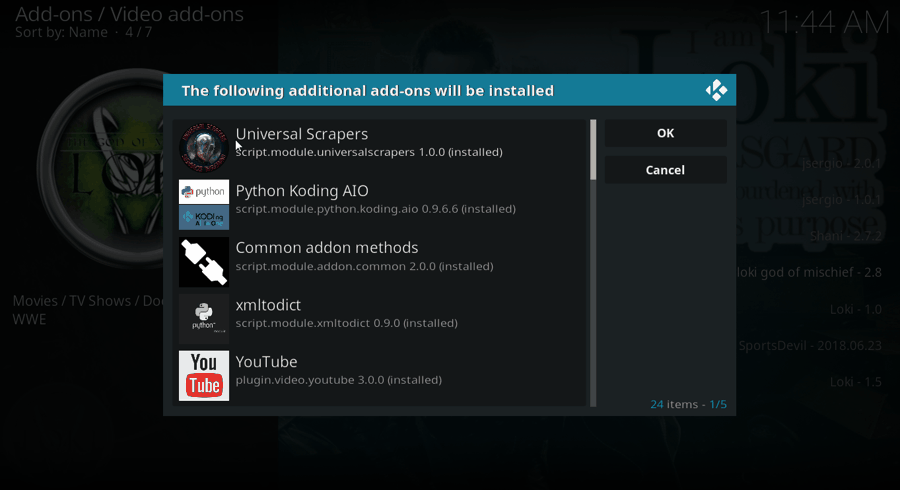
Step 12: Another pop-up will open, prompting you that certain additional add-ons will be installed. Click on Ok.
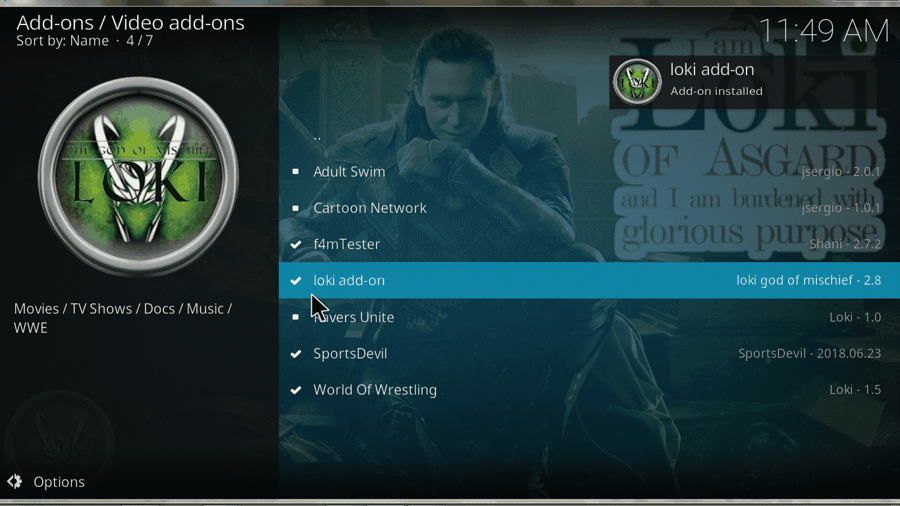
Step 13: Now wait till the Loki Addon is installed on Kodi. A notification at the top right corner will confirm so by showing the Loki Add-on installed message.
Once the Add-on is installed, you can visit the Add-on page to open the Loki addon and use it on Kodi.
Wait! It looks like you are all set to start watching your favorite content on Kodi. But have you protected your online identity yet? You are under constant surveillance by the Government and ISP. They use your IP address 35.175.39.36 to track you. Streaming free or copyrighted videos may get you into legal trouble.
Thankfully, you can use a VPN to easily protect your privacy and go invisible from your Government and ISP. I use and recommend ExpressVPN with Kodi.
ExpressVPN is the fastest, most secure, and streaming-friendly VPN. It is easy to install and set up on any Kodi device, including FireStick, Smartphones, PCs, and more.
ExpressVPN, offers an unconditional 30-day money-back guarantee. So, if you do not like the service (I don't see why), you can get a full refund within 30 days.
Please remember that we encourage you to use a VPN to maintain your privacy. However, we do not condone breaking copyright laws.
Before you start using Kodi for streaming, here is how you can protect yourself with ExpressVPN:
Step 1: Sign up for ExpressVPN Here
Step 2: Download ExpressVPN on your device by clicking HERE
Step 3: Open the ExpressVPN app on your device. Sign in with your account. Click the connect/power button to connect to the VPN
Great! You have successfully secured yourself with the best Kodi VPN.
Overview of Loki Add-on
As mentioned earlier, the Loki add-on has a large content database. It not only includes movies, but TV shows, Documentaries, Sports shows, WWE shows, UFC shows, and much more. The categories and sub-categories in Loki make it easier for users to search for a movie or any video easily. Integration and pairing options make this addon even more user-friendly.
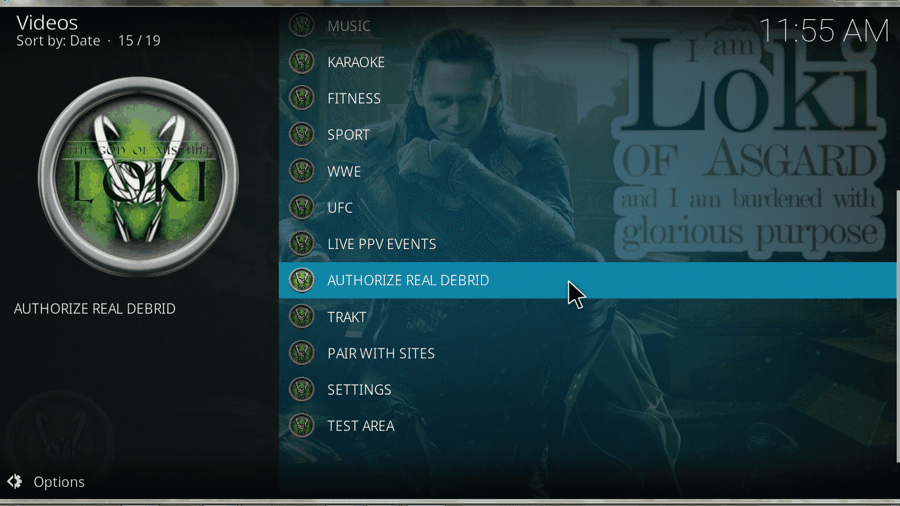
If you want to integrate your Real Debrid account with Loki add-on on Kodi, you can do so easily. Simply open the Loki Add-on from the Add-on page. When the add-on opens, scroll down to find the Authorize Real Debrid option and select it. A pop-up will open up with a URL to open and a passcode. Open the URL on any device, then enter the passcode. The passcode expires in 120 seconds, so be quick.
In order to pair Loki with download sites, look for the Pair with sites option in the Loki add-on and select it. A pop up with options to pair with Openload, Flashx, Streamango, Vevio, Vidup, etc. will open. Select any of these sites to open the URL in your browser, where you will find the option to set up pairing.
Closing Words
The Loki add-on is a complete entertainment package with a vast database of movies, shows, documentaries, and other videos. The categorization and search options make this add-on even more worthwhile. All that comes with a nice looking Loki background.
We liked the overall Loki experience on Kodi. Make sure to let us know about your opinion about the add-on based on your experience.
You may also like:
How to install Nightwing Kodi Addon
How to install Seren Kodi Addon
How to install Gaia Kodi Addon
How to install Black Lightning Kodi Addon

Leave a Reply