The following guide will explain installing and using the Seren Kodi addon. It will also cover the unofficial addon’s top features and safety aspects. Moreover, you will also learn how to set up Real Debrid and install the Provider Package on Seren. The guide is valid for all Kodi-supported gadgets, including FireSticks, New FireStick 4K, New FireStick 4K Max, and Fire TVs.
What is Seren Addon?
Seren is a third-party Kodi addon available in the Nixgates repository. It’s an entertainment addon offering many movies and shows across various genres.
However, Seren differs slightly from other Kodi addons. It uses torrents to stream videos.
Seren works only with premium link providers, such as Real Debrid. Therefore, it offers better-quality video streams than most other third-party addons.
Attention KODI Users: Read before you continue
Government and ISPs endlessly monitor your online activities using your IP address 35.175.39.36 (exposed to everyone). Kodi is an excellent platform for streaming movies, TV shows, and sports, but streaming copyrighted content can get you into legal trouble.
You should use a reliable Kodi VPN and protect your streaming activities and privacy. A VPN will hide your IP address and bypass government surveillance and geo-restrictions.
I trust and use ExpressVPN, the fastest and most secure Kodi VPN. It's easy to install on any Kodi device, including Amazon FireStick, PCs, and Smartphones. In addition, it offers a 30-day money-back guarantee, and 3 free months with the annual plan.
Read: How to Install & Use the best VPN for Kodi.
Is Seren Safe?
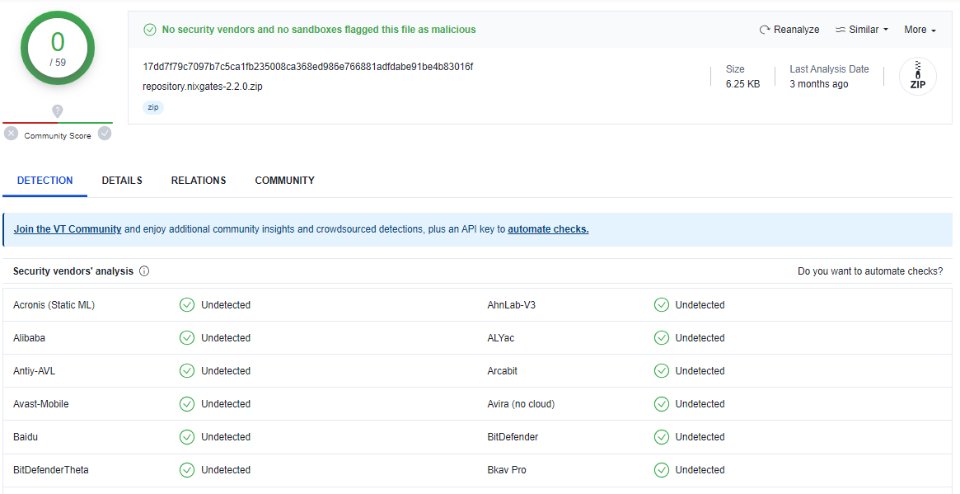
Seren is a third-party Kodi addon hosted by the Nixgates repository. Therefore, claiming anything regarding its safety status is quite impossible.
Kodi developers don’t control or monitor unofficial addons. Therefore, they may pose a security risk. Moreover, these addons may also contain malware or get hijacked.
So, you must conduct thorough research before getting a third-party addon. That said, VirusTotal didn’t catch any issues when I tested the URL of Nixgates. The result is attached below.
Is Seren Legal?
Again, the legal status of third-party and unofficial addons is quite complicated. These platforms may contain pirated content or copyrighted videos. Moreover, you may face legal troubles if you accidentally stream pirated content.
Hence, if you want to use the Seren Kodi addon, I advise you to get a reliable VPN to secure your online activities.
A Virtual Private Network like ExpressVPN will protect and secure your privacy. It will also protect your identity if you ever come across copyrighted content.
Features of Seren
Seren is mainly known for its clean, innovative user interface and fantastic features. Some of the top characteristics of the addon include the following:
- It lets you stream high-quality content in HD and 4K.
- It runs fast and smoothly.
- The content library is enormous and offers many genres.
- It offers continuous episode playbacks.
How to Install Seren Kodi Addon
Again, Seren is a third-party Kodi addon. Therefore, you need to authorize it before you can use it. To do this, you must enable Unknown Sources on Kodi. Then, download the addon via the Nixgates repository.
I have divided the installation guide into three parts to make it simpler:
- Part 1: Enable Unknown Sources
- Part 2: Install Nixgates Repo
- Part 3: Install Seren Kodi Addon
Part 1: Enable Unknown Sources
As a default setting, you can’t download unofficial addons/ repositories on Kodi. Therefore, part 1 of the installation is about enabling Unknown Sources.
Please follow these steps:
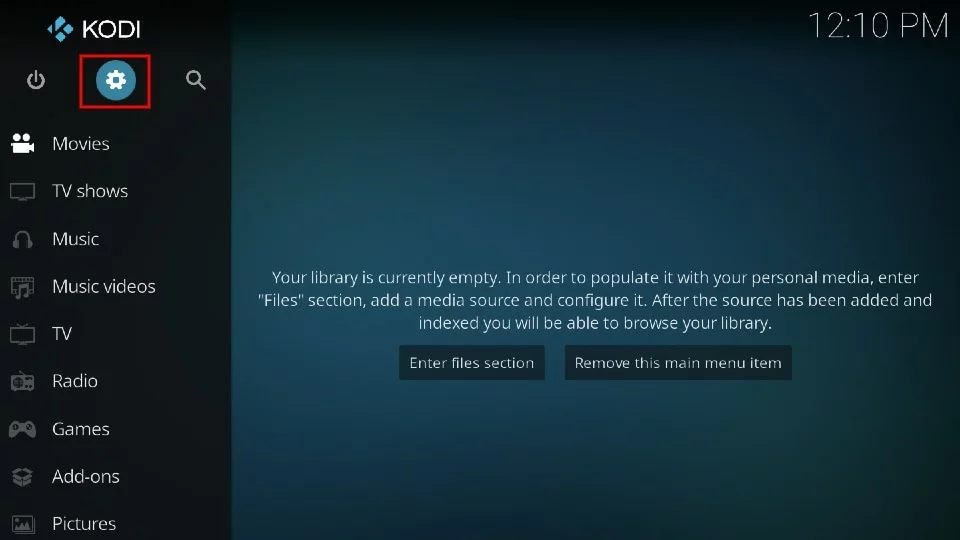
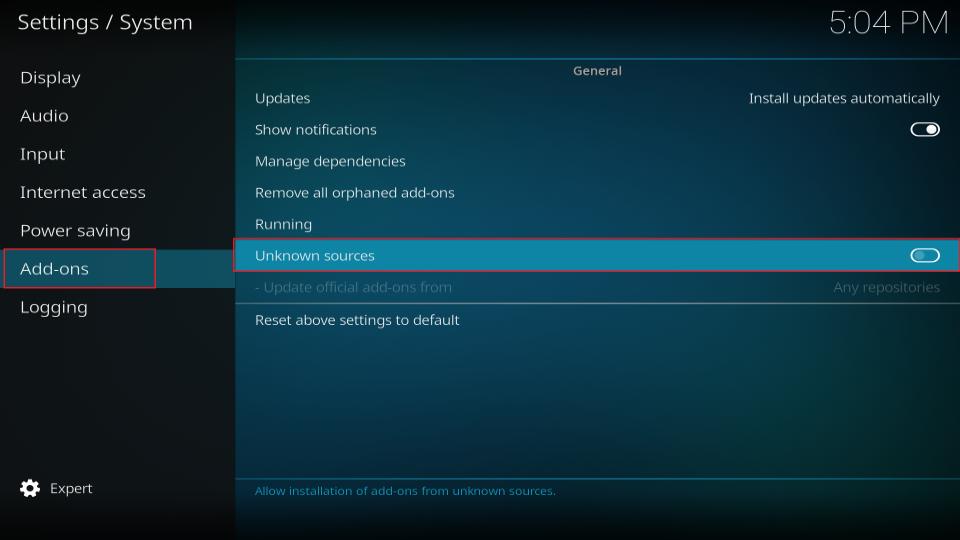
1. First, you need to go to Kodi’s settings. To do this, click on the Cog icon at the top left of your screen.
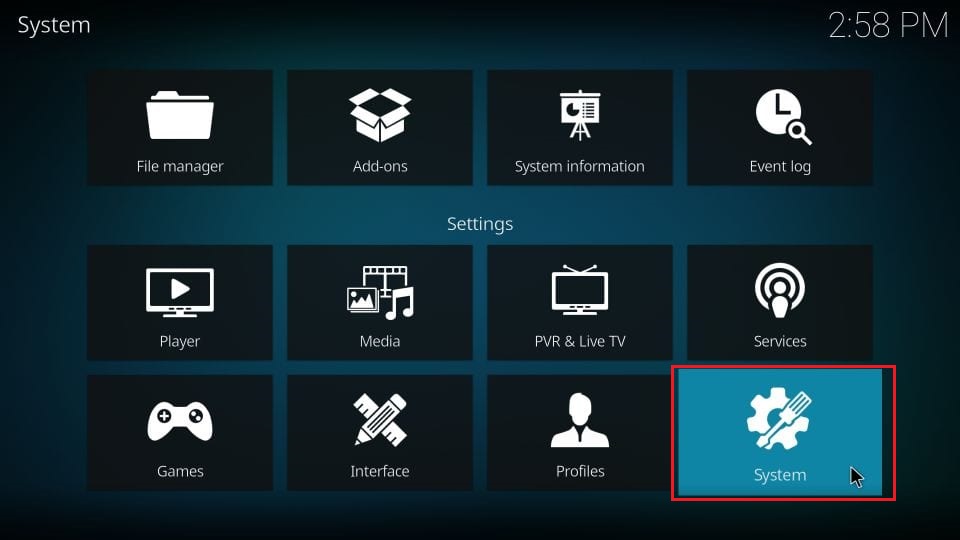
2. Choose the System option from the Settings menu.
3. Look down the list and select Add-ons. On the right side of your screen, you’ll see the Unknown sources tab. Select it and move the slider for Unknown sources to the right.
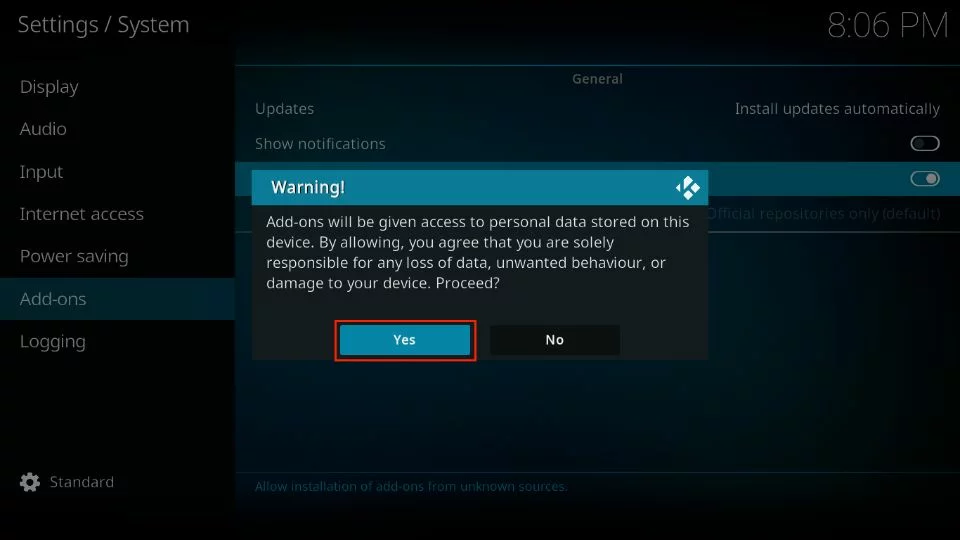
 4. When you do this, you’ll get a pop-up warning similar to what is shown below. You can safely ignore this, but if you want to be extra careful, you can return after installing Seren and turn off unknown sources. For now, click Yes to proceed.
Hit Escape or Back to get back to the main home screen.
Part 2: Install Nixgates Repo
You can now download the Nixgates repository. Here are the complete steps:
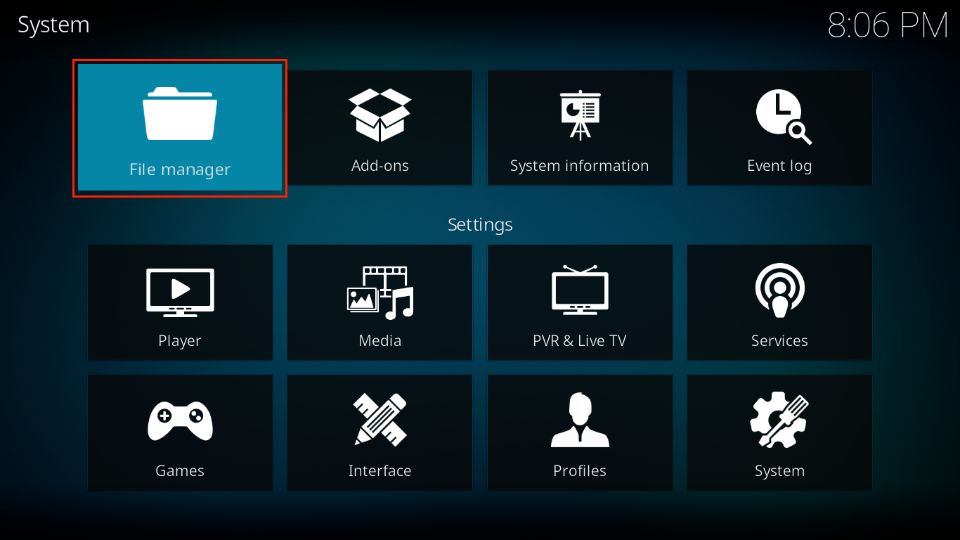
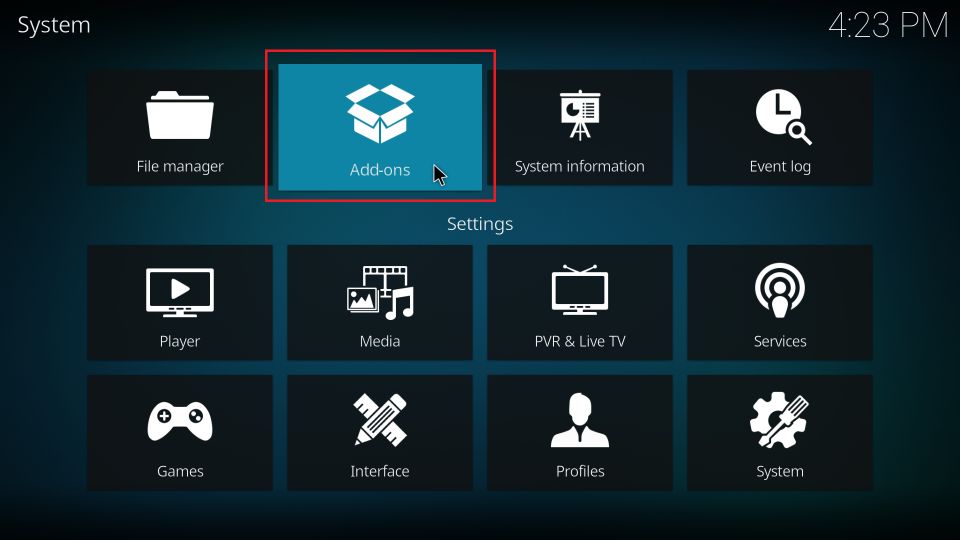
1. Click on Settings (cog icon) as you did earlier to bring up the Kodi system settings screen again.
2. This time, you will select File Manager at the top left. For reference, it looks like a file folder.
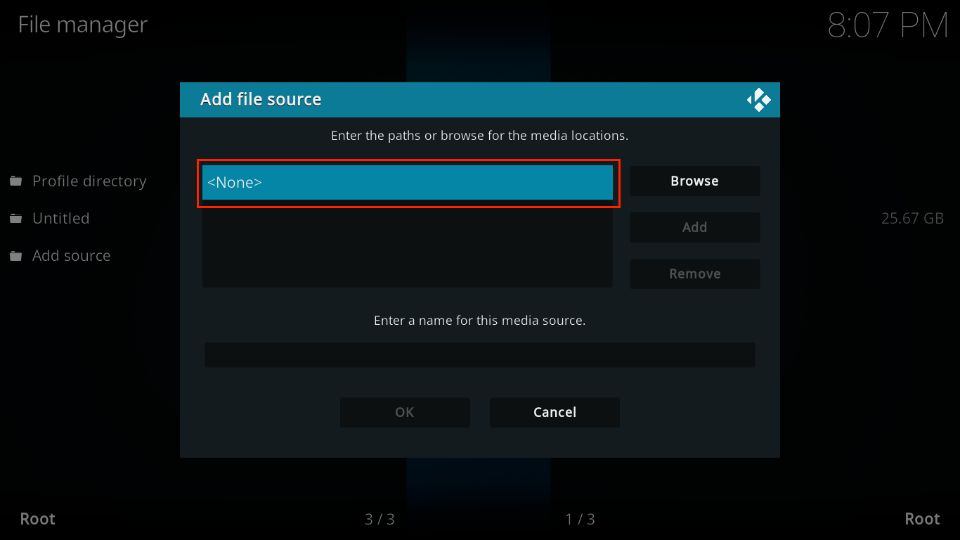
3. Select Add source as highlighted.
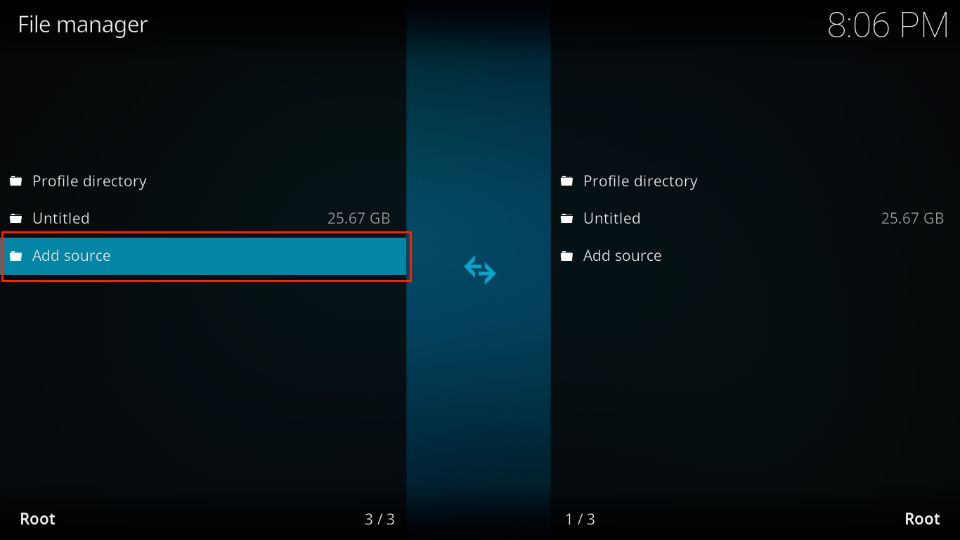
4. Double-click the <None> tab on the next screen.
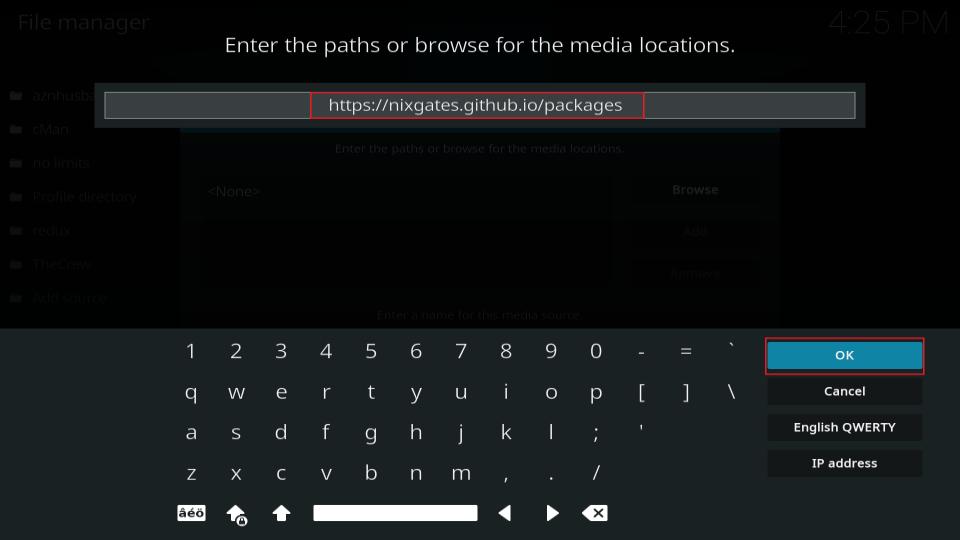
5. Type in the following – https://nixgates.github.io/packages – exactly as shown, then click OK. You must enter this correctly, as this is where the addon is stored.
Disclaimer: The URL belongs to the Nixgates repository. FireStickHow is not affiliated with its developers.
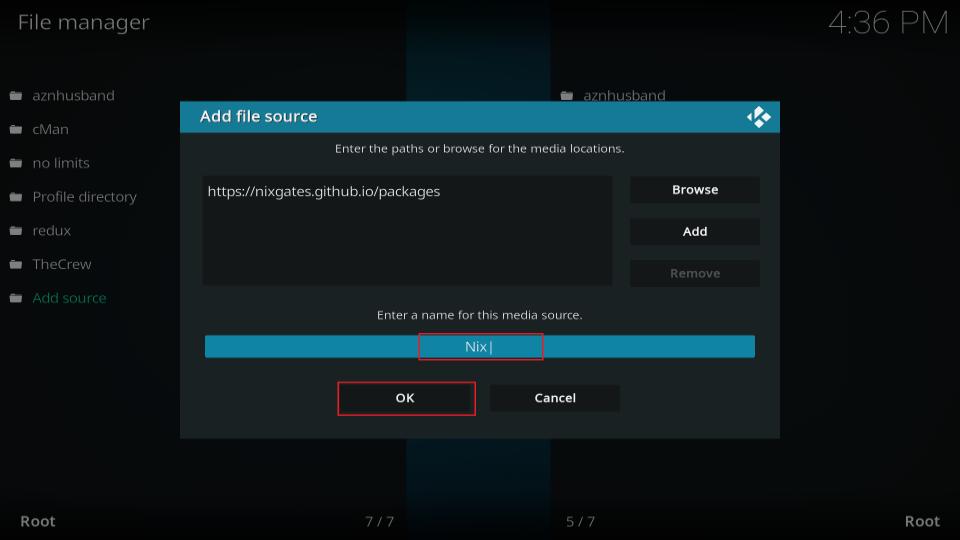
6. On the next screen, you must give this repository a name to find it easily. I would probably use Nix so you know what you are looking for, but you can use anything you like as long as you remember it. Once you’ve selected a name, click on OK again.
7. Next, return to the System menu and press the Add-ons tab.
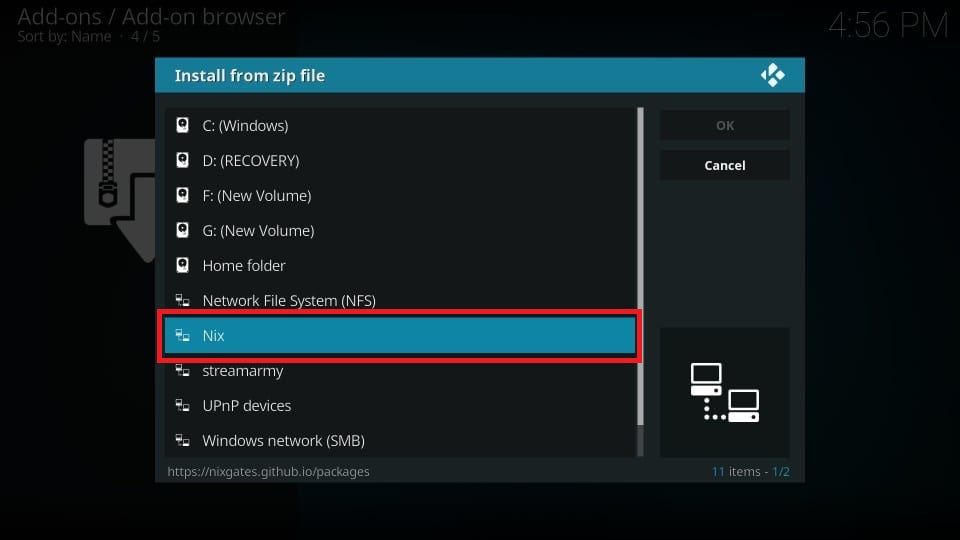
8. Select Install from zip file from the menu.

9. Select Nix (or the name you entered earlier) from the list and click OK.
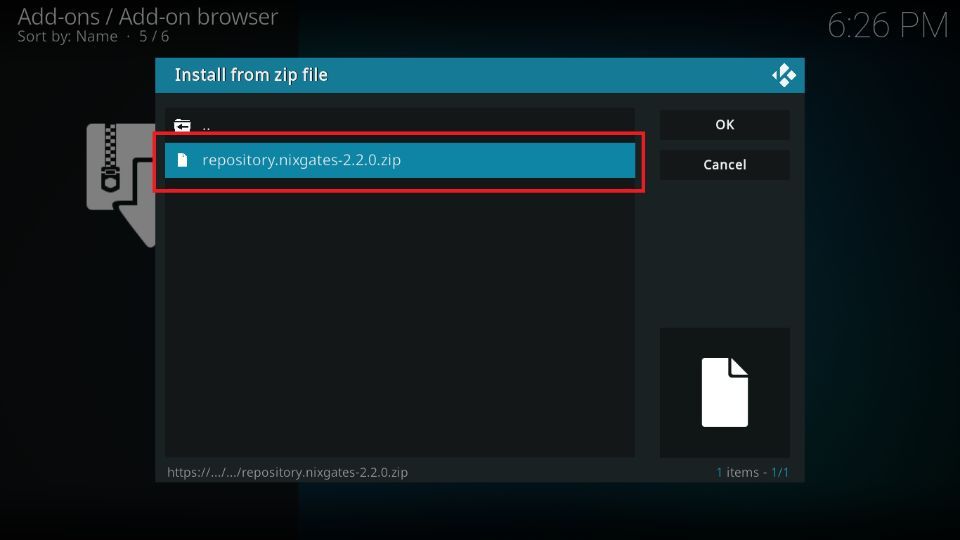
10. On the next screen, you will see a file named repository.nixgates-2.2.2.0.zip. Click on it and then click OK.
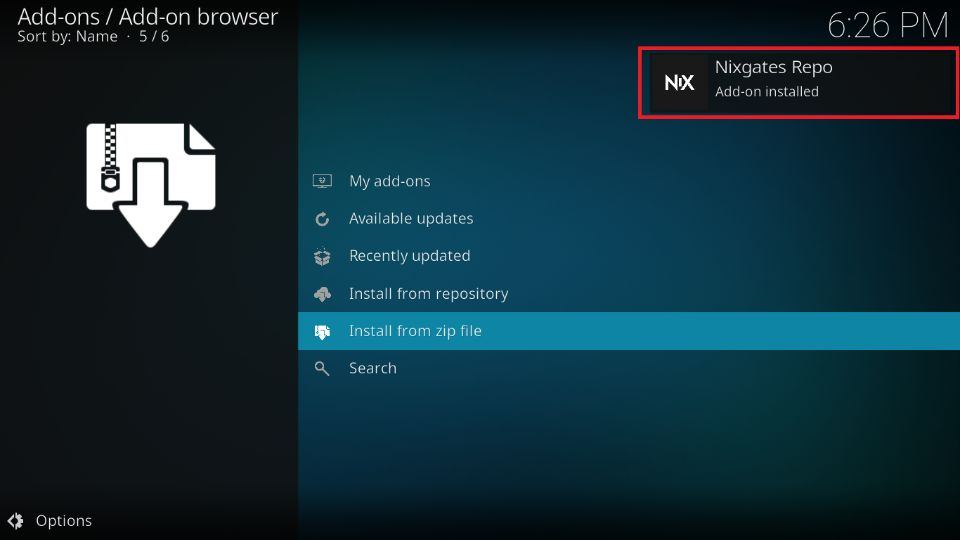
11. Wait for the repository to install. You’ll get a message that states the repo’s name and then tells you that the addon is installed, which should slide out on the top right of your screen.
Part 3 – Install Seren Kodi Addon
After downloading the Nixgate repository, you can easily install the Seren Kodi addon. Follow these steps:
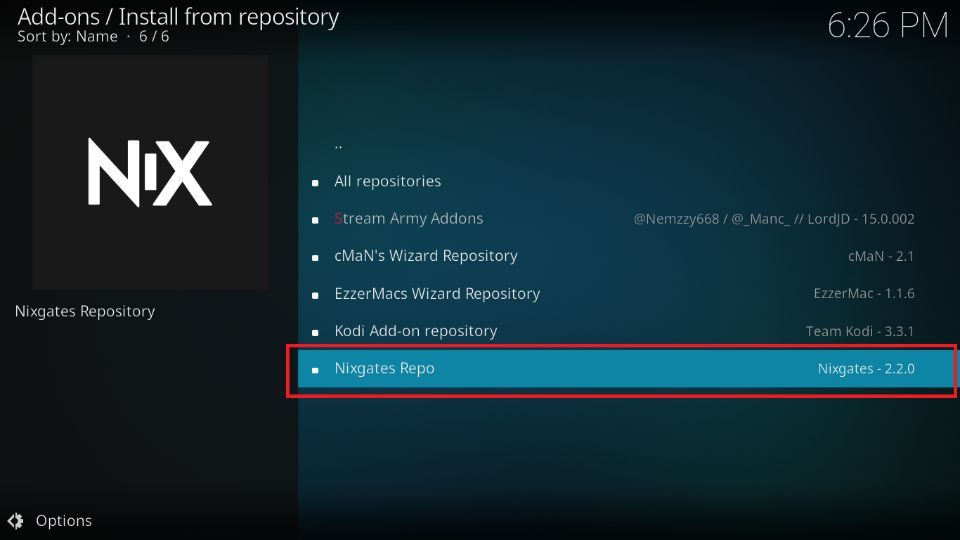
1. In the Add-ons section, press Install from repository.

2. Select the Nixgates Repo from the list that appears on your screen.
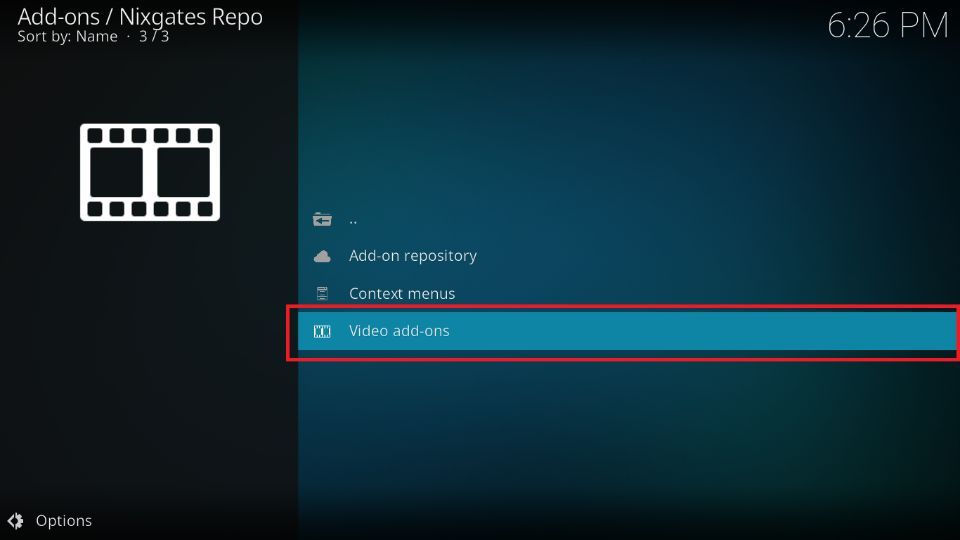
3. On the next screen, select the Video add-ons option to view all available addons.
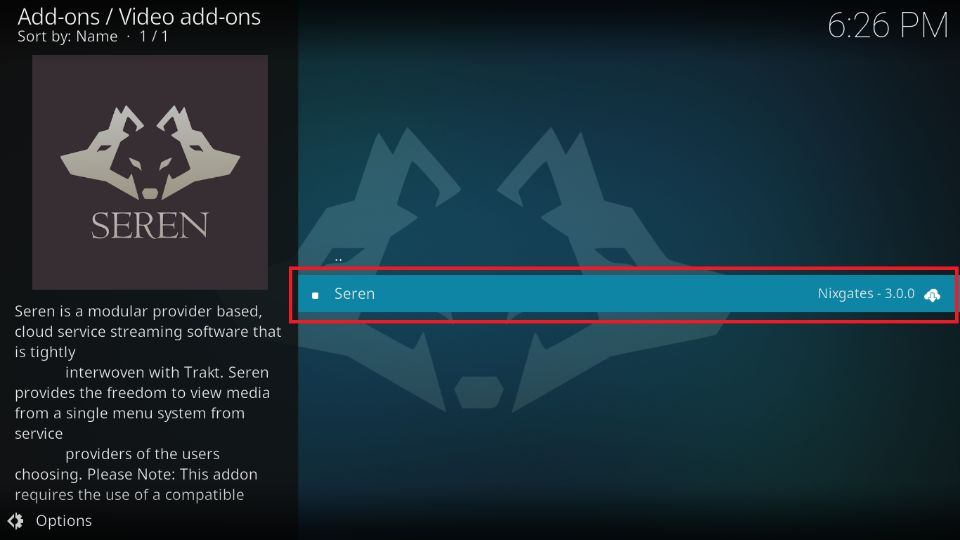
4. Select Seren.
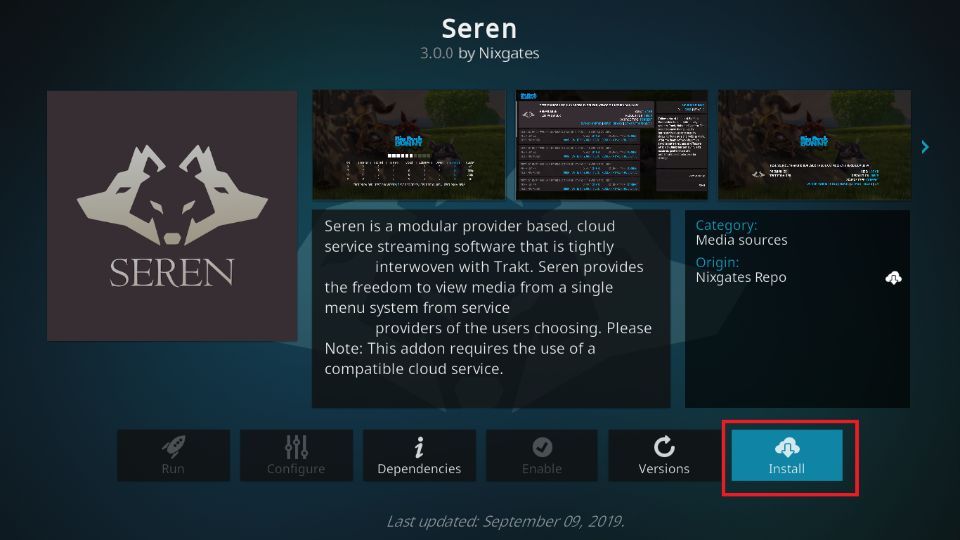
5. Click the Install option on the bottom right of your screen to launch the installation process.
6. Soon, you will receive the Seren Add-on installed notification. With this, we wrap up part 3 of the installation guide.
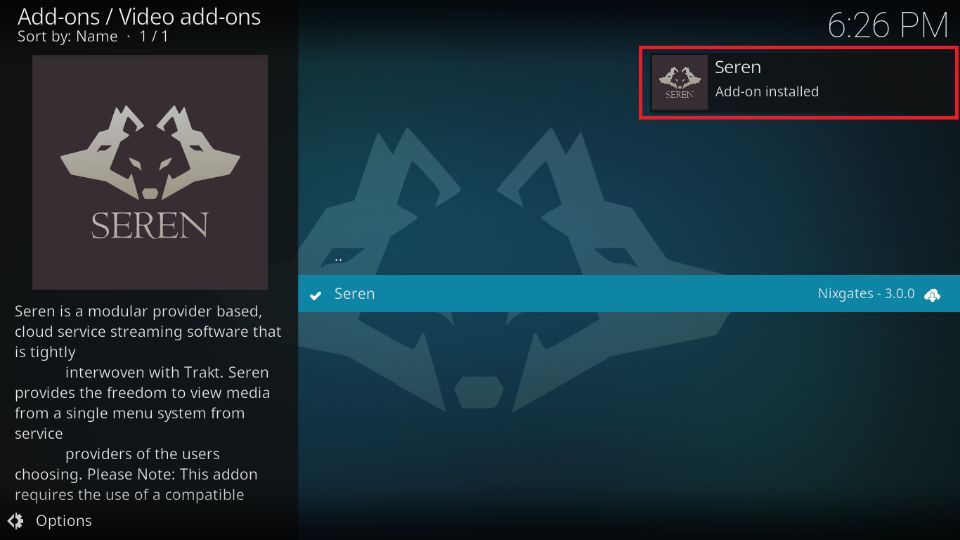
You have successfully installed the Seren addon on Kodi.
Wait! It looks like you are all set to start watching your favorite content on Kodi. But have you protected your online identity yet? You are under constant surveillance by the Government and ISP. They use your IP address 35.175.39.36 to track you. Streaming free or copyrighted videos may get you into legal trouble.
Thankfully, you can use a VPN to easily protect your privacy and go invisible from your Government and ISP. I use and recommend ExpressVPN with Kodi.
ExpressVPN is the fastest, most secure, and streaming-friendly VPN. It is easy to install and set up on any Kodi device, including FireStick, Smartphones, PCs, and more.
ExpressVPN, offers an unconditional 30-day money-back guarantee. So, if you do not like the service (I don't see why), you can get a full refund within 30 days.
Please remember that we encourage you to use a VPN to maintain your privacy. However, we do not condone breaking copyright laws.
Before you start using Kodi for streaming, here is how you can protect yourself with ExpressVPN:
Step 1: Sign up for ExpressVPN Here
Step 2: Download ExpressVPN on your device by clicking HERE
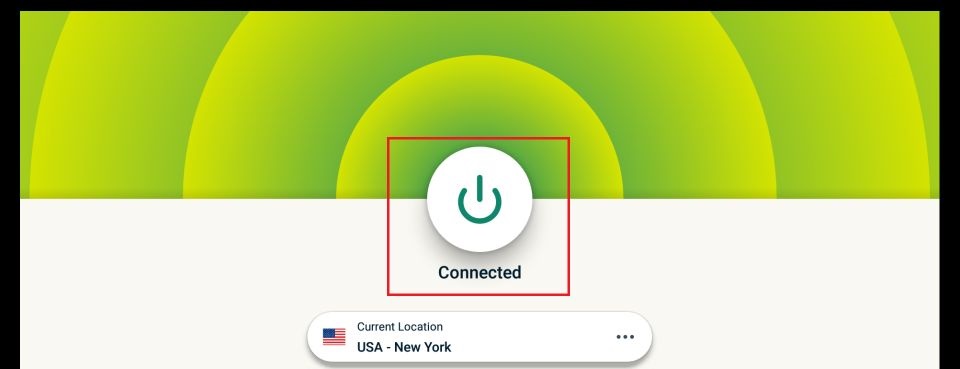
Step 3: Open the ExpressVPN app on your device. Sign in with your account. Click the connect/power button to connect to the VPN
Great! You have successfully secured yourself with the best Kodi VPN.
How to Set Up Seren Kodi Addon with Real Debrid
Real Debrid will improve your streaming experience on Seren. Moreover, it’s necessary to have a Real Debrid or Premiumize account to use the addon.
Here is how you can set up the Seren Kodi addon with Real Debrid:
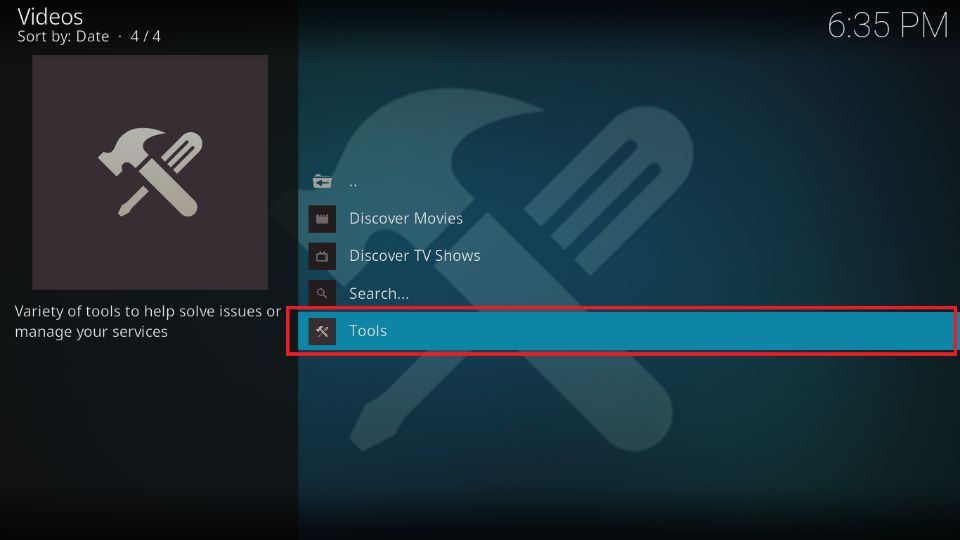
1. Start by selecting the Seren icon in the Add-ons section.
![]()
2. Next, scroll down and select the Tools option.
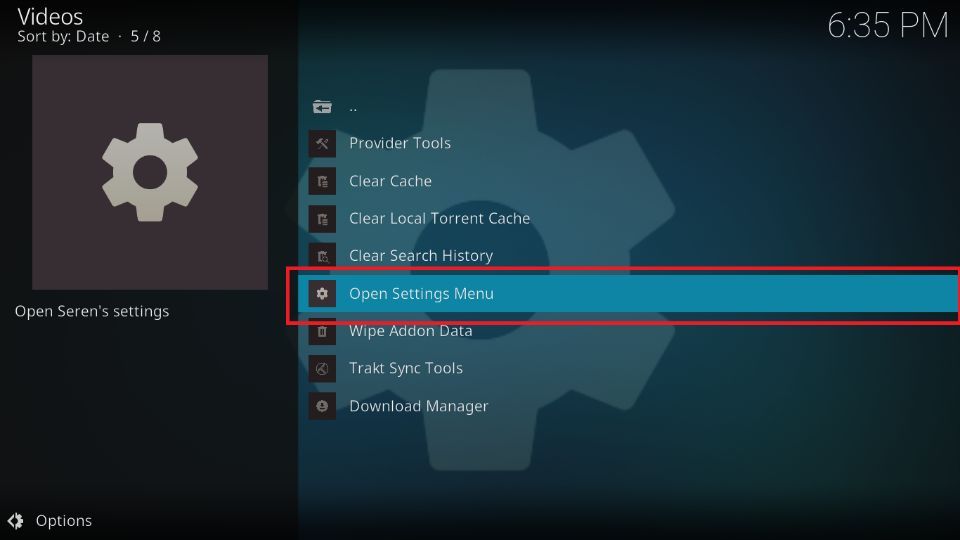
3. Tap on the Open Settings Menu tab.
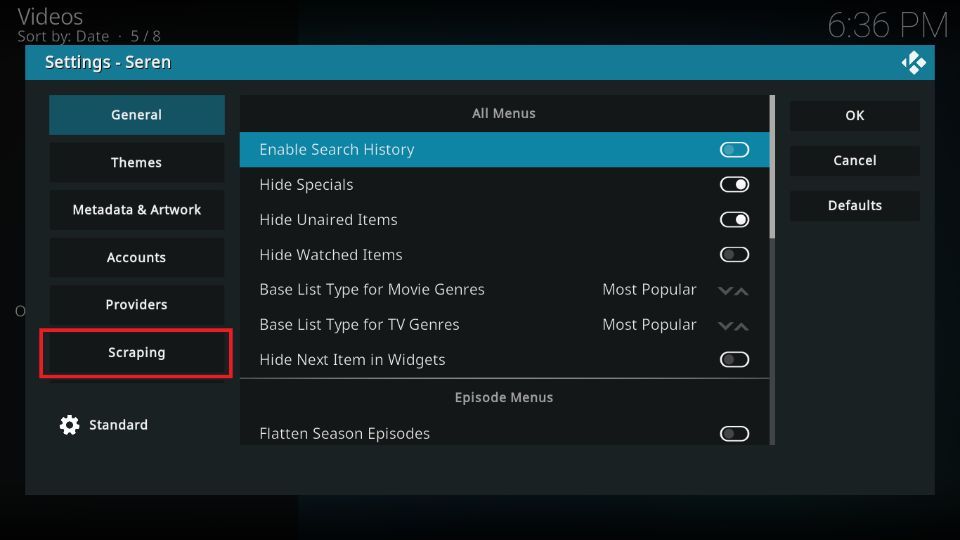
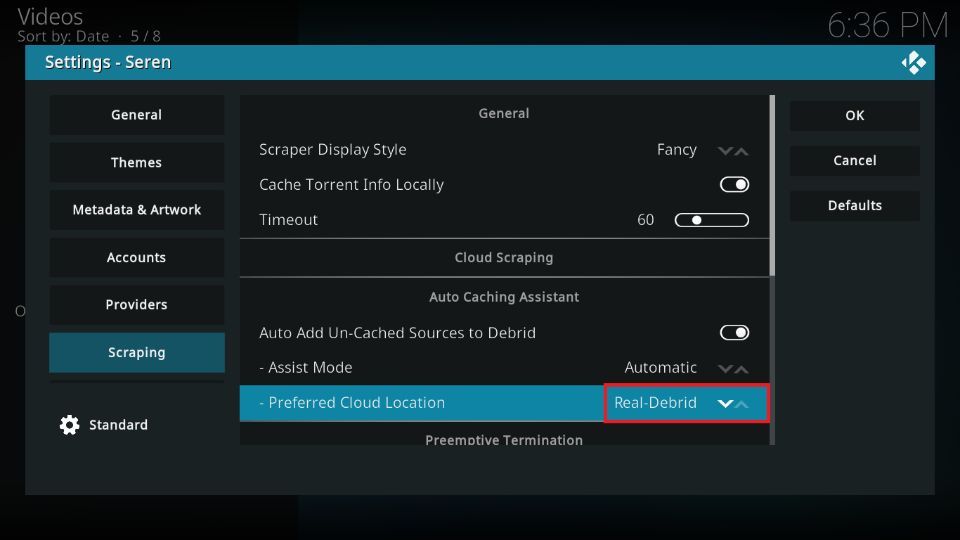
4. The Seren Setting menu will quickly pop up. Scroll down and click on Scraping.
5. Press Real Debrid in the Preferred Cloud Location tab.
6. Next, scroll to the Accounts menu.
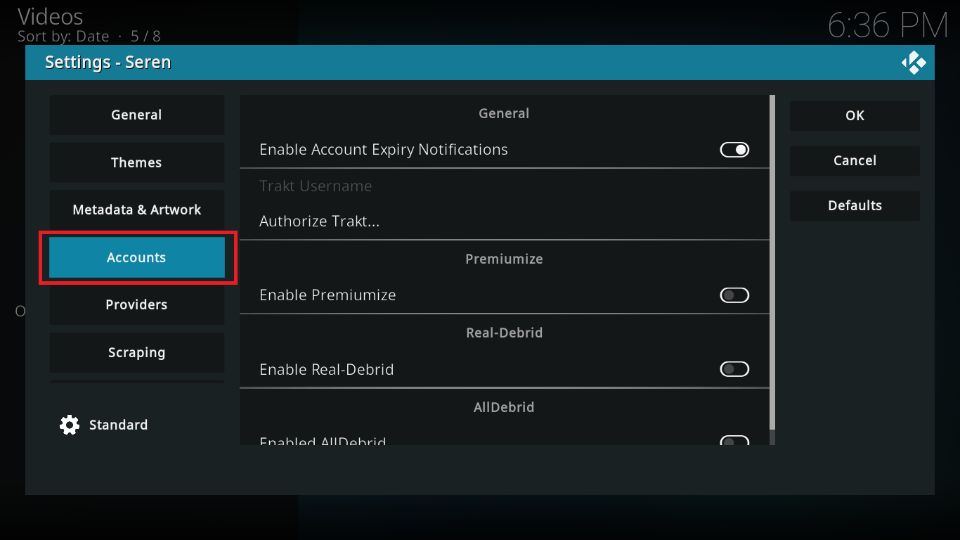
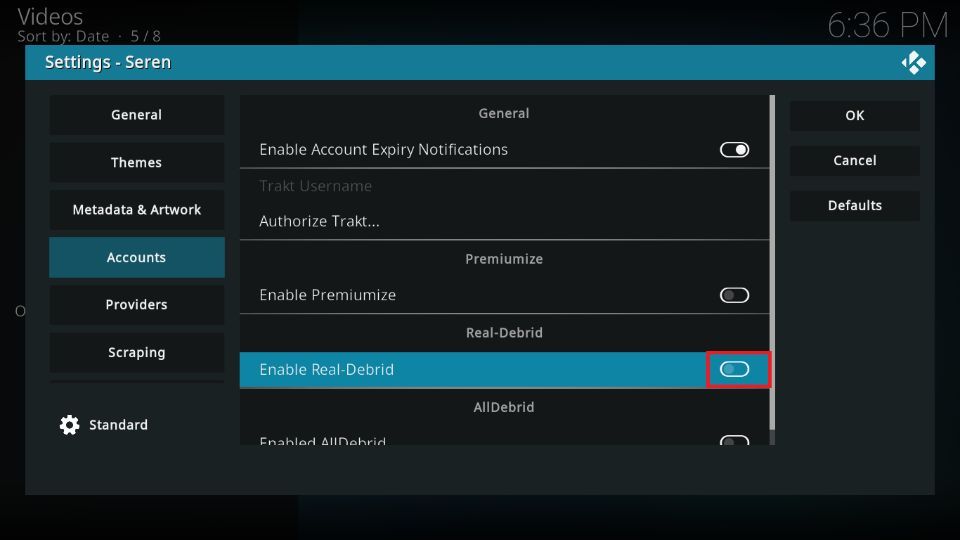
7. Go to the Real-Debrid section and slide the switch for Enable Real Debrid to turn it on.
8. Next, navigate to the Authorize Real Debrid tab.
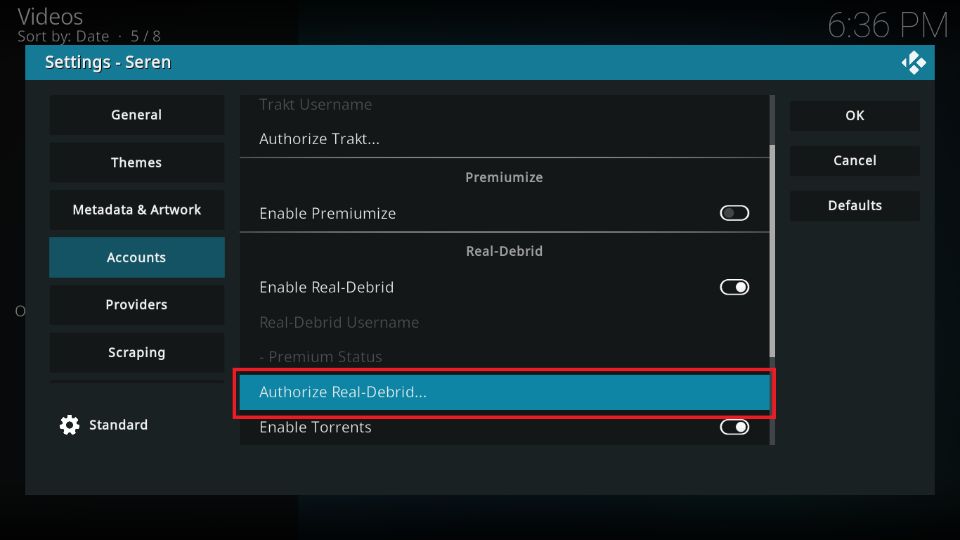
9. An authorization menu will appear. Follow the on-screen prompts to complete the process.
Visit the https://real-debrid.com/device site via a web browser and enter the displayed code.
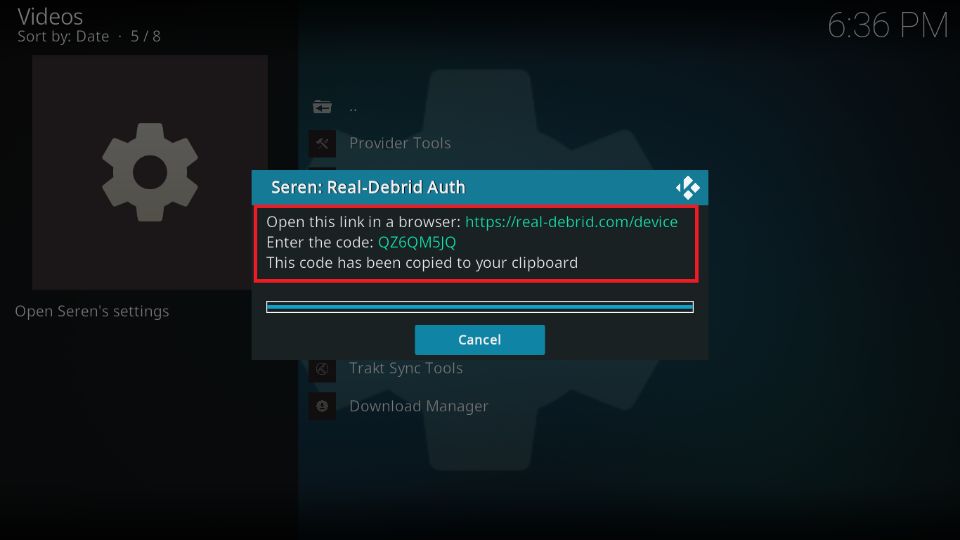
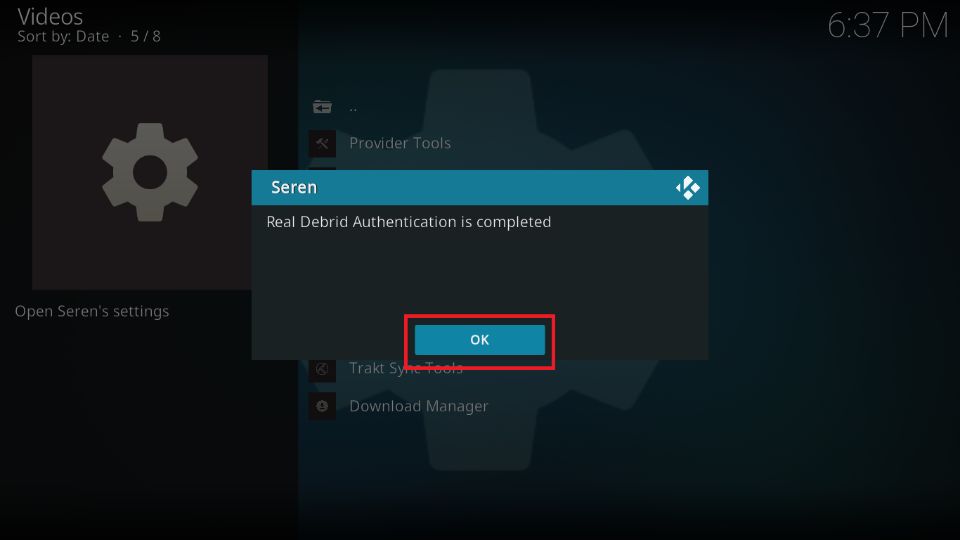
10. After the steps, you will get an alert saying Real Debrid Authentication is complete. Press OK.
How to Install Provider Package on Seren Addon
Seren also requires a provider package to work. Here are the steps for installing a Provider Package on Seren Addon.
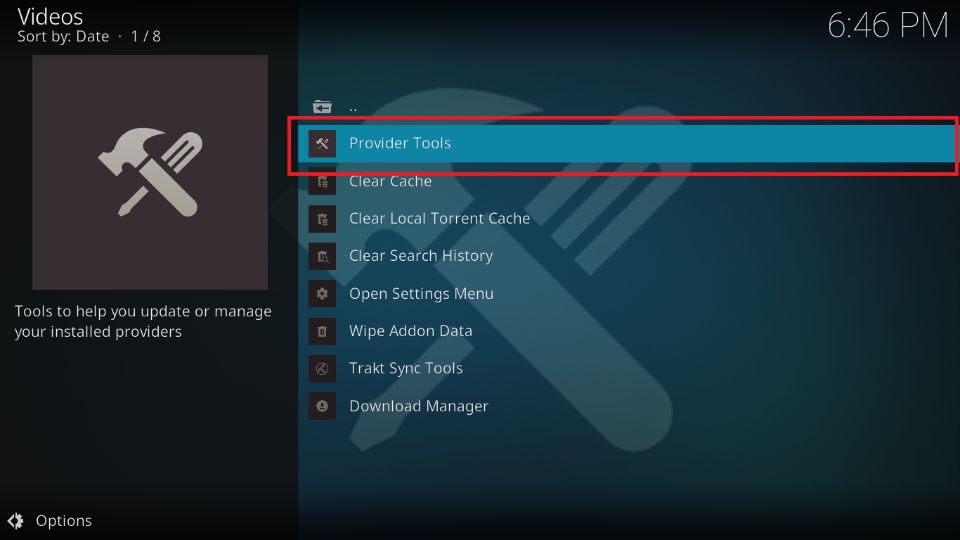
1. Open the Seren Kodi Add-on and go to the Provider Tools option.
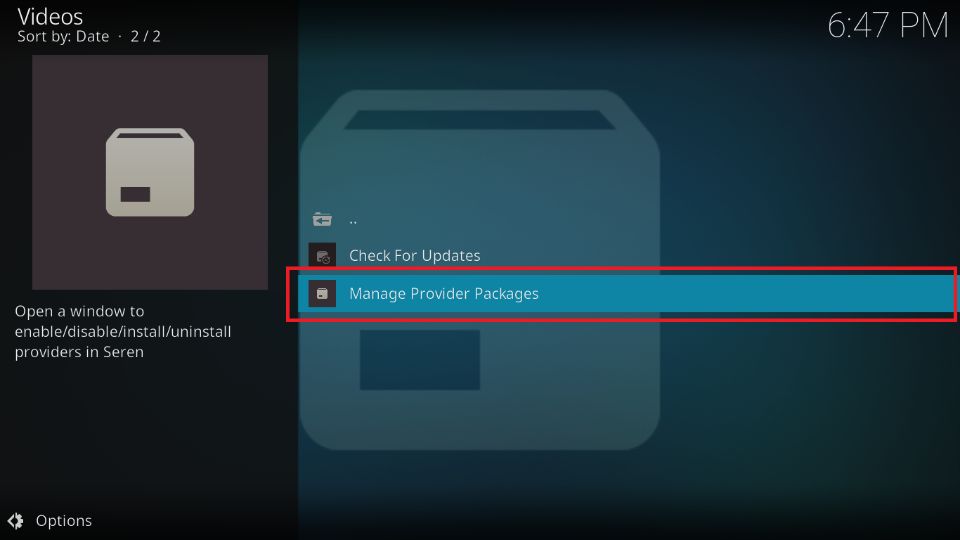
2. Scroll down and select Manage Provider Packages.
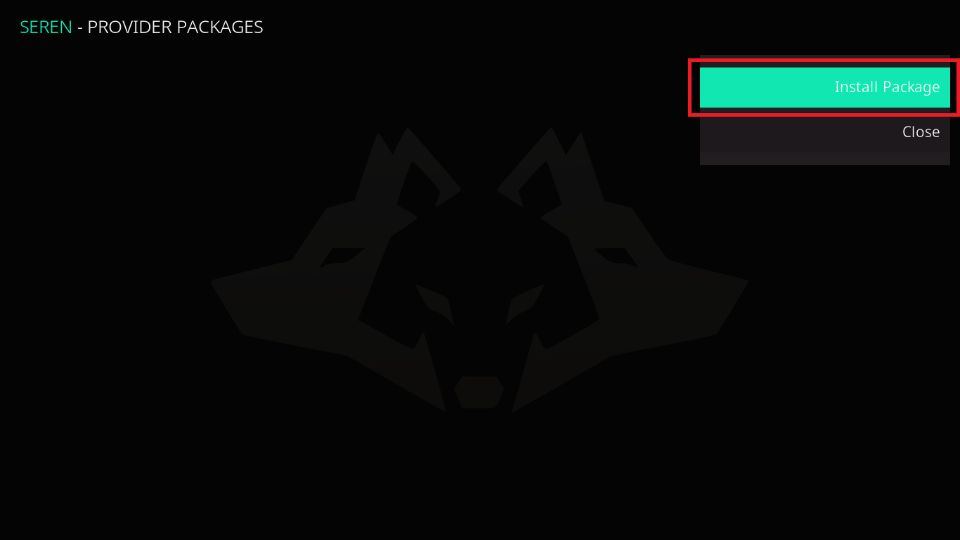
3. Press the green button titled Install Package.
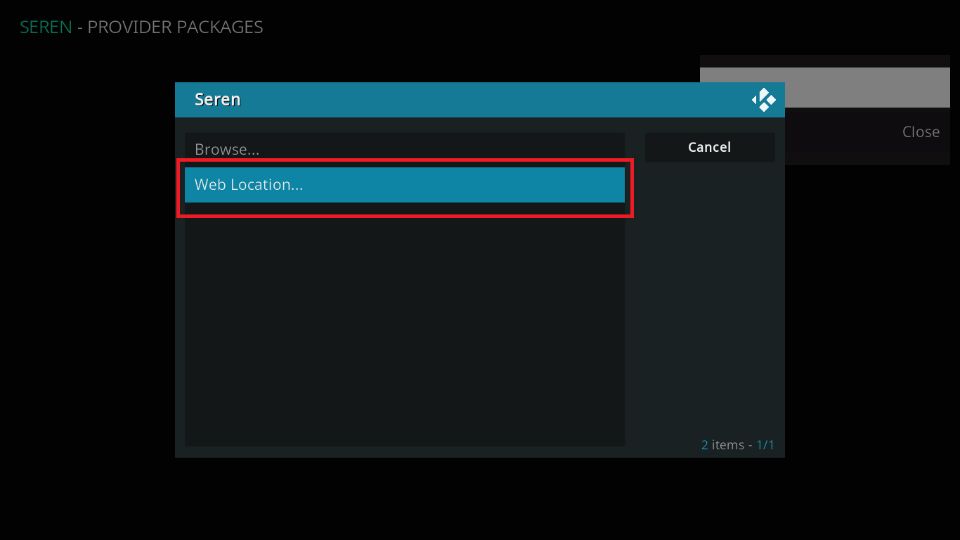
4. A Seren menu will pop up. Select the Web Location tab.
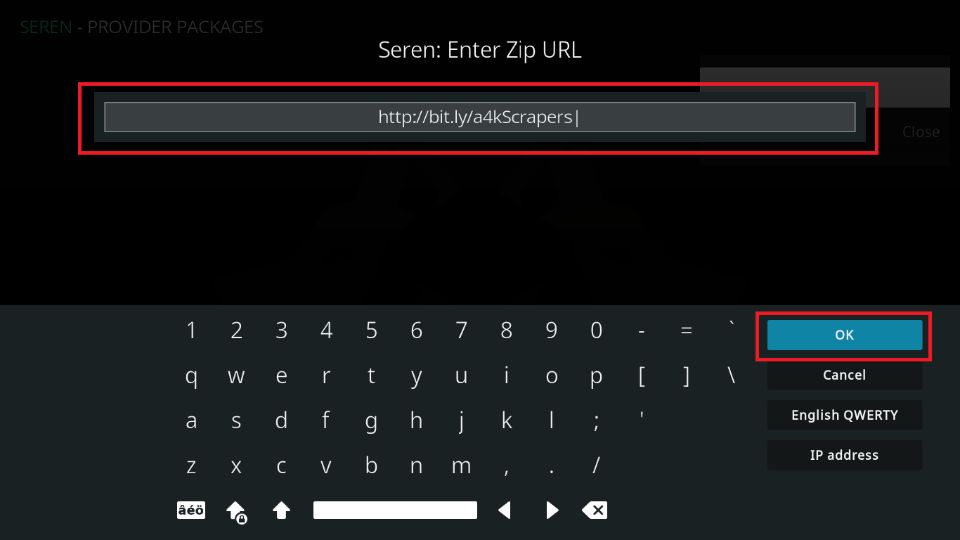
5. Type http://bit.ly/a4kScrapers in the tab and press OK.
6. Press Install to start installing the file.

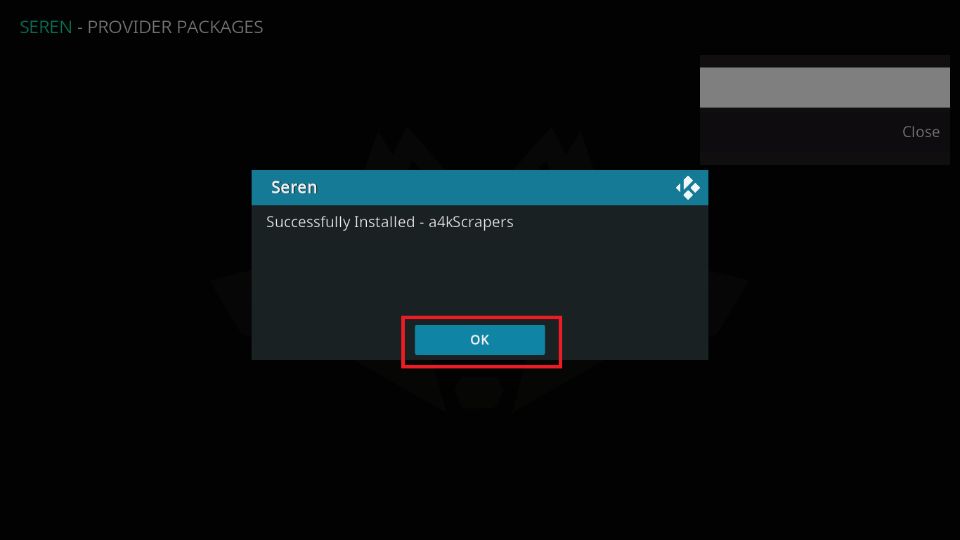
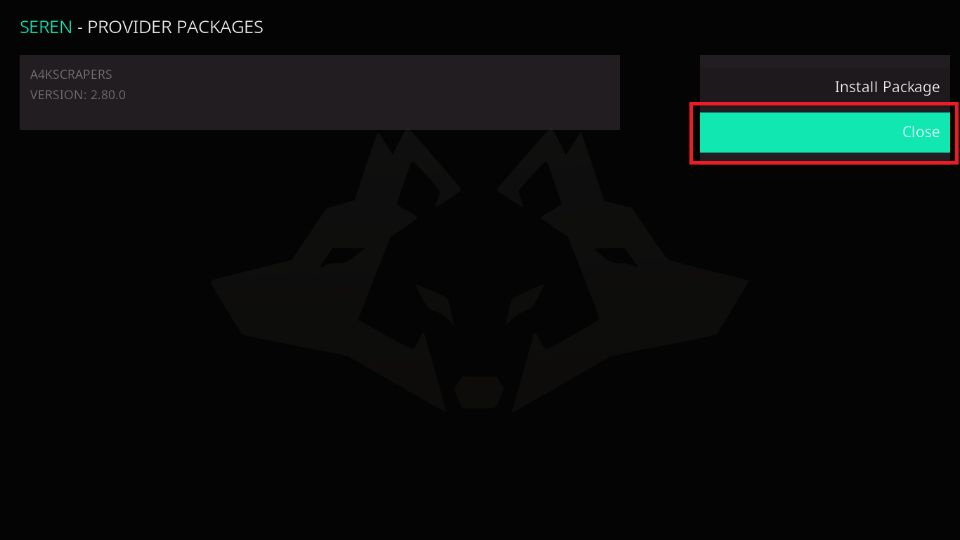
7. Press OK once you receive the Successfully Installed- a4kScrapers notification.
8. Lastly, press the green button titled Close.
How to Use Seren Addon on Kodi
The Seren Kodi addon is now up and running. Seren is an excellent platform for watching on-demand content. Moreover, its vast library will ensure you find something according to your preference.
Follow this short user guide to stream your favorite shows and movies on Seren.
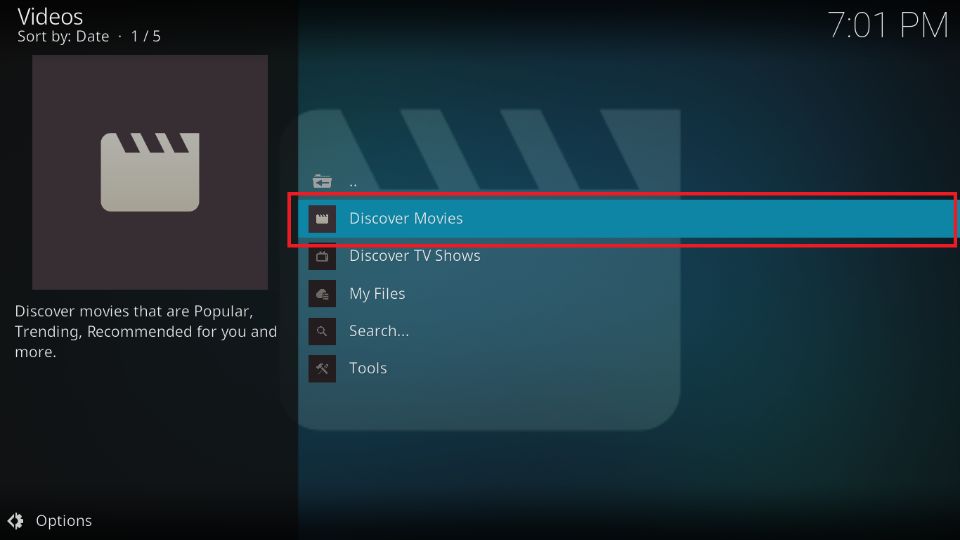
First, launch the addon and open the Home menu.
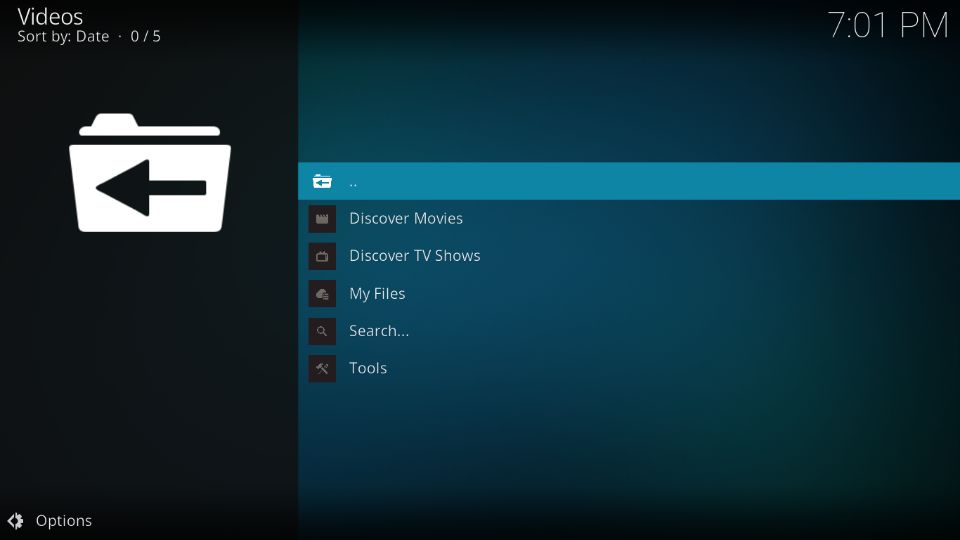
Now, select the Discover Movies tab.
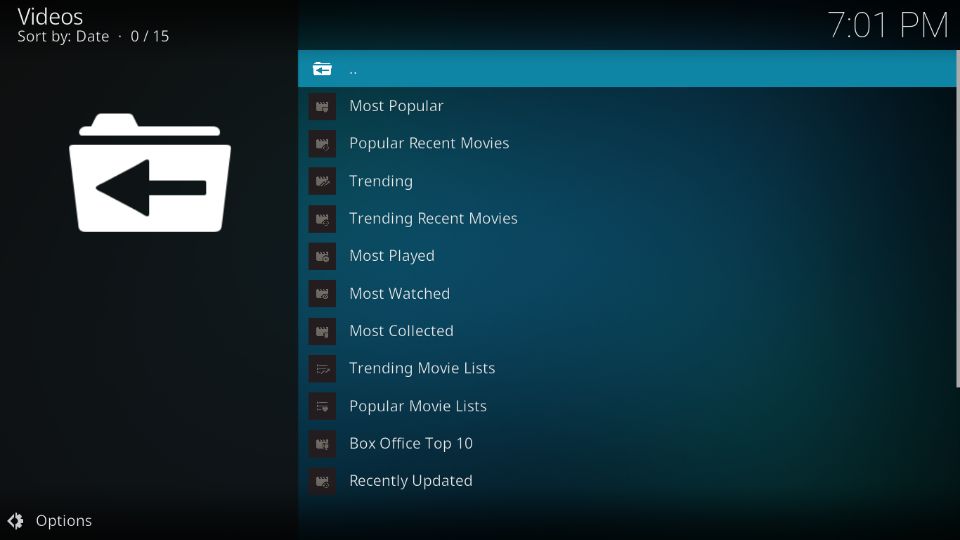
The menu is divided into categories like Most Popular, Popular Recent Movies, Trending, Most Played, etc. You can explore each section individually.
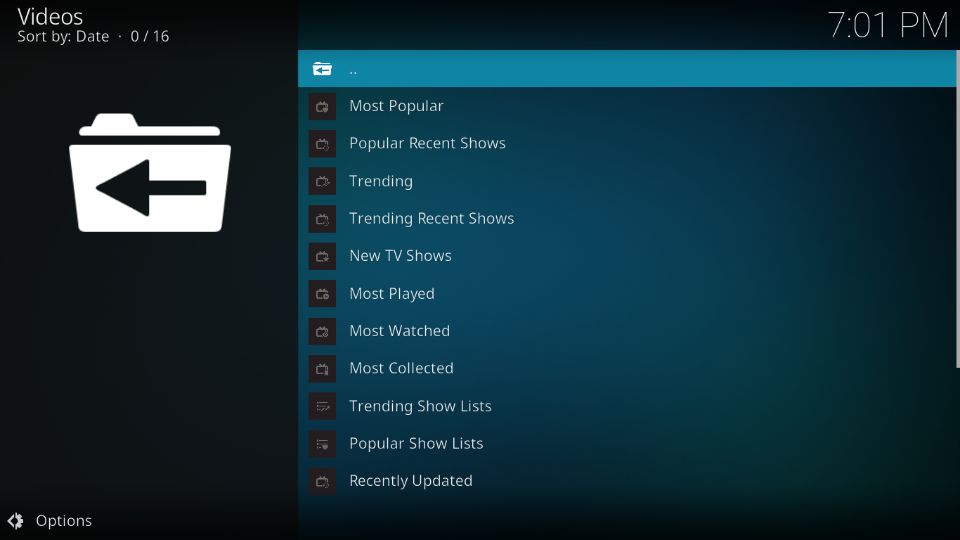
Next is the Discover TV Shows menu.
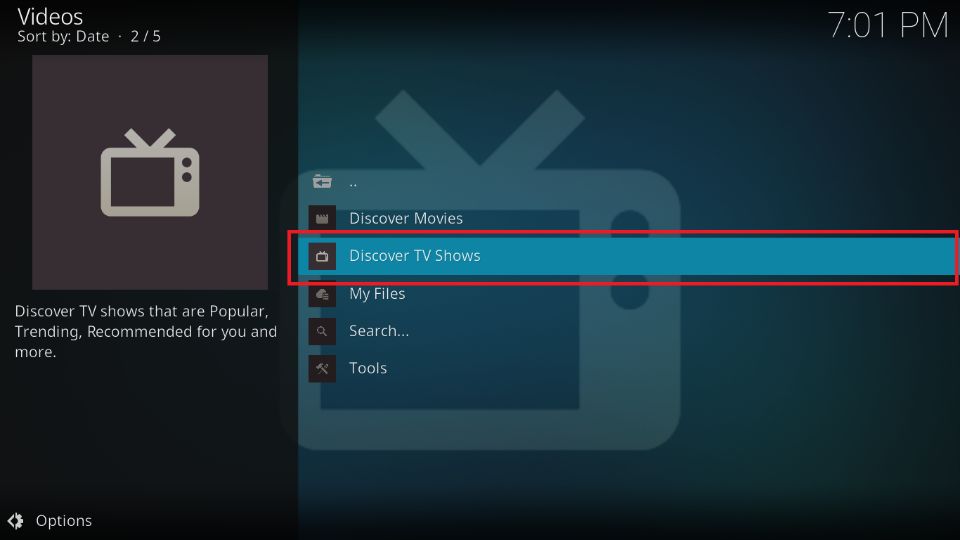
The menu is further categorized into sub-sections: Most Popular, Most Played, Most Watched, etc.
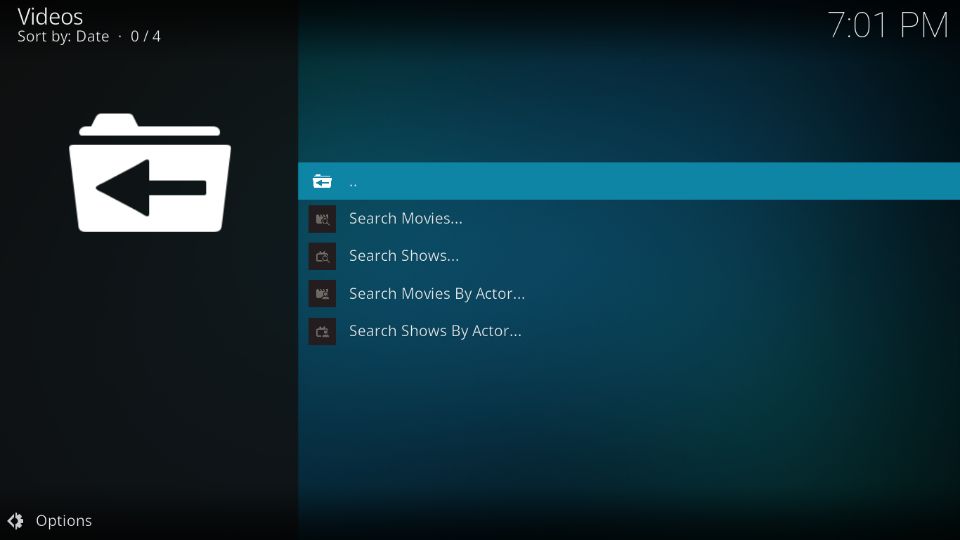
Now, press the Search menu below MyFiles.
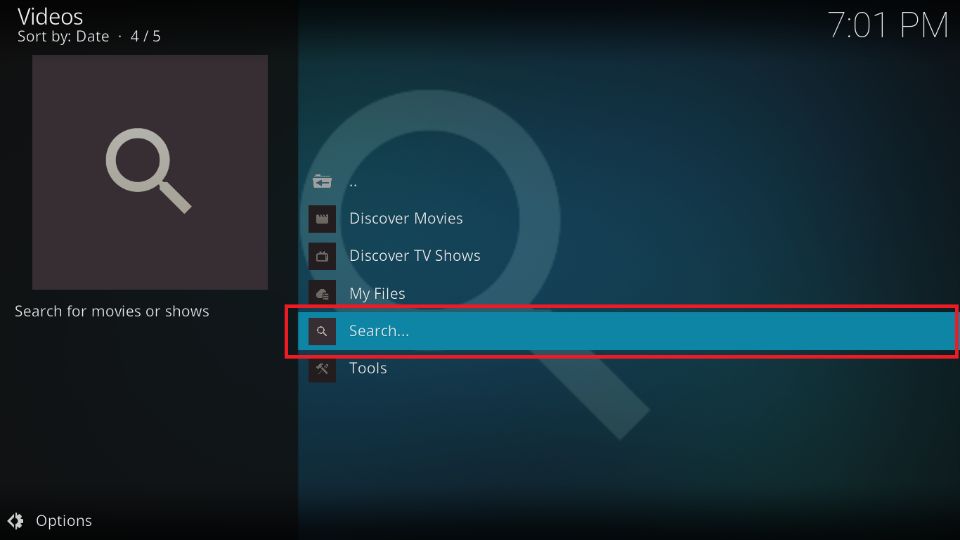
You can look for various movies and TV shows using the Search facility.
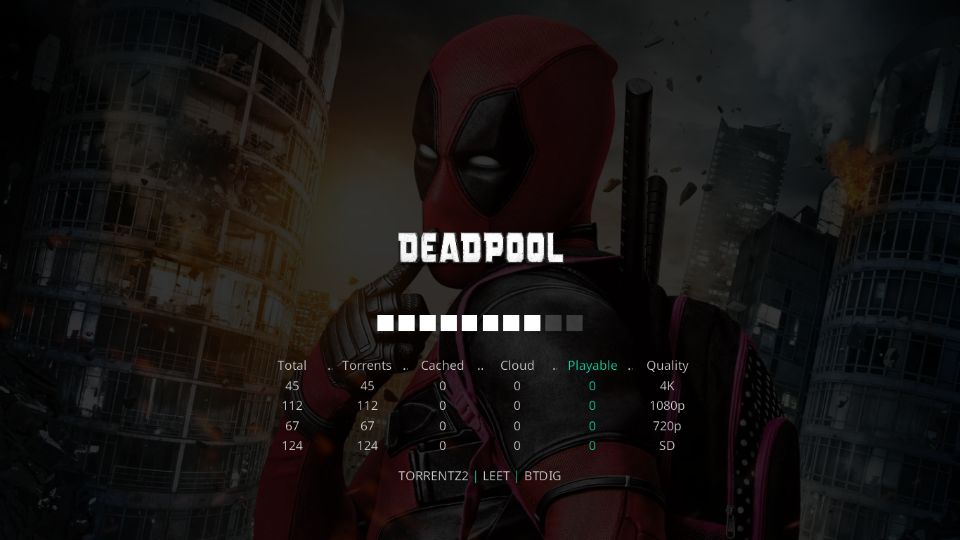
Here is an example of how Seren works. When you select a movie or show, it will display all the available links, torrents, streaming quality, etc., for the specific show.
Wrapping Up
This post demonstrated how to install the Seren Kodi addon. With many streams available in HD and even 4K, you can attach it to the highest-quality TV. Also, Seren offers tons of movies and shows. So, there is something for everyone.
Related:
Leave a Reply