This post covers the complete set of steps to install Streamline Kodi Build. You may use these instructions to install Streamline on FireStick (or other Fire TV devices), Android Boxes (or Android TV), Mobiles, Computers or any device that supports Kodi.
When I first looked at the Streamline build, I was absolutely sure I will add it to our catalog of Best Kodi Builds and also create a tutorial. It is a wonderful build and I want to make sure you know it exists. The build checks on all counts I care about.
Streamline is a lightweight Kodi build designed to work flawlessly and smoothly on all devices. Even if you have a low-RAM device like FireStick.
If you like minimal, straightforward interface, I am confident you will love the visual appeal of Streamline Kodi build. It is neat, slick and just so easy to use.
This build also takes care of all your streaming needs. With a solid library of popular video add-ons, you can watch Live TV, Movies, Shows, Sports content and just about anything you want. It is indeed one of the best Kodi builds to have.
Attention KODI Users: Read before you continue
Government and ISPs endlessly monitor your online activities using your IP address 35.175.39.36 (exposed to everyone). Kodi is an excellent platform for streaming movies, TV shows, and sports, but streaming copyrighted content can get you into legal trouble.
You should use a reliable Kodi VPN and protect your streaming activities and privacy. A VPN will hide your IP address and bypass government surveillance and geo-restrictions.
I trust and use ExpressVPN, the fastest and most secure Kodi VPN. It's easy to install on any Kodi device, including Amazon FireStick, PCs, and Smartphones. In addition, it offers a 30-day money-back guarantee, and 3 free months with the annual plan.
Read: How to Install & Use the best VPN for Kodi.
Steps to Install Streamline Kodi Build
Streamline build is available through the Mancave repository, which happens to be a third-party source. To install builds or addons from such sources, we need to make sure that the security setting called Unknown Sources is enabled or turned ON.
Therefore, before we get started with the installation steps, let’s first get over with this:
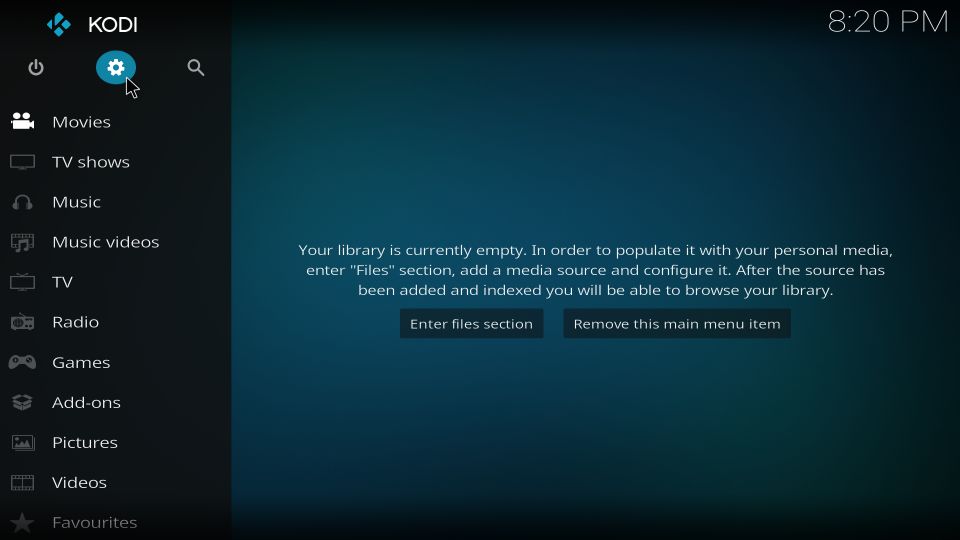
1- From the main screen of Kodi access the Settings menu. For that, the cog icon/gear icon in the upper-left of the window needs to be clicked
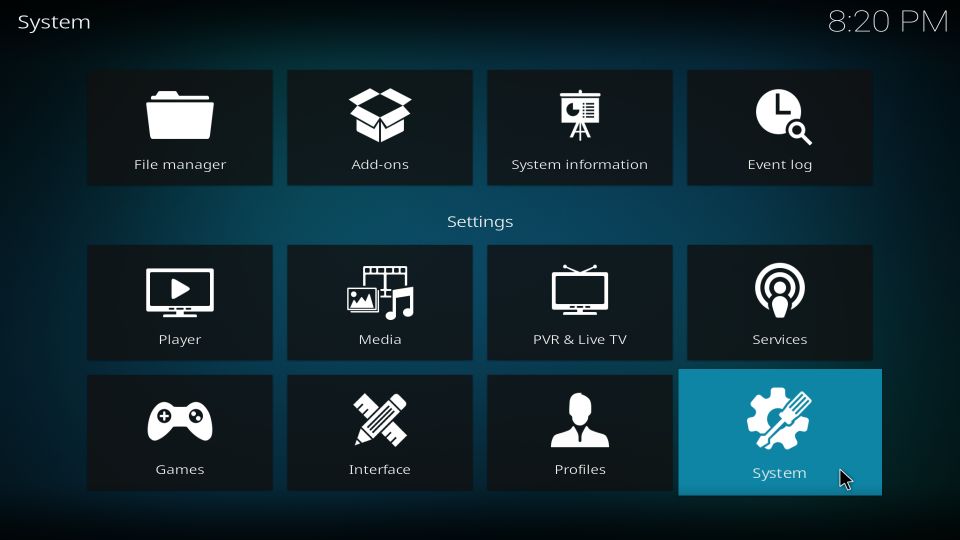
2- When you are on this screen, click System
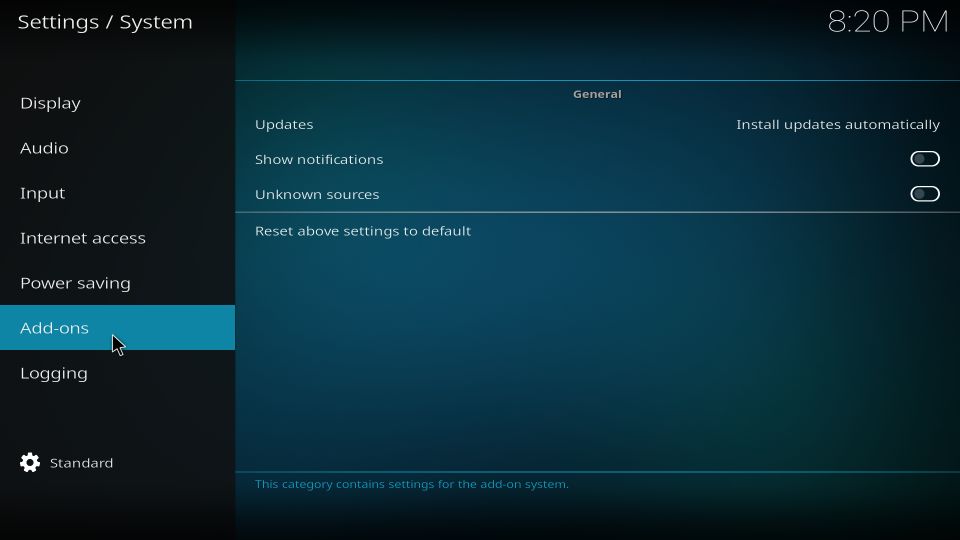
3- Now, you want to make sure add-ons in the left menu bar is selected
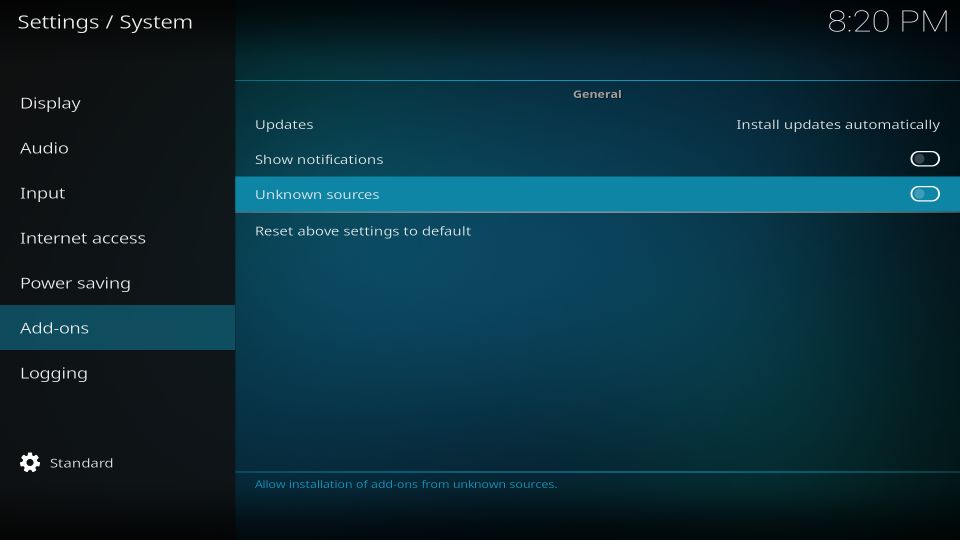
4- We will now go to the right side and enable or turn on the option Unknown Sources
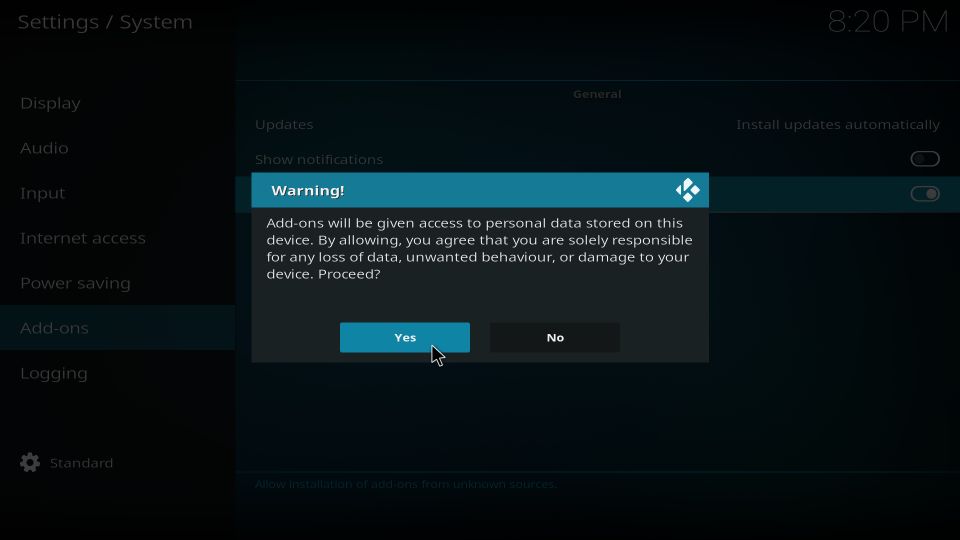
5- When you do that, a warning is displayed. It’s alright. Ignore it. Streamline is one of the safest Kodi builds
When this prerequisite is taken care of, you are ready to install Streamline build on Kodi.
Getting Started with Installation Steps
Here is the complete set of instructions to install Streamline Kodi build:
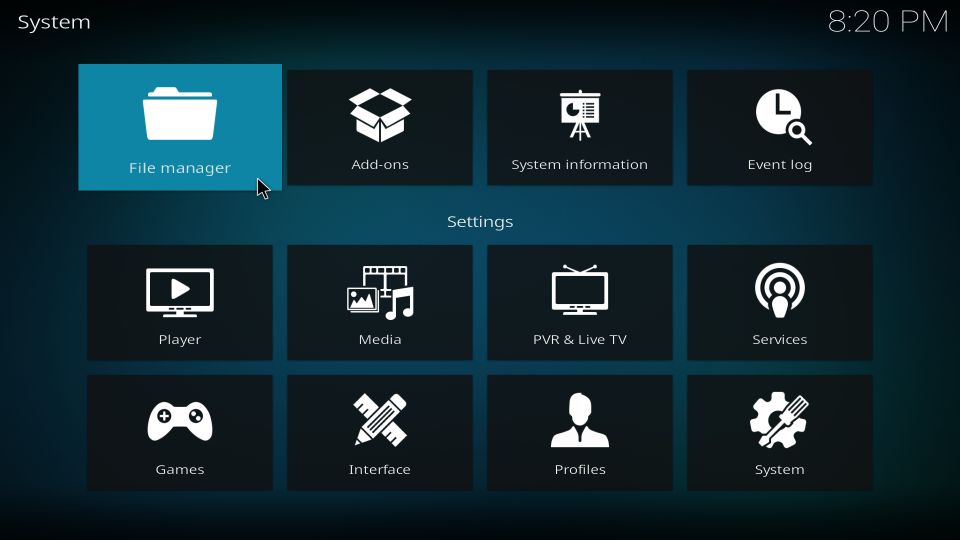
1- Go to the Settings one more time on the home screen
2- Access the option File manager
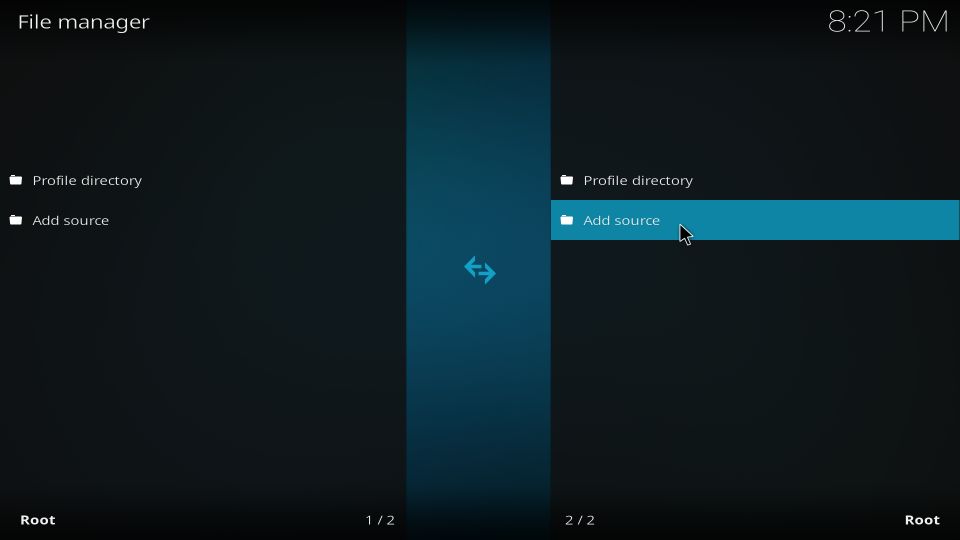
3- You must now see the following screen with Add source on both sides. Click it on either side you want
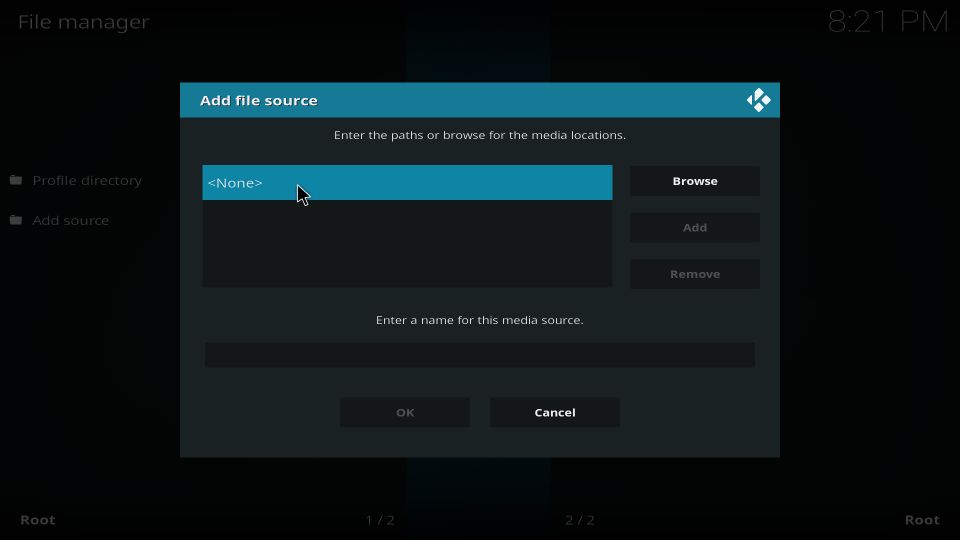
4- When this popup is displayed, click where it says <None>
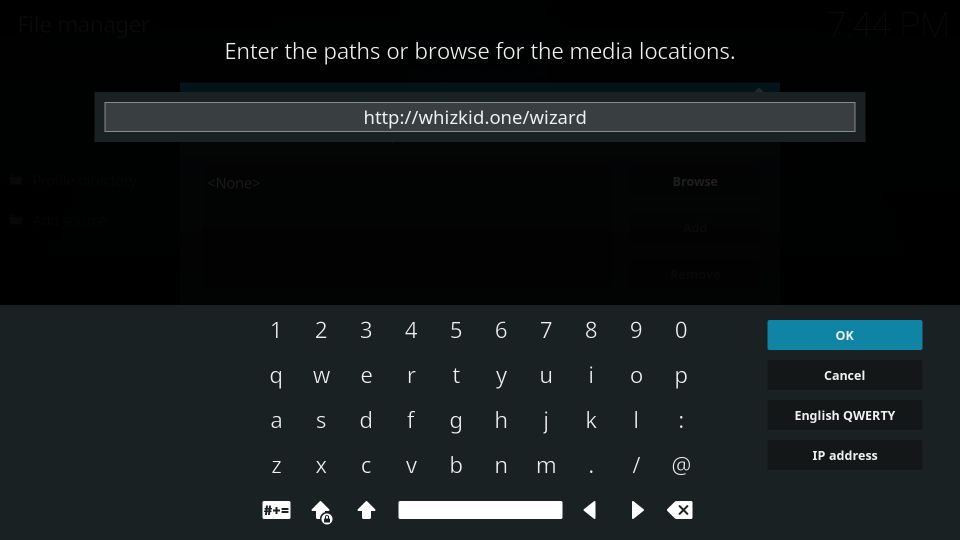
5- On this window, provide the source URL http://whizkid.one/wizard
Remember to type the URL exactly as given. It is also case sensitive.
Click OK
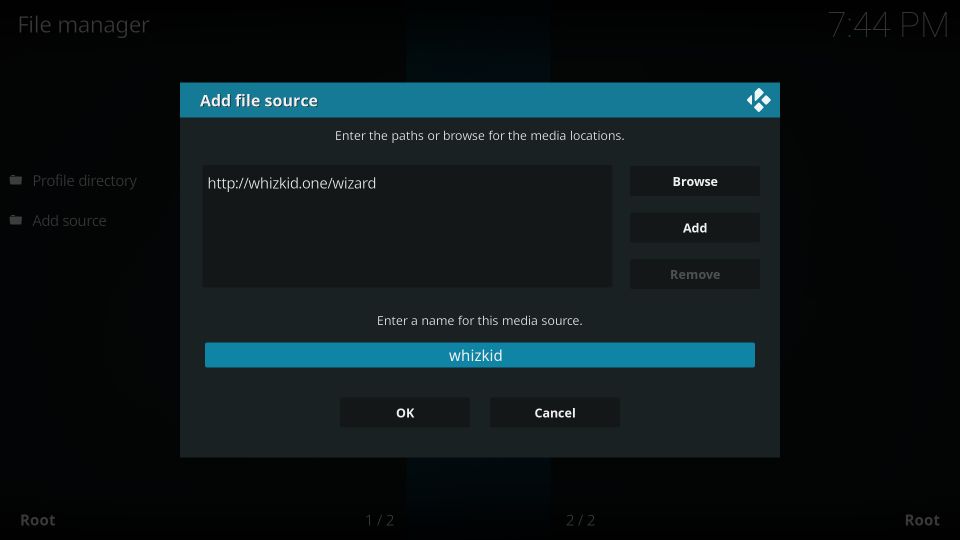
6- To proceed, name the URL or source you just added in the designated area. I am entering the name whizkid. You may choose any other name you want to remember this source with
Click OK when you are ready
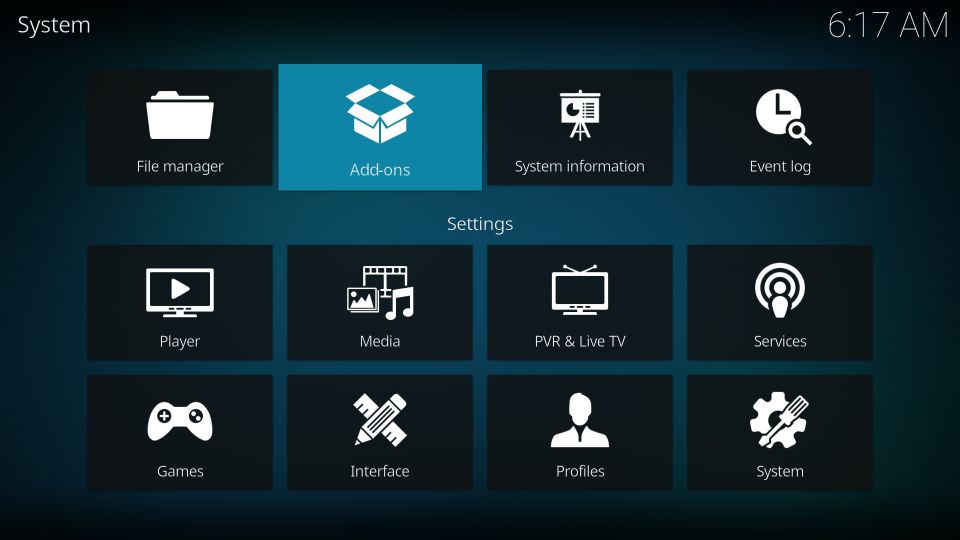
7- Now we will return to the Kodi home screen. From there, access Settings again
8- Click Add-ons on this window
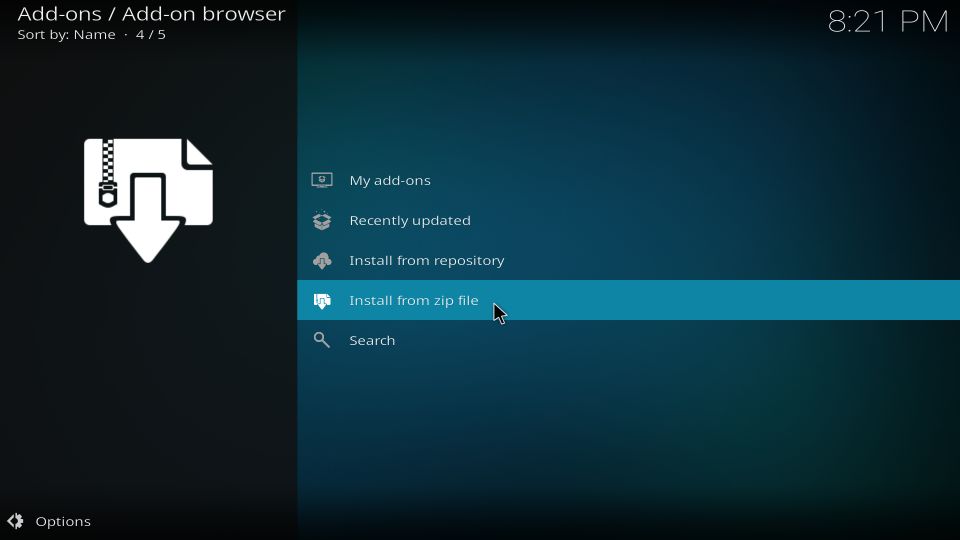
9- Next, open Install from zip file
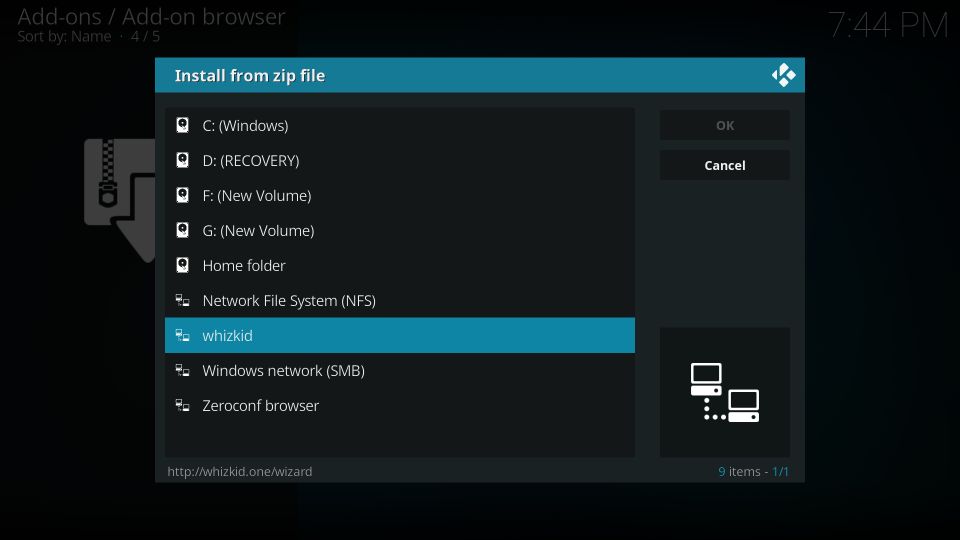
10- You should now see whizkid or any other source-name you provided earlier. Click it!
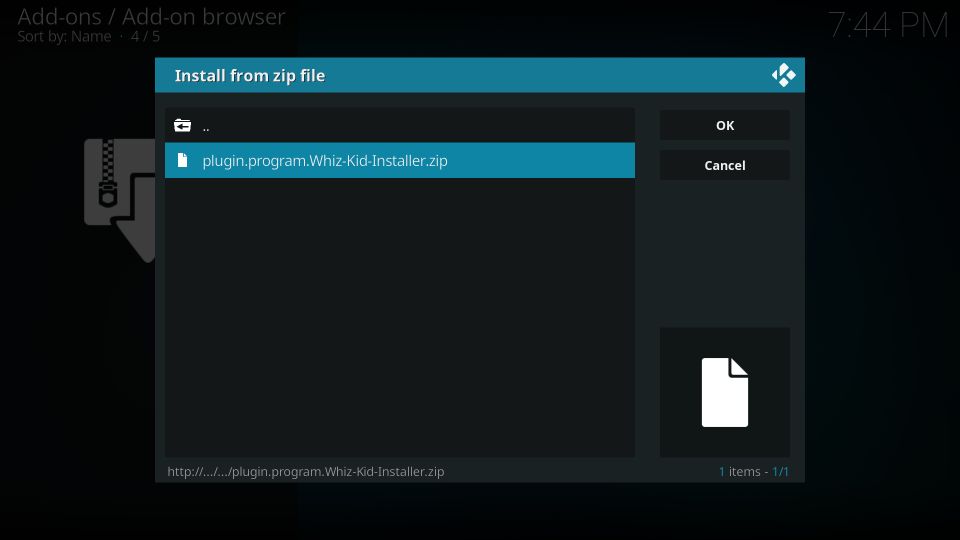
11- Click the file with the name plugin.program-Whiz-Kid-Installer-zip
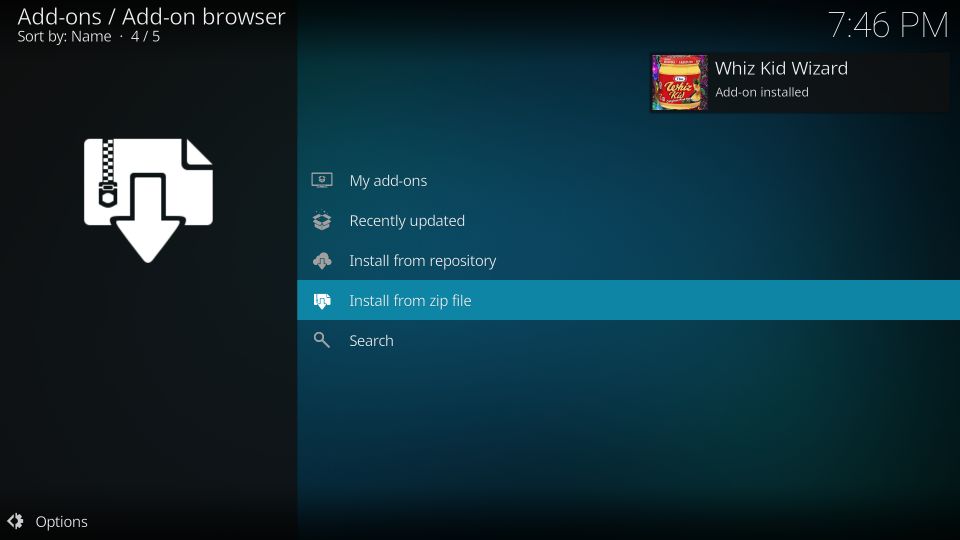
12- We will now wait for 2-3 minutes. This is how long it takes to install this Whiz Kid Wizard. Since the download status is not displayed, you will know the addon has been installed only when the Add-on installed alert appears on the top right
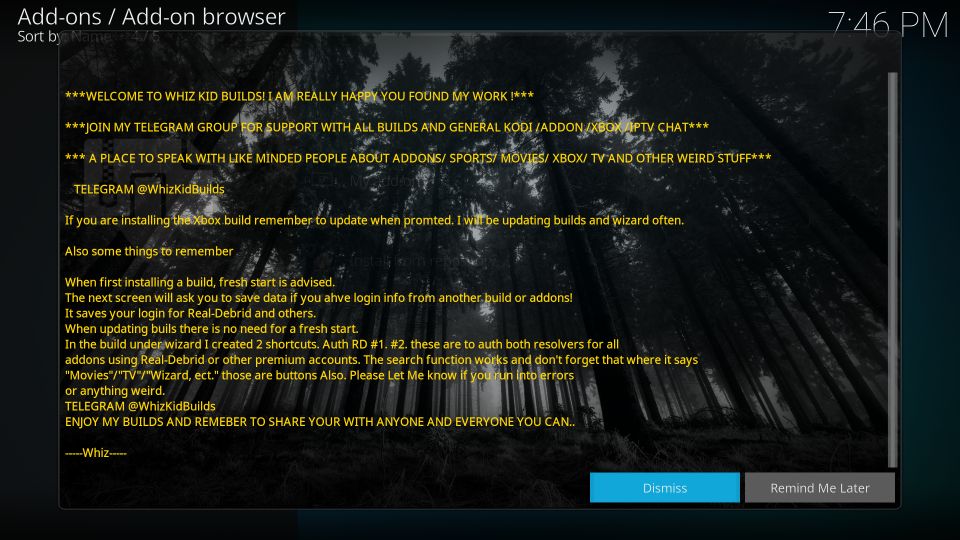
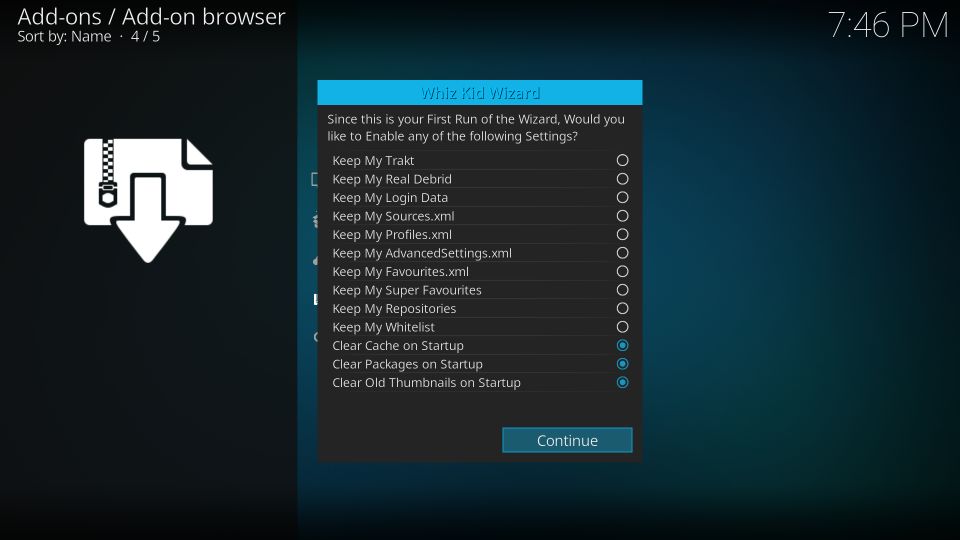
13- Within a couple of seconds, this popup is displayed. Click Dismiss
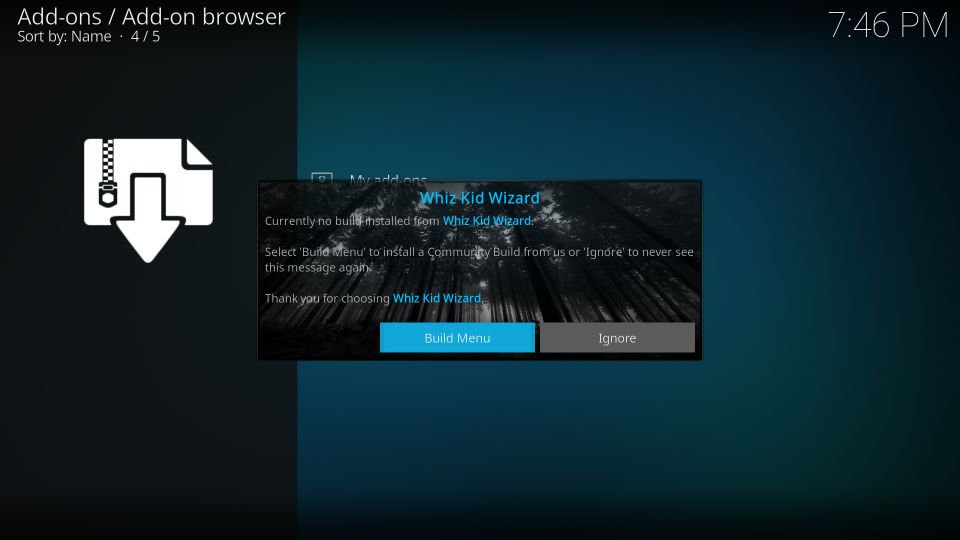
14- Now this popup appears. Click Continue
15- You may now click the Build Menu option and skip to step 18. In case you clicked Ignore or simply want to go to the list of builds from the main screen of Kodi, follow the next step
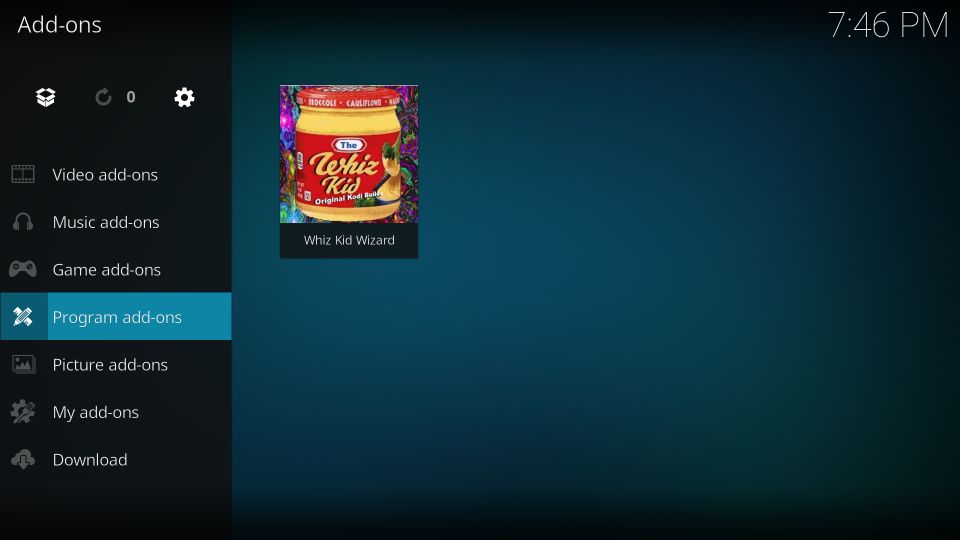
16- Return to the home screen of Kodi and open Whiz Kid Wizard from Add-ons > Program add-ons
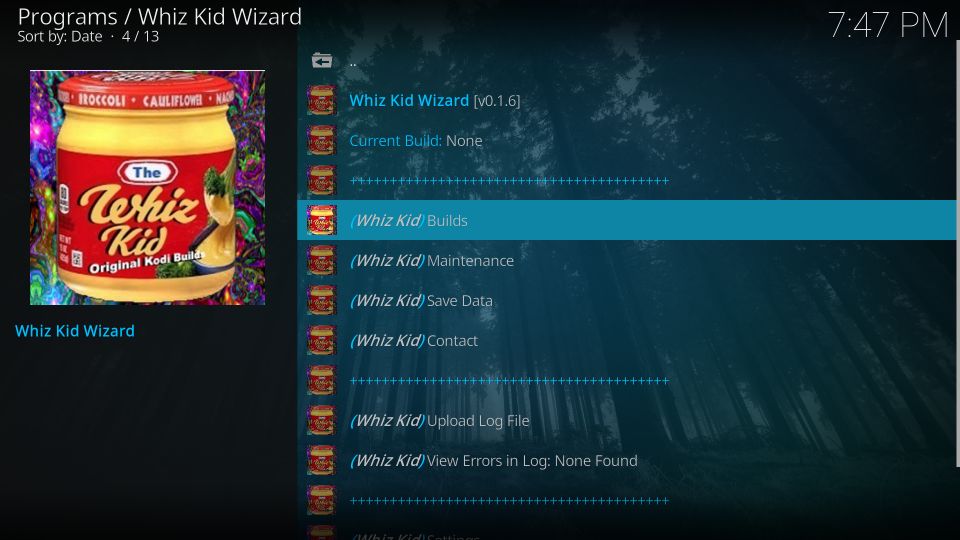
17- Click Builds
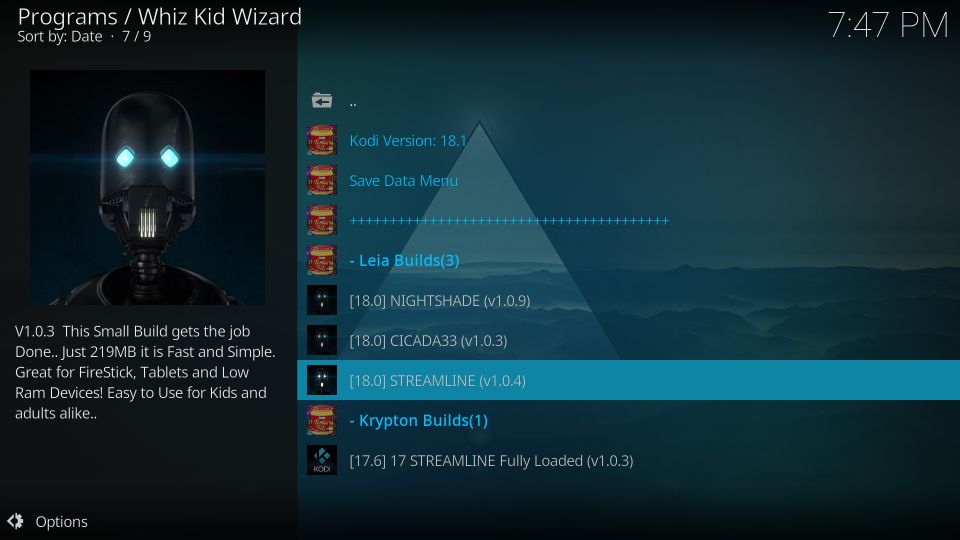
18- Click the Streamline build as you see in the image below
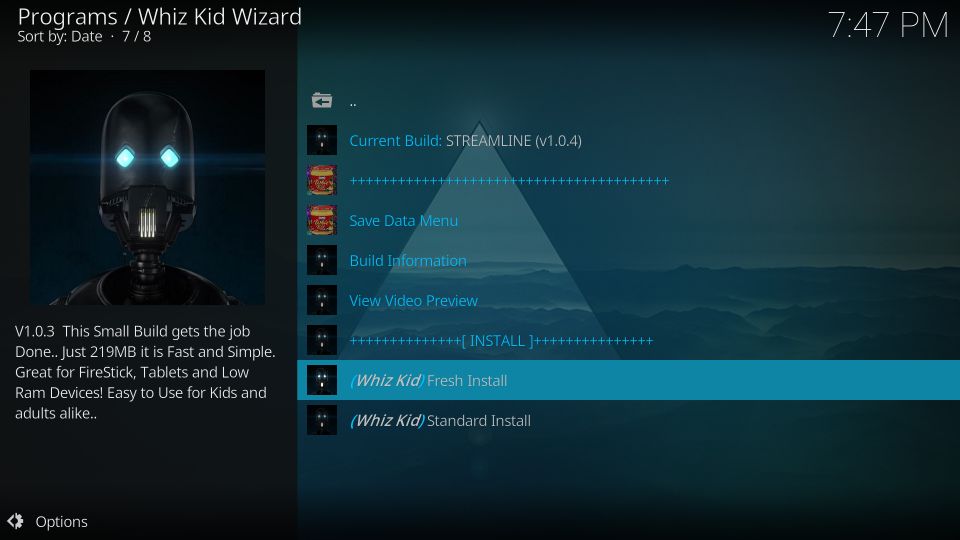
19- Go ahead and click Fresh Install
In fact, you could also choose Standard Install. I recommend Fresh because I have mostly observed that these builds work smoothly when they are installed from the scratch. It’s totally up to you how you want to go ahead with it
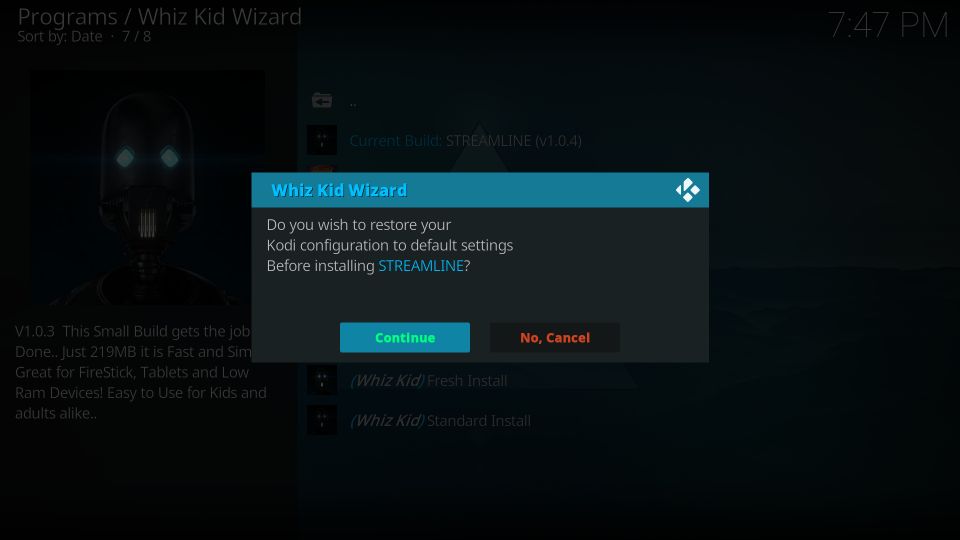
20- Click Continue and allow Whiz Kid Wizard to reset Kodi to default configuration before installing the Streamline Kodi build
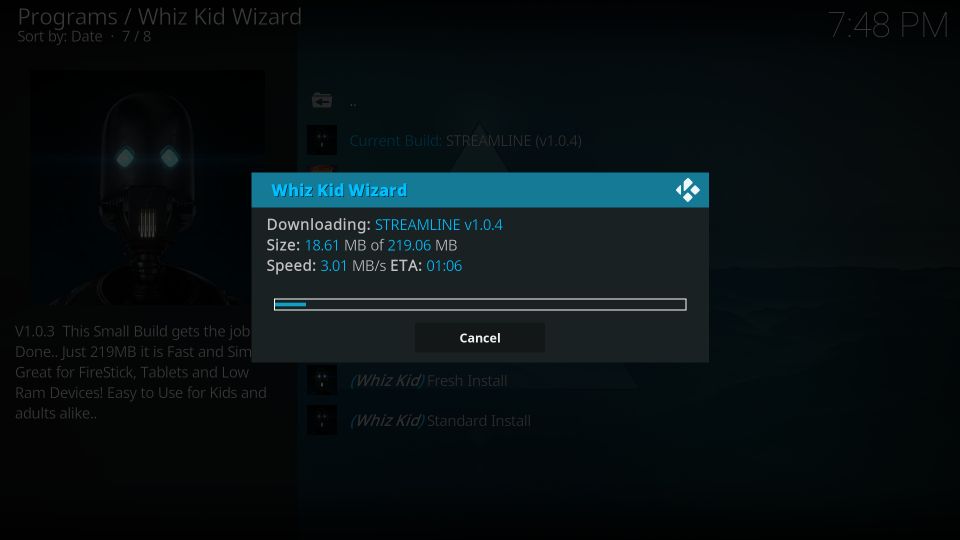
21- Build will first download and then install. The whole process takes a while. You simply need to wait!
22- As soon as the build is installed, a popup might appear asking you to Force Close Kodi. If it does not appear, the Wizard will force close Kodi automatically
This is all you need to do to install Streamline build on Kodi. You may now restart Kodi to see the new build.
Wait! It looks like you are all set to start watching your favorite content on Kodi. But have you protected your online identity yet? You are under constant surveillance by the Government and ISP. They use your IP address 35.175.39.36 to track you. Streaming free or copyrighted videos may get you into legal trouble.
Thankfully, you can use a VPN to easily protect your privacy and go invisible from your Government and ISP. I use and recommend ExpressVPN with Kodi.
ExpressVPN is the fastest, most secure, and streaming-friendly VPN. It is easy to install and set up on any Kodi device, including FireStick, Smartphones, PCs, and more.
ExpressVPN, offers an unconditional 30-day money-back guarantee. So, if you do not like the service (I don't see why), you can get a full refund within 30 days.
Please remember that we encourage you to use a VPN to maintain your privacy. However, we do not condone breaking copyright laws.
Before you start using Kodi for streaming, here is how you can protect yourself with ExpressVPN:
Step 1: Sign up for ExpressVPN Here
Step 2: Download ExpressVPN on your device by clicking HERE
Step 3: Open the ExpressVPN app on your device. Sign in with your account. Click the connect/power button to connect to the VPN
Great! You have successfully secured yourself with the best Kodi VPN.
How to access and use Streamline Kodi Build
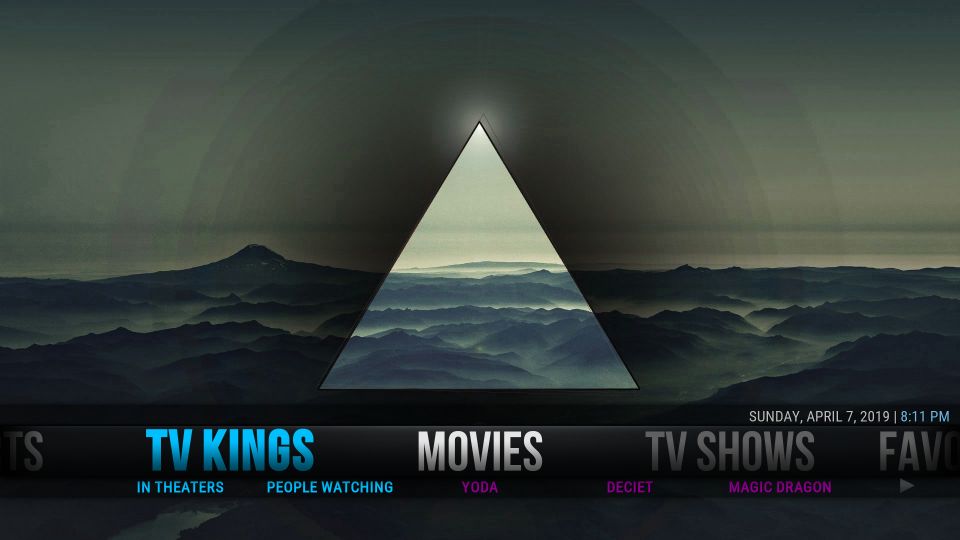
As I said, to access the build all you need to do is restart Kodi. You will be presented with a completely new interface. This is the home screen of Kodi with Streamline build you must expect:
The build features multiple categories related to streaming that let you get started almost instantly. However, I strongly recommend that you let the build complete all its updates when you run it for the first time. This ensures smooth operation afterward.
Here are the top categories:
- Movies
- TV Shows
- Sports
- TV Kings
- Favorites
Video add-ons are one of the most important aspects of any Kodi build. Thankfully, Streamline Kodi build carries some really good ones. Here is a quick list of some of its best addons:
- Deceit
- Seren
- SportsDevil
- The Magic Dragon
These are some of the popular Kodi addons. You can start streaming Movies, Shows, Live TV, Sports and more.
Conclusion
As I write this guide, Streamline Kodi build is fairly new. However, it did not take long for me to include it in our rally of Best Kodi Builds. This build is rapidly climbing up the ladder and I believe it will soon be one of the most looked up mainstream builds. I have justifiable reasons to think that way.
First, the build is lightweight. It works smoothly on even the devices with low RAM and processing capabilities, like FireStick. Second, it has a plain, straightforward user interface which has an appeal of elegance to it. The simplicity of the build makes it very easy to use. And, very importantly, the build packs some top-rated video addons for all your streaming needs. I recommend this build to new as well as experienced Kodi users.
You may also like:
How to Install The Business Kodi Build
How to Install No Limits Magic Build
How to Install Kodi on FireStick

Leave a Reply