This tutorial will demonstrate how to install cCloud TV addon on Kodi. This addon works on all the devices on which you can install and use Kodi.
cCloud TV is a great cord-cutting option with tons of options to stream live TV. This addon has a sizeable collection of satellite channels from the United States as well as from other countries. cCloud Kodi addon works on both Kodi 18.4 and Kodi 17.6.
You will find various familiar live TV categories on the main screen of the addon including Sports, News, Entertainment, Lifestyle, etc. It also has the FilmOn section for more live TV streaming options. As a bonus, there are a couple of on-demand categories too.
Presently, cCloud TV addon on Kodi is offering excellent performance. It is fast to navigate and quick to playback the live TV channels.
If you are looking for live TV streaming option for Kodi, I see no reason why you would not want to give cCloud a try.
Attention KODI Users: Read before you continue
Government and ISPs endlessly monitor your online activities using your IP address 35.175.39.36 (exposed to everyone). Kodi is an excellent platform for streaming movies, TV shows, and sports, but streaming copyrighted content can get you into legal trouble.
You should use a reliable Kodi VPN and protect your streaming activities and privacy. A VPN will hide your IP address and bypass government surveillance and geo-restrictions.
I trust and use ExpressVPN, the fastest and most secure Kodi VPN. It's easy to install on any Kodi device, including Amazon FireStick, PCs, and Smartphones. In addition, it offers a 30-day money-back guarantee, and 3 free months with the annual plan.
Read: How to Install & Use the best VPN for Kodi.
How to install cCloud TV addon on Kodi
The installation process of any addon is always a bit long-drawn. Therefore, I am breaking it down into broad parts to ease you through the steps. Here is the overview of what you will do:
- Allow Unknown Sources: To download any third-party source addon, such as cCloud TV
- Add the source URL: To point Kodi to the location of the addon on the web
- Install the Kodil repository: The repository which hosts cCloud TV
- Install cCloud TV addon: From the Kodil repository
The steps that follow now will cover the above in exactly the same order as they are laid out:
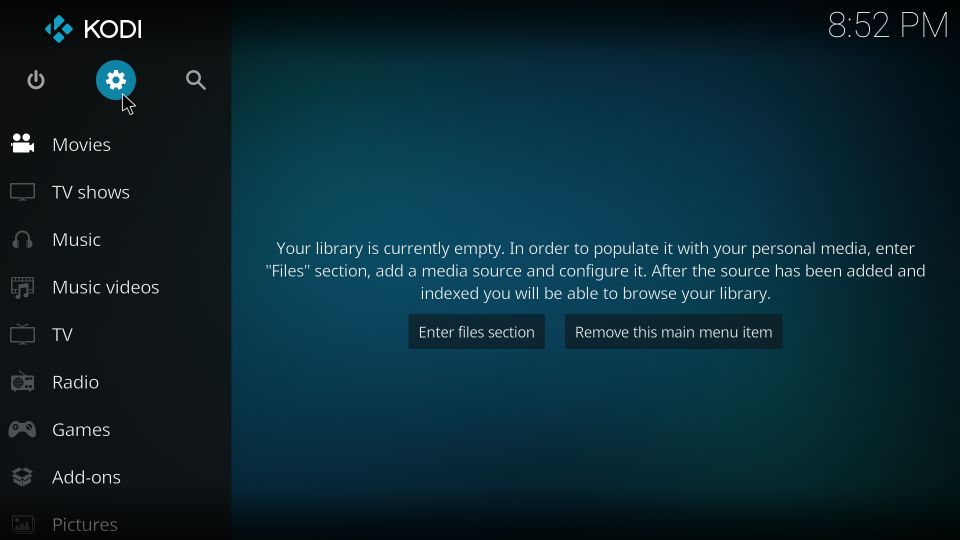
1: Go to the Settings window from the Kodi home screen
Need to click the cog icon in the top-left of the screen
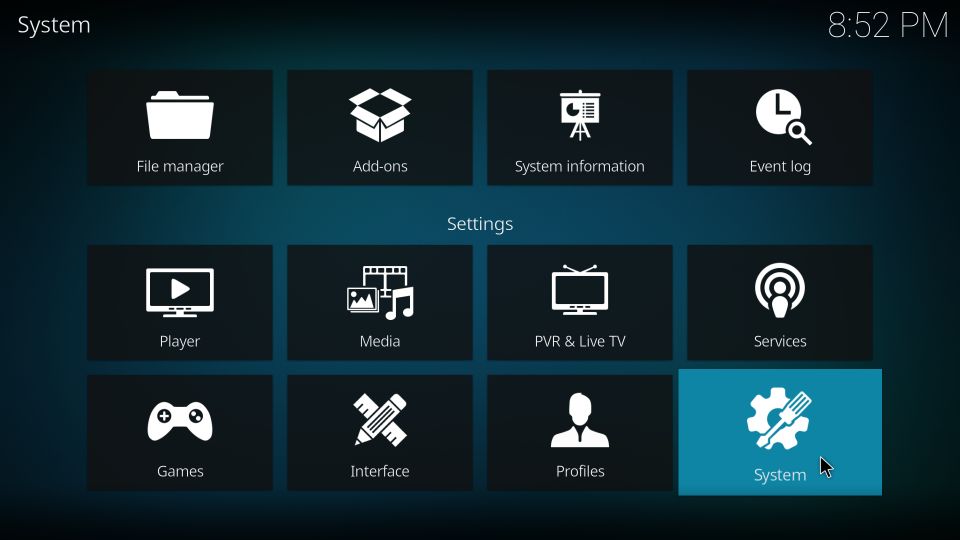
2: Now open the option System on your Kodi 18 Leia version
On the Kodi 17.6 version, it is System settings
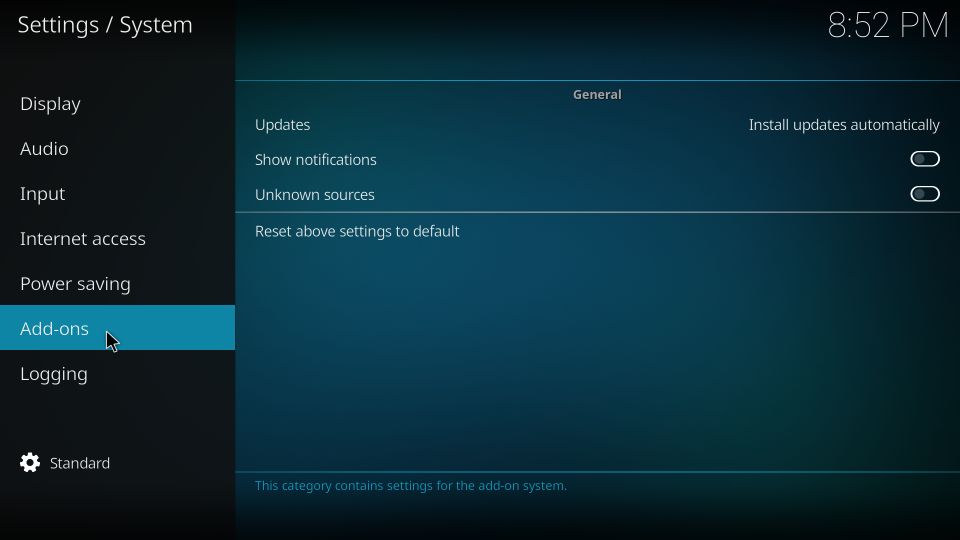
3: Hover over Add-ons in the left menu on the window that follows next
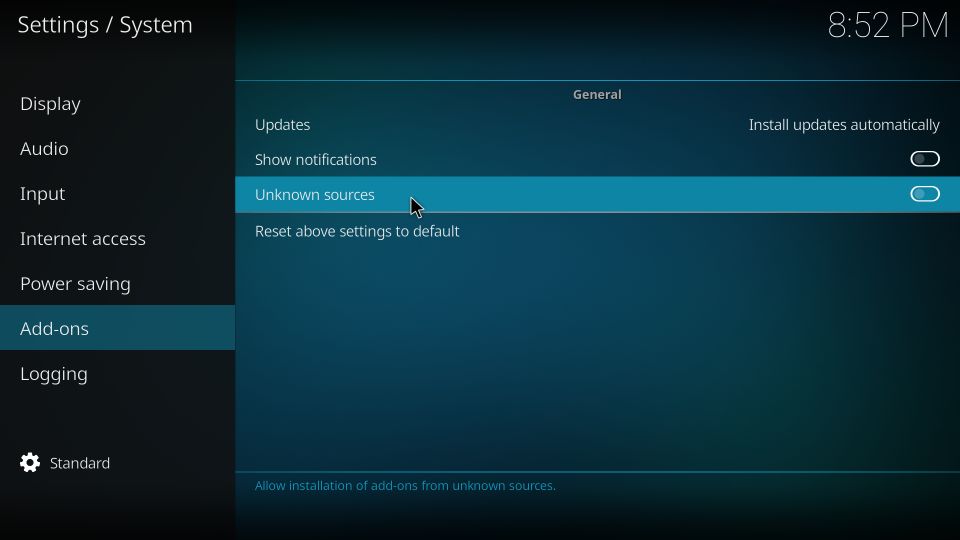
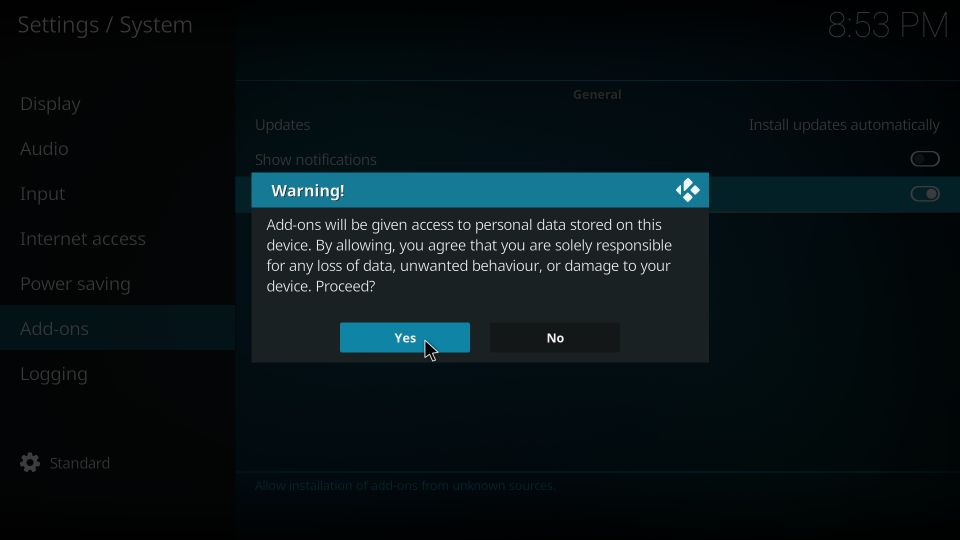
4: On the right side of the same window, click Unknown Sources switch to turn it ON
5: Dismiss this warning message by clicking Yes
cCloud is a trusted, tested and safe Kodi addon
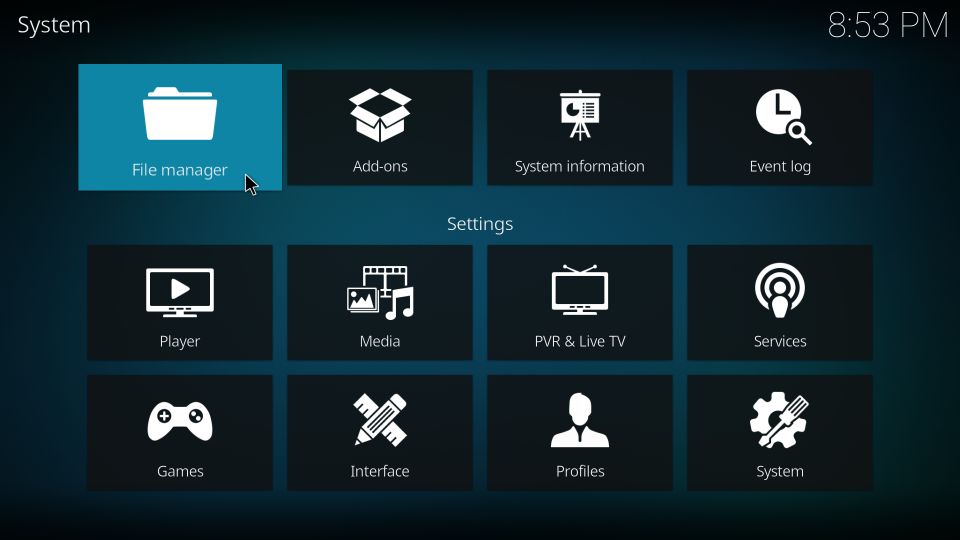
6: Go back to the Settings menu/window
Either from the home screen like you did before or by pressing the back button once after enabling Unknown Sources
7: Open the File manager option
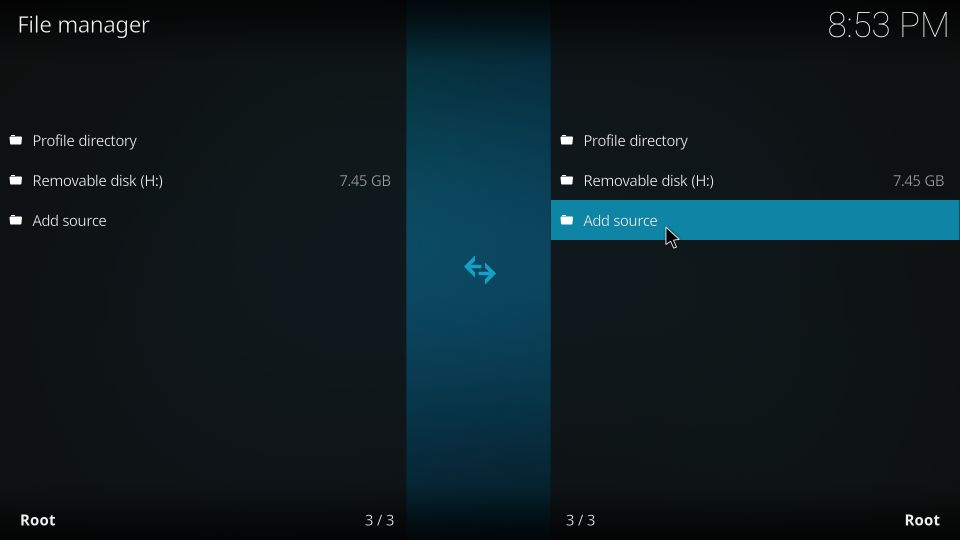
8: You now access the Add source option
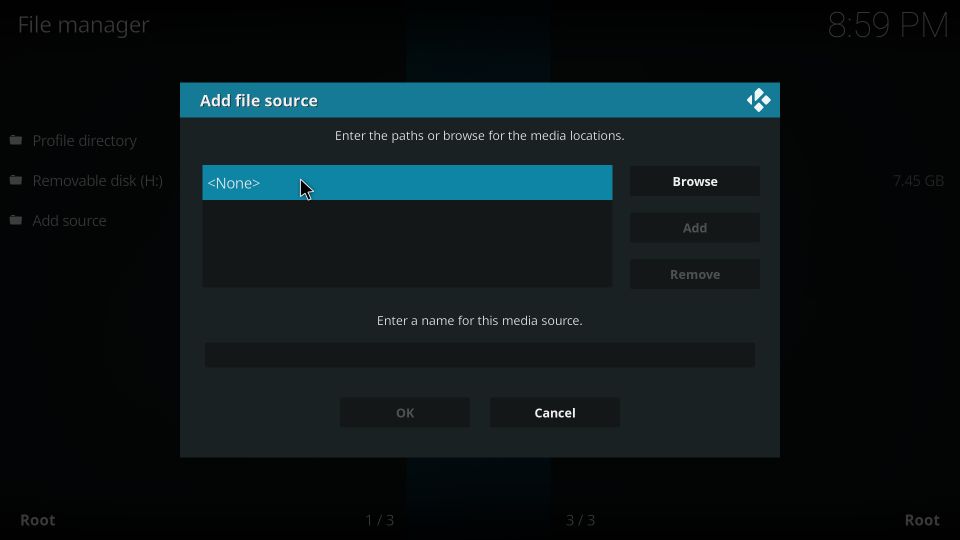
9: You should now see this small window within the Kodi screen
Click <None>
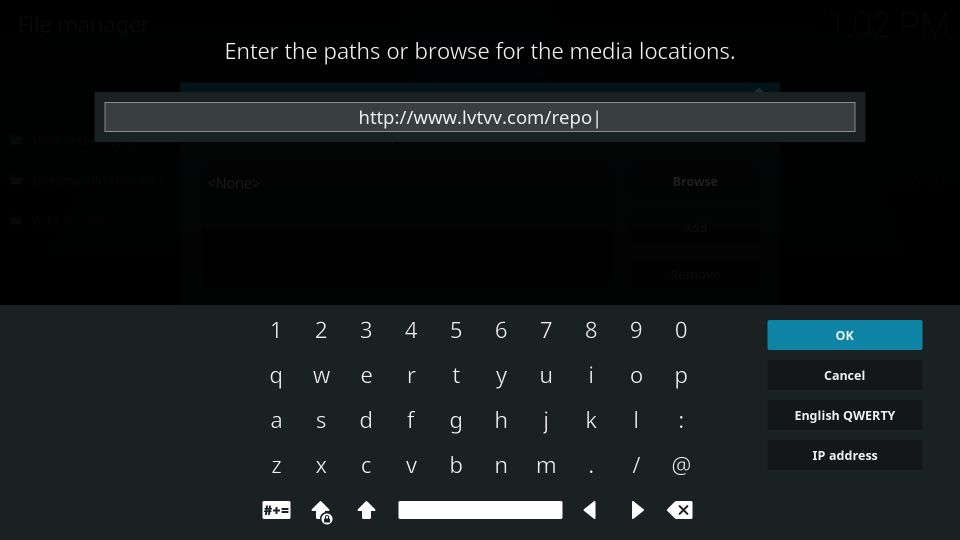
10: Carefully type in the following link/URL: http://www.lvtvv.com/repo/
Hit OK
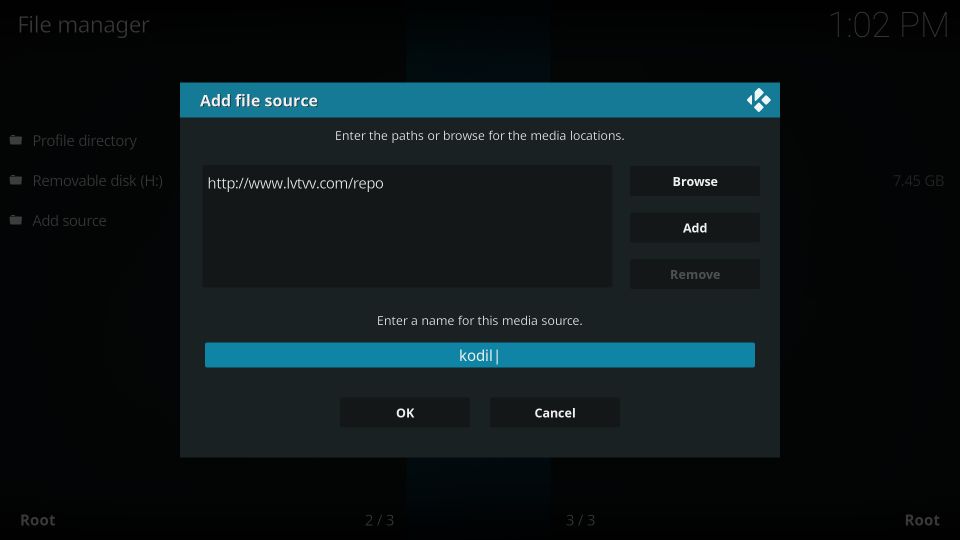
11: Now select or hover over the section Enter a name for this media source
Type the name kodil or any other name you prefer
Click OK
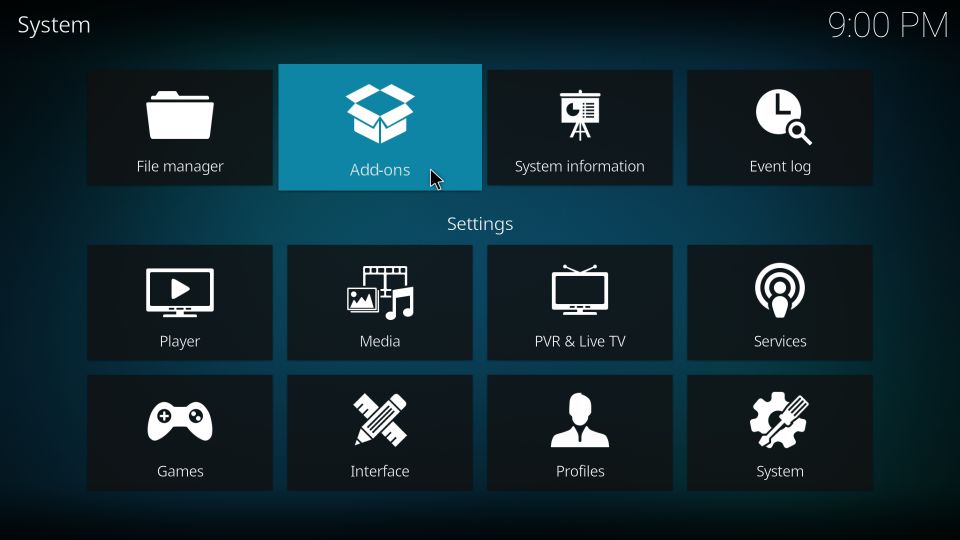
12: The Kodi 18 users need to be back on the Settings menu. Press the back button or navigate to the following window from the home screen of Kodi
Click Add-ons
Kodi 17.6 users should go to Kodi home-screen, click Add-ons in the left menu, and click open-box in the top-left corner on the next window
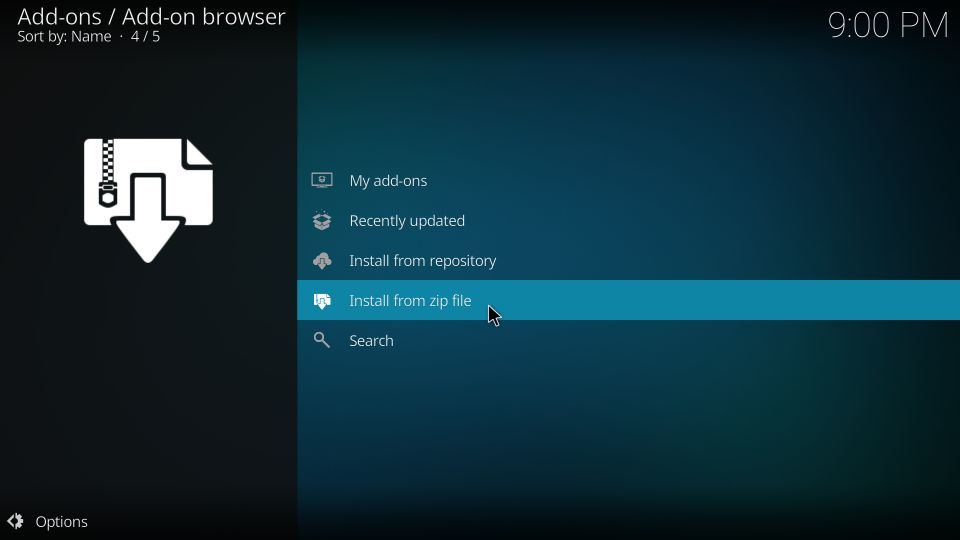
13: Now choose the item Install from zip file
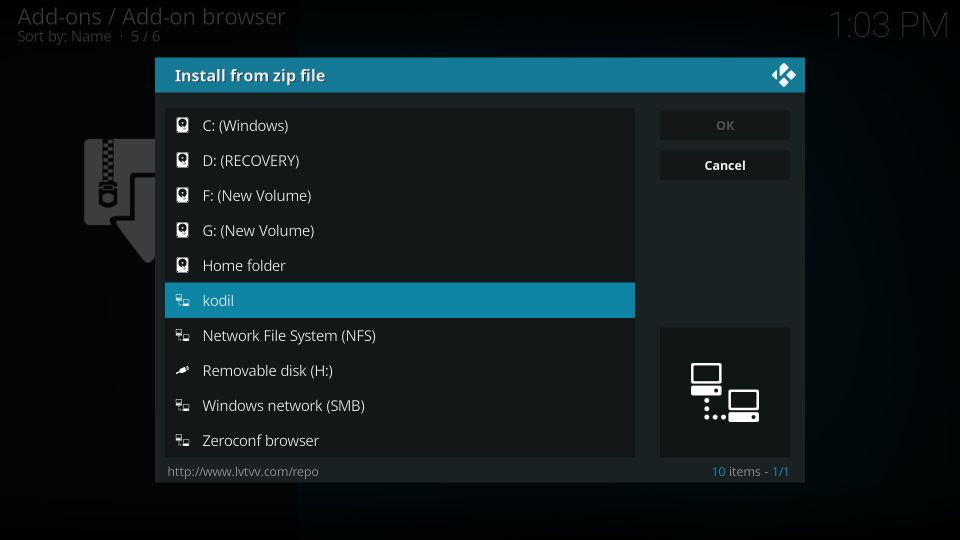
14: You must now see the name you added in Step 11 earlier (kodil in our case)
Go ahead and click it
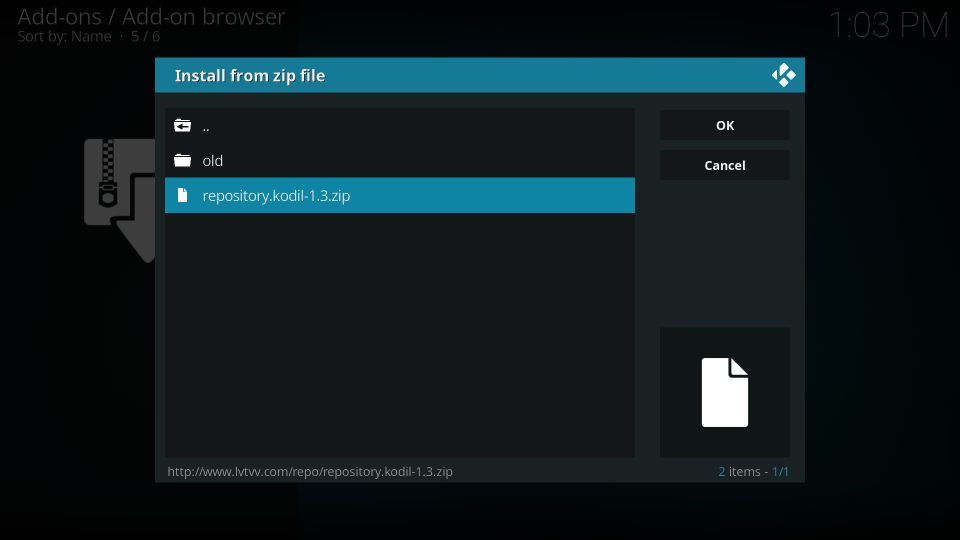
15: A zip file is displayed on the next screen
Click repository.kodil-x.x.zip
The version number of this file may have changed since I wrote this guide
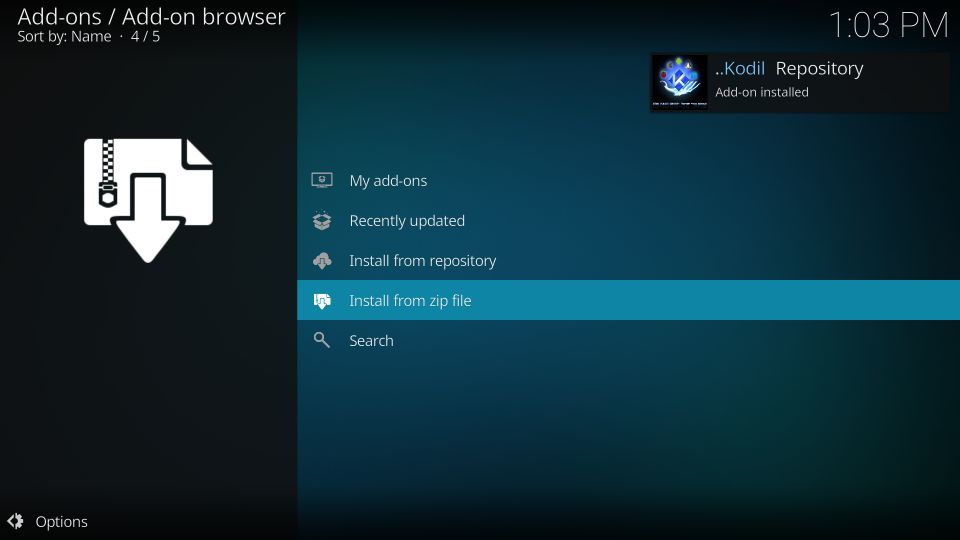
16: In probably less than a minute, repository installation confirmation is displayed in the upper-right section of this screen
Kodil Repository has been installed
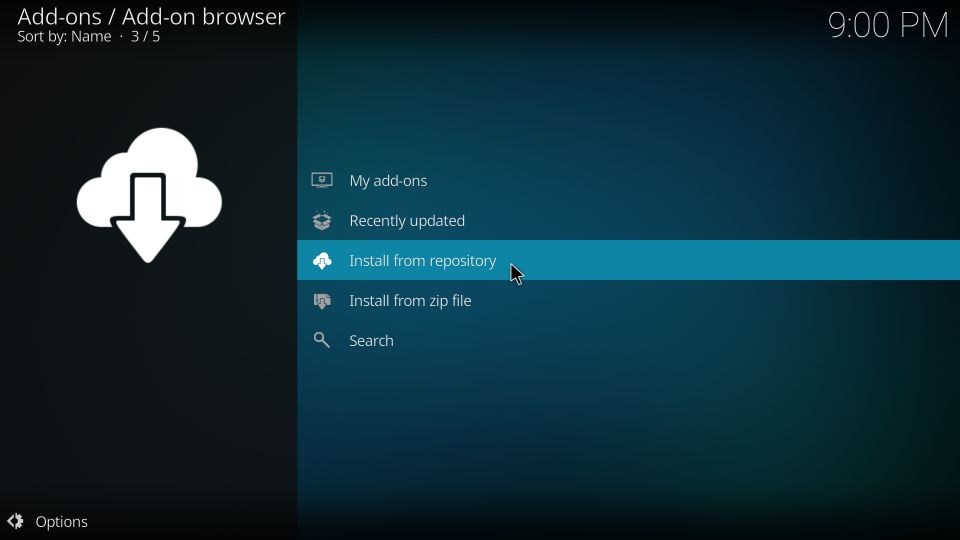
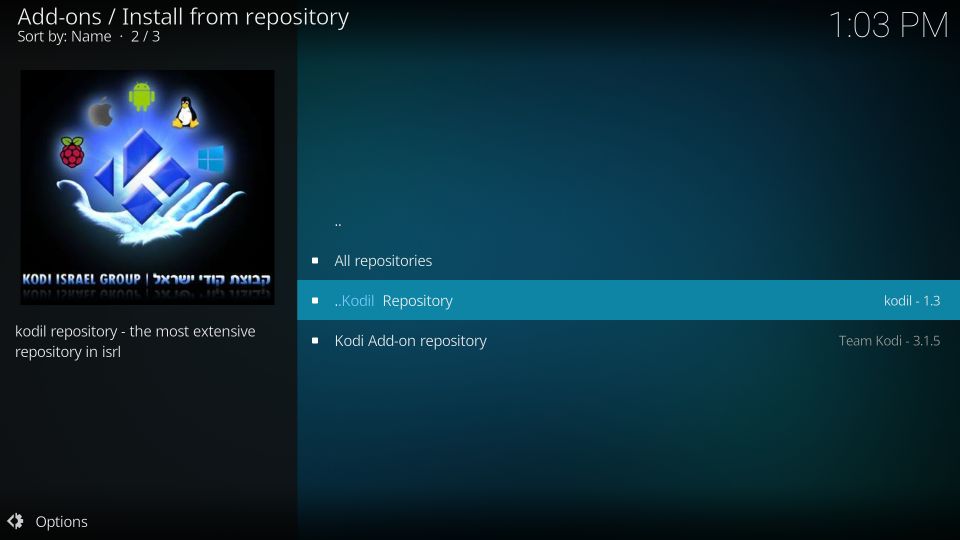
17: Open the option Install from repository
18: Access the …Kodil Repository entry
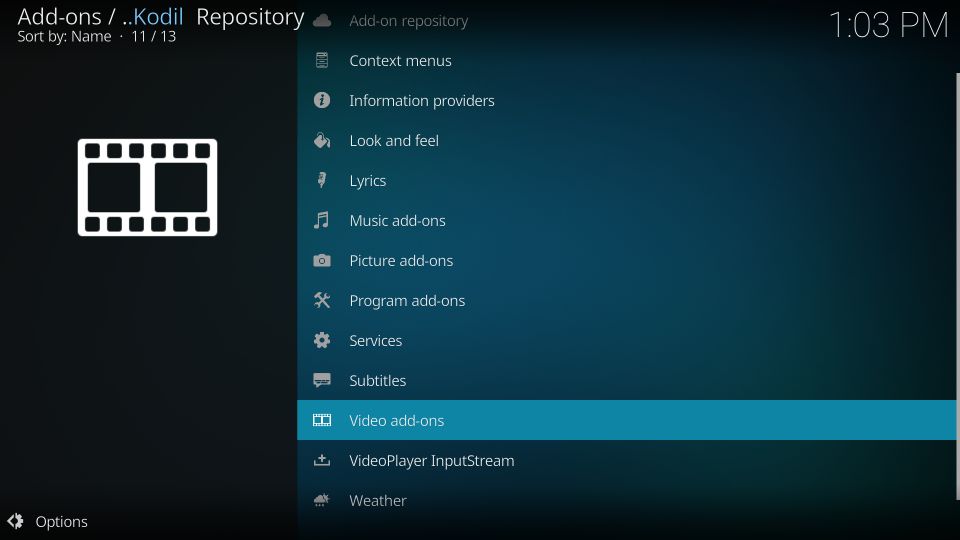
19: Now go to the Video add-ons option
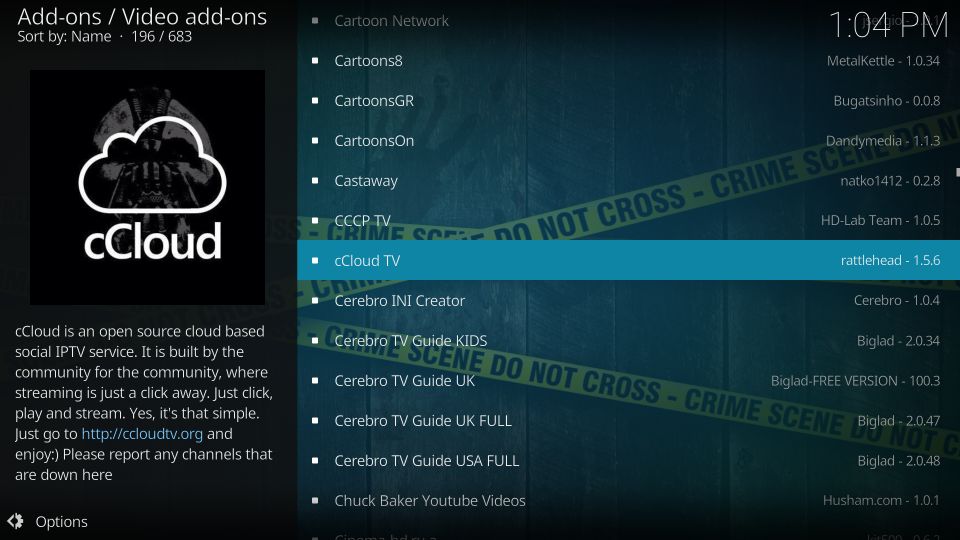
20: Keep scrolling until you find the cCloud TV addon entry. Kodil Repository has dozens of addons. Therefore, it will take some scrolling to get to it
Click it
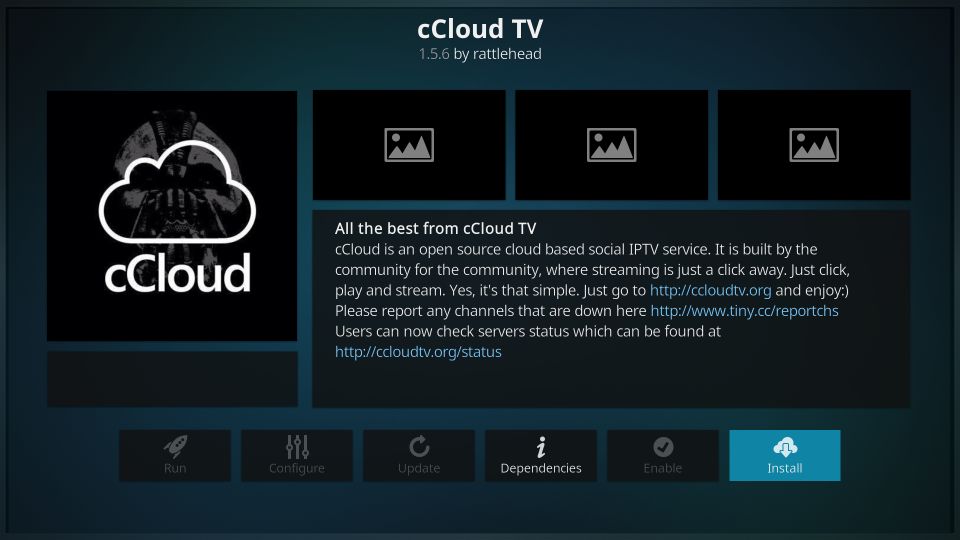
21: Click Install when this window follows
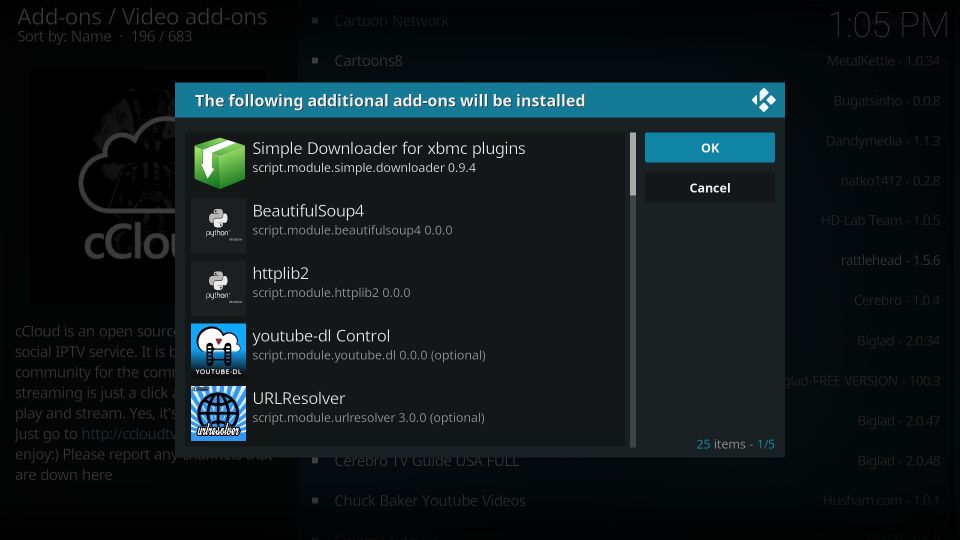
22: For Kodi 18 users, an additional window is displayed
Click OK
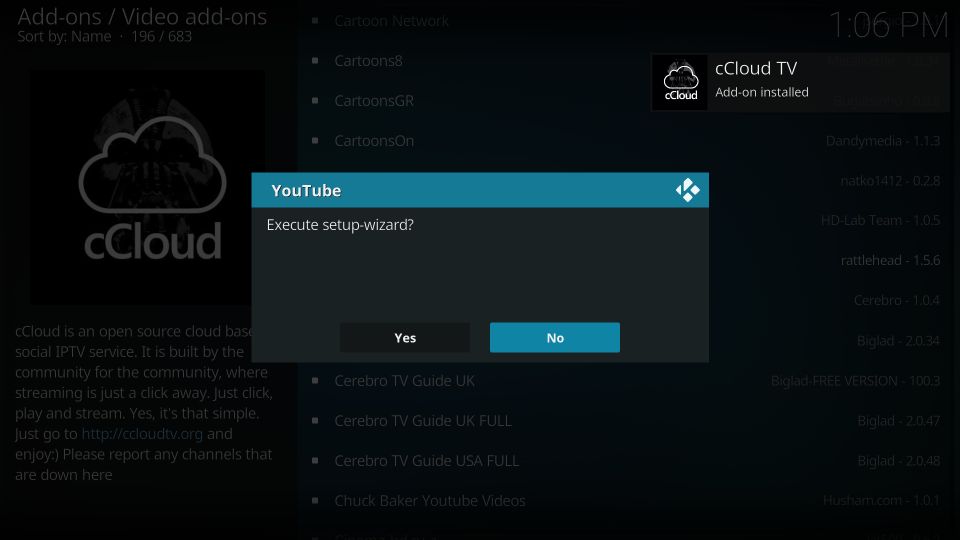
23: Click NO when this YouTube dialog box pops up
If you want to configure the YouTube addon, you may also click Yes
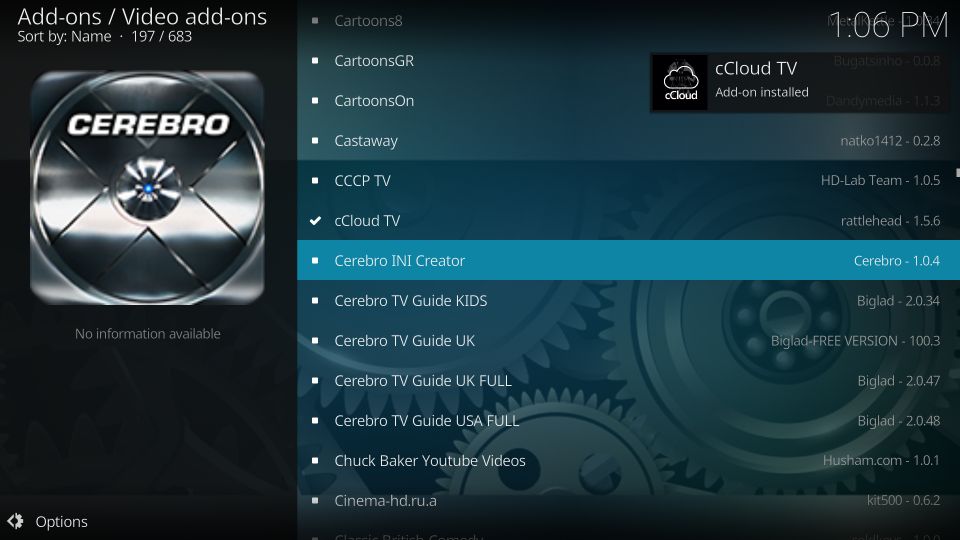
24: cCloud TV Add-on installed notification will be displayed when the addon has been installed on Kodi
So, these are the steps to install cCloud TV on Kodi.
Wait! It looks like you are all set to start watching your favorite content on Kodi. But have you protected your online identity yet? You are under constant surveillance by the Government and ISP. They use your IP address 35.175.39.36 to track you. Streaming free or copyrighted videos may get you into legal trouble.
Thankfully, you can use a VPN to easily protect your privacy and go invisible from your Government and ISP. I use and recommend ExpressVPN with Kodi.
ExpressVPN is the fastest, most secure, and streaming-friendly VPN. It is easy to install and set up on any Kodi device, including FireStick, Smartphones, PCs, and more.
ExpressVPN, offers an unconditional 30-day money-back guarantee. So, if you do not like the service (I don't see why), you can get a full refund within 30 days.
Please remember that we encourage you to use a VPN to maintain your privacy. However, we do not condone breaking copyright laws.
Before you start using Kodi for streaming, here is how you can protect yourself with ExpressVPN:
Step 1: Sign up for ExpressVPN Here
Step 2: Download ExpressVPN on your device by clicking HERE
Step 3: Open the ExpressVPN app on your device. Sign in with your account. Click the connect/power button to connect to the VPN
Great! You have successfully secured yourself with the best Kodi VPN.
How to access and use cCloud TV on Kodi
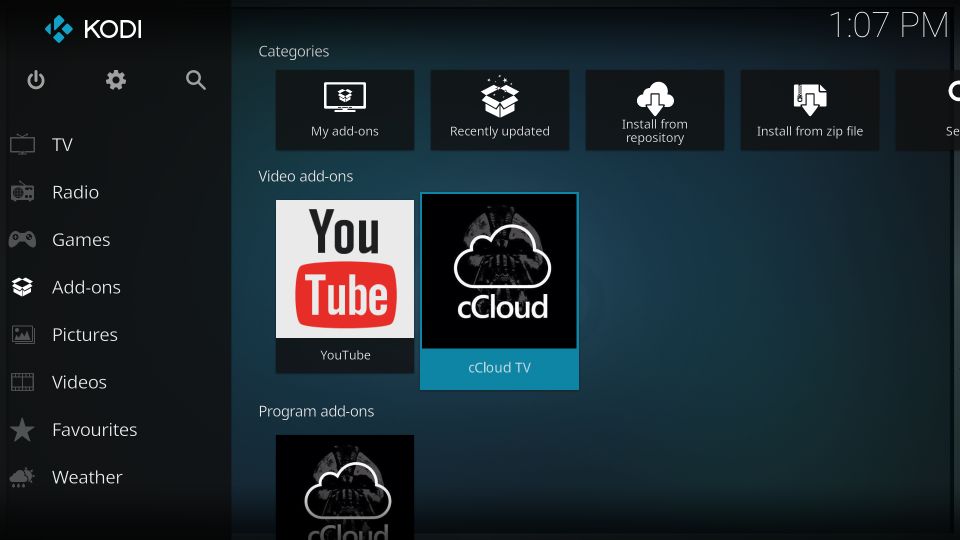
You will find all your installed Kodi addons on the main screen of the Kodi app. They appear in the Video add-ons section
When you are on the home screen, DO NOT click Add-ons in the left menu. Just Select it
You should now see cCloud TV Kodi addon in the Video add-ons category. Click the addon to open it
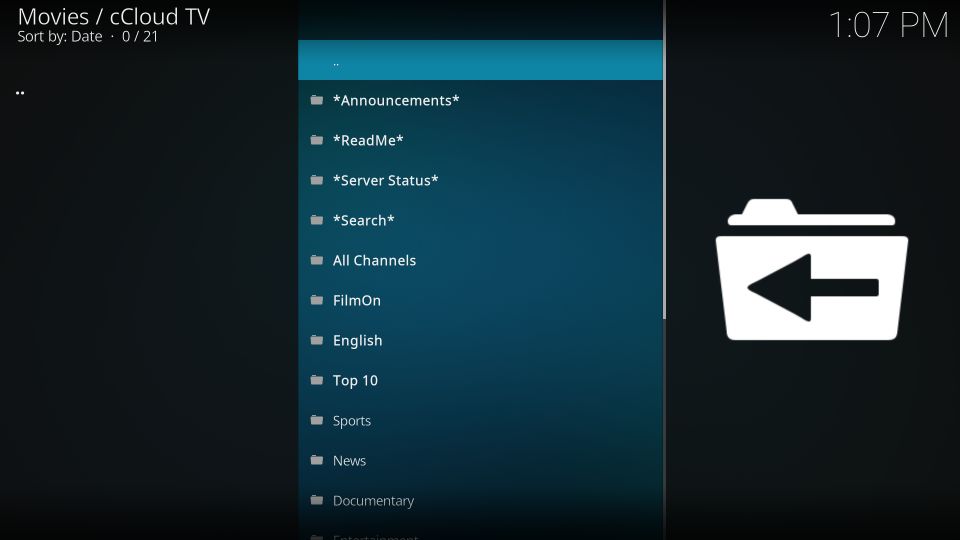
When the cCloud TV addon loads up, this is what you see on its first screen:
There are over a dozen categories to stream live channels from, including:
- All Channels
- FilmOn
- English
- Top 10
- Sports
- News
- Documentary
- Entertainment
- Family
- Movies
- Music
- Lifestyle
cCloud TV Kodi addon also has two on-demand sections:
- On Demand Movies
- On Demand Shows
The on-demand collection isn’t that big. We are not complaining though. cCloud TV is supposed to be an IPTV addon. Yet, you may find some interesting movies and shows here.
There is a Non-English/International category too if you want to stream live TV channels from outside the US
In the end…
cCloud TV is a decent option to watch your favorite TV channels. It has neatly categorized channels into familiar and popular categories for your easy picking. There are plenty of channels from the US, UK, and many other countries.
cCloud TV addon on Kodi offers smooth navigation and quick playback. The only drawback is that some of its main screen categories do not have any subcategories for proper organization of the content. For instance, when you open the Sports category, you would want to have the streams further organized into subcategories at least by sports types (such as basketball, baseball, football, soccer, etc.) So, that’s a bit disappointing. Everything else looks great.
You may also like:
How to install PowerNation Kodi Addon
How to install Moria Kodi Addon
How to install Magic Dragon Addon
How to jailbreak a Firestick

Leave a Reply